How To Replace Adt Door Sensor Battery

Hey there, friend! Grab a coffee, settle in. We need to chat about something that probably wakes you up at 3 AM with a tiny, persistent little chirp. Sound familiar? Yeah, I'm talking about that ADT door sensor battery that decided it's had enough and is now staging a very public protest.
Seriously, why do they always pick the middle of the night? It’s like they have a timer set for maximum annoyance. But guess what? You don't need to call ADT and wait for a technician (or pay for one, eek!). We're gonna tackle this together, because it's super easy. You got this!
That Annoying Little Chirp? Yeah, We're Fixing It!
So, your ADT panel is probably flashing a "low battery" warning, or a specific zone is acting up, or, most commonly, you're hearing that infamous single chirp every 30 seconds from a sensor you can't quite pinpoint. It's the security system's way of saying, "Hey, I'm trying to protect you, but I'm running on fumes here!"
Must Read
And let's be real, ignoring it isn't an option. That chirp will follow you through the house, whispering sweet nothings of impending battery doom until you actually do something about it. So, let’s silence that little noisy neighbor once and for all!
Your "Mission Briefing" (What You'll Need)
Alright, secret agent, let's gather our tools. Don't worry, it's not a lot. Think of it like prepping for a very important coffee date, but instead of sugar, we're talking batteries!
First up, and probably the most crucial item, is the new battery. Now, ADT, bless their hearts, uses a few different types of sensors. But generally, for those door and window sensors, you're often looking for a CR123A lithium battery. It’s like the superhero of small batteries. But seriously, the best way to be sure? Pop open your sensor first and check the old one! It'll usually have the type printed right on it. Or, if you're feeling fancy, Google your specific ADT sensor model. Knowledge is power, my friend!

Next, you might need a tiny tool. Sometimes, these sensor covers are a bit stubborn, almost like they don't want you to fix them. A small flathead screwdriver or even just a butter knife (carefully, please!) can be your best friend here. Something thin enough to gently pry open the casing without leaving battle scars on your sensor or, more importantly, your fingers. Safety first, always!
And that's pretty much it! No fancy soldering irons, no circuit diagrams, just a battery and a tiny bit of finesse. See? Told you it was going to be easy!
The Great Battery Swap: Step-by-Step!
Step 1: Locate the Culprit
This sounds obvious, right? But sometimes that little chirp echoes everywhere! Find the specific door or window sensor that's giving you grief. It'll be a small plastic box, usually beige or white, attached to the door/window frame itself, with a smaller magnet piece on the actual door/window.

Step 2: The Big Reveal (Opening It Up)
Okay, this is where your tiny screwdriver comes in handy. Look for a small notch or a slight seam on the side or bottom of the sensor. Gently insert your flathead screwdriver (or butter knife, remember?) into that notch and gently twist or pry. The cover should pop off with a satisfying little click. Don't go full hulk on it; these things are usually designed for relatively easy access.
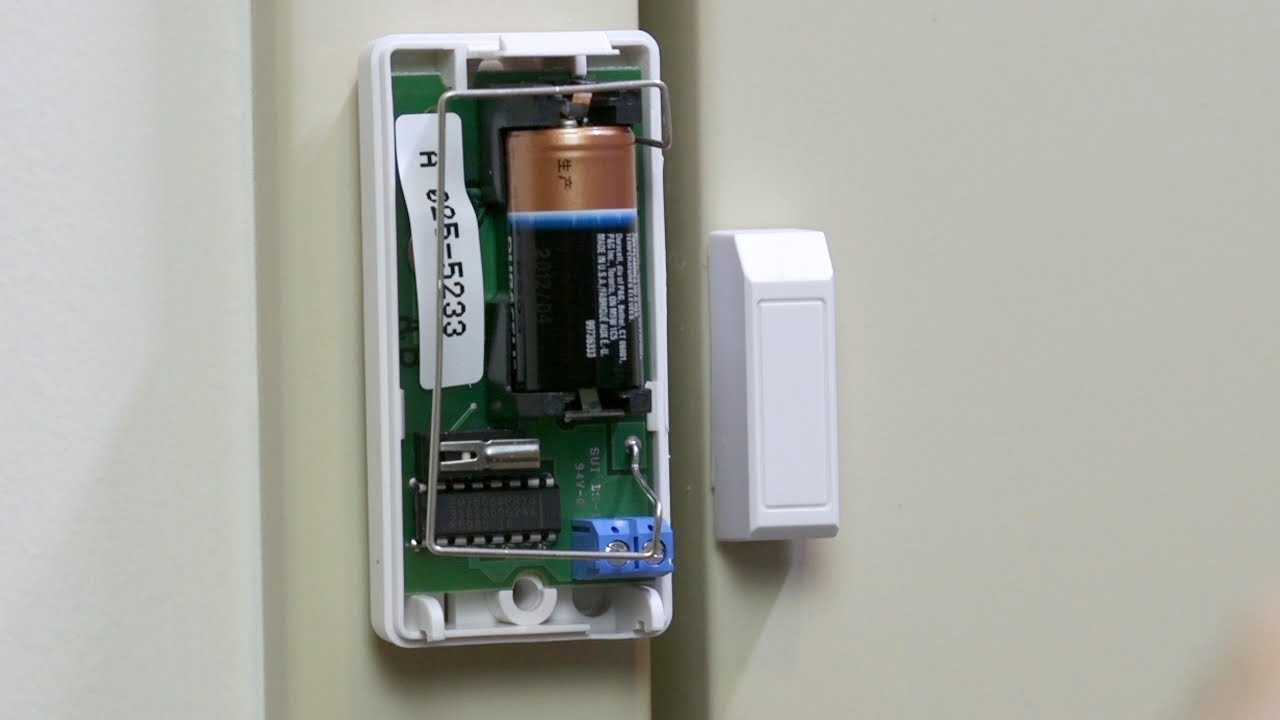
Once the cover is off, you'll see the circuit board and, ta-da, the battery!
Step 3: Eviction Notice (Removing the Old Battery)
Take a mental picture, or even a quick snap with your phone, of how the old battery is seated. Pay attention to the positive (+) and negative (-) terminals. It's important to put the new one in the same way. Most batteries are held in by a small clip or just snuggly fit. Gently pry out the old battery. Give it a proper send-off; it served you well!

Step 4: The Fresh Start (Inserting the New One)
Now, grab your shiny new battery. Remember that mental picture? Place the new battery in exactly the same orientation as the old one. Make sure the positive (+) side lines up with the positive terminal in the sensor. It should slide in and snap securely into place. Give it a little wiggle to make sure it's snug.
Step 5: The Grand Re-Sealing (Closing It Up)
Time to put the cover back on! Line up the cover with the sensor base, making sure any small tabs or clips align correctly. Press firmly until you hear that satisfying click again. Give it a little jiggle to make sure it's secure. Voila! You've successfully performed sensor surgery!
Don't Forget the Grand Finale: Clearing the System!
This is a crucial step, my friend! Just replacing the battery sometimes isn't enough to tell your ADT panel, "Hey, I'm all better now!" You'll likely need to clear the low battery signal from the panel itself.
How you do this varies slightly by ADT panel model, but generally, here's the drill:
- Disarm your system, wait a few seconds, then arm it again. Sometimes, this cycle is enough to refresh the sensor status.
- For some panels, you might need to go into the "System Test" or "Trouble" menu. Look for options to "Clear Trouble" or "Clear Alerts." You might need your master code for this.
- If all else fails, and the low battery alert persists after a few minutes, try disarming your system twice. Sounds weird, but often works.
Give it a few minutes after you've tried to clear it. The system sometimes takes a moment to recognize the new battery. If the chirp doesn't return and the panel is happy, you're golden!
You Did It! High Five!
See? Told you it wasn't rocket science! You just saved yourself some time and potentially some money. You're now a certified ADT door sensor battery replacement expert. Go ahead, bask in that glory. And the next time that little chirp starts up, you'll know exactly what to do. No more 3 AM wake-up calls from a grumpy sensor!
Now, about that coffee refill...