How To Change Battery On Yale Door Lock

Alright, intrepid home hero! Prepare yourself for a thrilling adventure, a quest for ultimate power, right there on your very own front door. We're talking about giving your magnificent Yale door lock a fresh burst of energy, a new lease on life, a reason to sing! No need for capes or superpowers, just a tiny bit of can-do spirit and maybe a screwdriver.
First things first, let's locate the heart of this operation. You'll want to be on the inside of your home, looking directly at the interior half of your beloved Yale lock. It's usually the chunkier, more substantial part, the brains of the operation, if you will.
Give it a good, friendly stare. You're looking for a specific spot, a hidden chamber, the very vault where the magic batteries reside. Think of it like finding a secret passage in a grand old castle, except this castle is your door, and the passage leads to battery glory!
Must Read
Now, some Yale locks are masters of disguise, so this secret panel might look a little different depending on your model. But fear not, the signs are there! You're generally looking for a section that looks like it could slide off or perhaps has a tiny, almost adorable, screw holding it in place.
The Grand Unveiling: Locating the Power Portal
Imagine your lock as a sleek, modern gadget. On the interior side, you might spot a smooth panel that seems designed to slip away. This is often the case with models like the Yale Assure Lock SL, where elegance meets practicality.
Alternatively, you might find a discreet little screw, usually at the very bottom or top of this panel. This tiny sentinel guards the power within, a true guardian of the energy source! It's not there to intimidate you, just to ensure everything stays snug.
If you see a screw, your trusty sidekick will be a small Phillips head screwdriver. Not the giant, heavy-duty kind for building furniture, but a smaller, more nimble one. Think of it as a precision instrument, your key to unlocking the treasure.
Hold your screwdriver like a seasoned explorer ready to uncover ancient artifacts. Gently insert its tip into the screw's head. You'll feel a perfect fit, a delightful click as the grooves align. This is the moment of connection, the prelude to triumph.

"Every twist of the screwdriver brings you closer to ultimate lock-power!"
With a slow, steady hand, turn the screwdriver counter-clockwise. Just a few turns, really. You're not trying to dismantle the entire lock, just politely asking that screw to loosen its grip. It should give way with charming ease.
Once it's loose, you can usually just lift it out gently. Keep this tiny screw safe! It's like a precious gem, a vital part of your lock's reassembly. Place it in a small dish, your pocket, or any spot where it won't play hide-and-seek.
For those fortunate souls whose Yale lock boasts a slide-off cover, your adventure takes a slightly different turn. Look for a small indentation or a distinct seam on the battery panel. This is your cue, your invitation to slide!
With your thumb or finger, apply a gentle, firm pressure in the direction of the arrow (if there is one!) or towards the edge of the lock. You'll feel a satisfying give, a smooth release. It's like opening a secret compartment in a spy movie!
The Revelation: Behold, the Batteries!
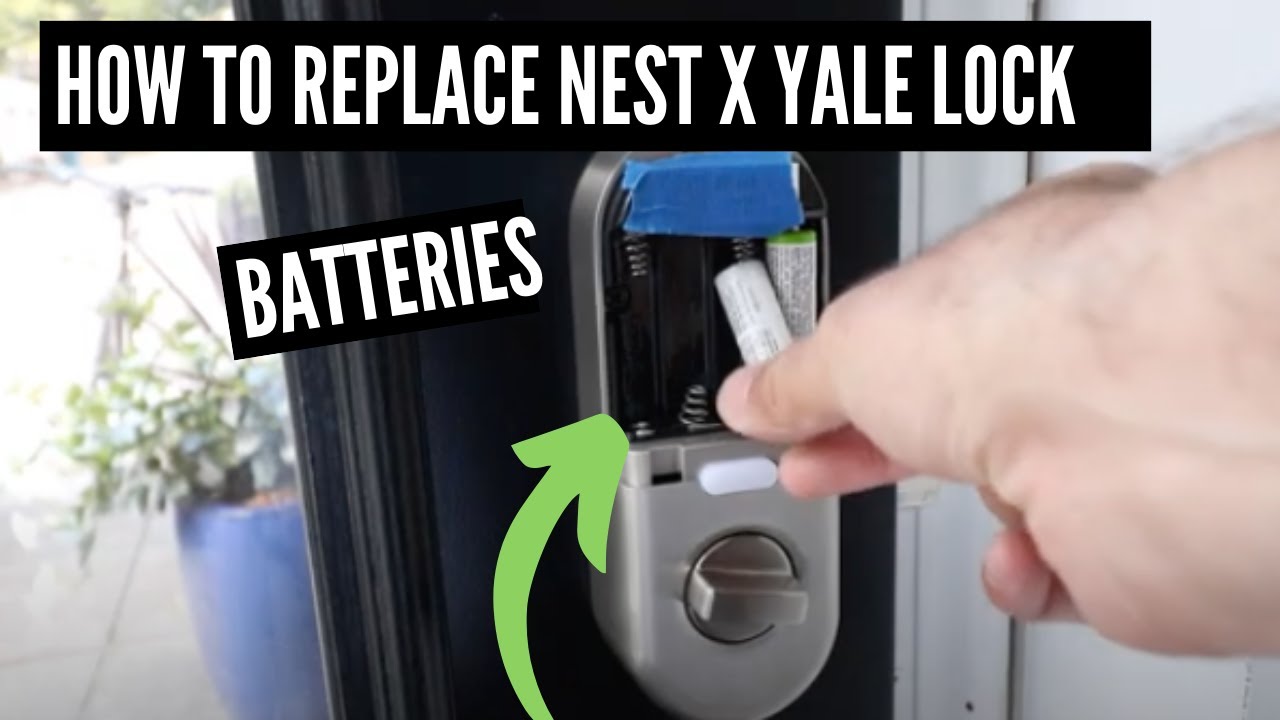
Whether you've unscrewed or slid, the moment of truth has arrived! The cover comes away, revealing the glorious battery compartment. Inside, you'll see the current residents, the old guard, patiently waiting to be retired.
These might be AA batteries, sometimes four of them, lined up like dutiful soldiers. Or perhaps they are 9V batteries, standing tall and proud. Your Yale lock is quite particular about its power source, so note the type!

Take a good look. Notice how they're oriented. See the little plus (+) and minus (-) symbols? This is crucial for when you introduce the new, eager batteries. It’s like a secret code for power flow!
Now, for the removal! Gently grasp each battery. They might be nestled in pretty tightly, but a little wiggle and pull will do the trick. Don't be shy, but also don't go full Hulk mode. A firm, polite tug is all that’s needed.
As you remove each one, you might reflect on their long service. They've powered countless entries and exits, kept your home safe, and now, their watch is done. Give them a silent nod of appreciation.
"Out with the old, in with the super-charged new!"
Once all the old batteries are out, you're left with an empty, but very important, chamber. It’s a clean slate, a blank canvas, ready for a masterpiece of fresh power!
The Power Surge: Introducing the New Recruits
Now for the exciting part! Grab your brand-new, fresh-out-of-the-pack batteries. For most Yale locks, these will be crisp AA alkaline batteries. Always use good quality, fresh batteries – your lock deserves the best!
Remember those little plus (+) and minus (-) symbols you noticed earlier? They're back in play! This is probably the most important step in our whole adventure, so let's give it a moment of focus.

Each battery compartment has corresponding symbols etched or molded into it. You're going to match the positive end (+) of your new battery to the positive symbol in the compartment, and the negative end (-) to the negative symbol.
Think of it as magnetic attraction, but for power! The rounded, slightly raised end of the battery is usually the positive (+) side. The flat end is the negative (-) side. Match them up perfectly, like pieces of a grand puzzle.
Slide the first battery into its slot. It should nestle in snugly. Then, follow with the next, paying close attention to the orientation. Each one should click into place with a satisfying firmness, like tiny engineers setting up power lines.
Continue this careful placement until all the slots are filled with gleaming, energy-packed batteries. You can almost feel the surge of power, the silent hum of renewed life flowing back into your magnificent Yale lock!
"Proper polarity: The secret handshake of enduring power!"
Once they're all in, give them a gentle pat. A job well done, little powerhouses! Your Yale lock is now brimming with potential, ready for its next chapter of security and convenience.
The Grand Finale: Securing the Energy and Testing Your Triumph!
With the new batteries proudly in place, it's time to close up shop. Take your battery cover – the one you so skillfully removed earlier – and prepare to return it to its rightful home.
If yours was a slide-on cover, align the edges carefully with the grooves on the lock. Gently slide it back into place until you hear that sweet, reassuring click. It’s like sealing a treasure chest after stowing away the gems!
If you had the pleasure of a screw-on cover, first make sure the cover is aligned perfectly over the battery compartment. Then, retrieve that tiny, precious screw you so carefully set aside.
Place the screw back into its hole. Then, with your faithful Phillips head screwdriver, gently turn clockwise. Just enough to make it snug. Don't overtighten; we're aiming for secure, not super-glued!
Now, for the moment of truth, the grand test! Give your Yale lock a little try. If it’s a keyless entry, punch in your code. Listen for the familiar whirring, the satisfying click of the bolt retracting and extending. It should sound stronger, more confident, more... alive!
If you have the voice prompts enabled, you might even hear a chipper "Locking" or "Unlocking," confirming your success. Revel in that sound! That, my friend, is the sound of a job incredibly well done.
You’ve done it! You’ve bravely ventured into the mechanical heart of your Yale door lock, performed a vital battery transplant, and brought it back to full, glorious power. Go ahead, give yourself a pat on the back, a fist pump, or even a triumphant little dance. You are, unequivocally, a home maintenance superstar!