How To Replace The Battery In A Honeywell Thermostat

Alright, settle in, grab another chai latte, because I'm about to tell you a tale. Not a tale of dragons or daring escapes, but something far more common, yet equally fraught with potential peril: the low battery warning on your Honeywell thermostat. Yes, that little digital harbinger of doom, quietly blinking in the corner, threatening to plunge your meticulously climate-controlled sanctuary into an arctic wasteland or, conversely, a tropical inferno. We've all been there, staring blankly at the screen, wondering if this is it – the beginning of the end, or perhaps, just a Tuesday.
But fear not, my intrepid home-manager! For today, we unravel the mystery, conquer the fear, and emerge victorious, armed with nothing but a couple of batteries and a newfound sense of power over your household's climate. Think of me as your Obi-Wan Kenobi, only I prefer slightly less sand and more caffeine. And trust me, replacing these batteries is easier than trying to understand your smart TV's streaming recommendations.
The Great Thermostat Rebellion: Why Does it Need Batteries Anyway?
You might be scratching your head, thinking, "Wait, my thermostat is wired into the wall! Why on earth does it need batteries?" Excellent question, my friend! While many modern thermostats are indeed powered by your home's electrical system (often through a magical "C-wire"), many, especially older Honeywell models or those designed for simple installation, still rely on good old AA or AAA batteries. These batteries usually power the display, the programmable features, and act as a backup in case of a power outage. It's like having a tiny, climate-controlling robot that needs its snacks.
Must Read
The low battery indicator isn't just a suggestion; it's a polite, digital plea for sustenance before your thermostat stages a full-blown coup, refusing to regulate your indoor temperature and leaving you shivering under a pile of blankets or sweating through your favorite pajamas. And who wants that? Not you, that's who.
Pre-Mission Briefing: Assembling Your Arsenal
Before we dive headfirst into this thrilling adventure, let's gather our supplies. This isn't brain surgery, but a little preparation never hurt anyone, except maybe that one time with the DIY haircut. You'll need:

- Two new AA or AAA batteries. Check your thermostat for the specific type, but these are the usual suspects. Pro tip: Don't skimp on quality here. This isn't the time for those dusty batteries you found at the bottom of a junk drawer that might have powered a Walkman in the '90s.
- Possibly a small flathead screwdriver or a butter knife. Sometimes, these Honeywell beasts are a little stubborn with their covers.
- A deep breath and a dash of courage. You've got this!
Phase One: Approaching the Beast (aka Your Thermostat)
First things first, let's locate the object of our quest. Your Honeywell thermostat. It's probably been hanging there, quietly doing its job, blissfully unaware of the minor panic it's about to cause. Look at it. Assess its stance. Is it a T-Series? A FocusPRO? A VisionPRO? Don't worry, the internal mechanics for battery replacement are surprisingly consistent across many models, which is a rare treat in the world of home electronics.
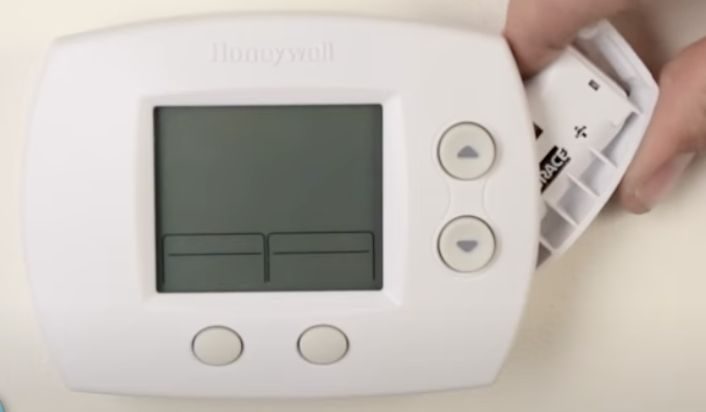
Now, gently, very gently, remove the cover. This is often the trickiest part, like trying to open a jar of pickles that's been sealed since the Eisenhower administration. Many Honeywell models have a tab on the bottom or sides. You might need to press a button, pull a lever, or simply give it a firm, but loving, tug straight off the wall plate. If it feels like you're about to rip it off the wall, you're probably doing it wrong. Look for arrows or small indentations that suggest how it might slide or pop off. Sometimes, a gentle pry with that screwdriver or butter knife in a designated slot does the trick. You'll often hear a satisfying click or pop when it comes free. Revel in that small victory!

Phase Two: The Great Battery Reveal!
With the cover off, you'll likely see the inner workings of your thermostat, which, let's be honest, looks a bit like a miniature circuit board convention. But more importantly, you'll spot the battery compartment. It's usually very clearly marked, often on the main unit itself, or sometimes cleverly tucked away on the side or even in the pull-out frame of some VisionPRO models. It might even have a little diagram showing you which way the batteries go. Bless these thoughtful engineers!
Observe the old batteries. Are they corroded? Leaky? If so, handle them with care, and maybe wear gloves if you're feeling extra cautious. (Or if you've recently watched a horror movie about toxic goo.)
Phase Three: The Sacred Swap (and the Polarity Predicament)
Now for the main event! Carefully remove the old, depleted batteries. Dispose of them responsibly – don't just chuck them in the regular trash. Many stores that sell batteries also have recycling bins. You're not just a climate control wizard; you're an environmental steward!
Next, take your new, shiny batteries. This is where attention to detail really matters. Notice the little + and - symbols inside the battery compartment. These are not just suggestions; they are sacred instructions. Insert the new batteries, ensuring the positive (+) end aligns with the positive marking and the negative (-) end aligns with the negative marking. Incorrect polarity can prevent the thermostat from working and, in rare cases, could potentially damage it. Think of it as putting socks on the wrong feet – it just doesn't feel right, and things won't work as they should.

Phase Four: Reassembly and the Grand Reboot
With the fresh batteries firmly in place, it's time to put your thermostat back together. Line up the cover with the main unit. It should snap back into place with a reassuring click, much like it came off. Don't force it; if it's not fitting, double-check that everything is aligned properly. It's like solving a really simple puzzle, but with higher stakes (your comfort!).
Once reassembled, your Honeywell thermostat will likely go through a brief reboot sequence. The screen might light up, show a loading animation, or ask you to confirm the time and date. This is normal. Take a moment to reset any lost settings if prompted. The low battery indicator should now be gloriously absent, replaced by the comforting display of your desired temperature.
Victory Lap: Bask in Your Glory!
Congratulations, my friend! You've successfully tamed the digital beast, averted a potential climate crisis in your home, and saved yourself a house call. You are now officially a DIY demigod, capable of solving minor household mysteries with aplomb. Go forth, tell your tales, and perhaps enjoy that perfectly temperate living room you've just single-handedly restored. Remember, that little blinking light is no match for your newfound prowess!