How To Replace Battery On Honeywell Home Thermostat

Ever had your trusty Honeywell Home thermostat go on strike? That moment when the screen goes blank, your AC stops on a scorching day, or the heat just won't kick in. Before you panic and call an expensive HVAC technician, what if I told you the fix is often super simple and incredibly satisfying? We're talking about replacing the batteries! It's not just useful; it's a small act of homeowner empowerment, a little victory that keeps your comfort control in your hands and your wallet a little heavier.
Think of your thermostat as the brain of your home's HVAC system. It tells your furnace or air conditioner when to act. Like any good brain, it needs power! Low batteries mean inconsistent temperatures or even a complete system shutdown. Replacing them ensures seamless comfort, prevents those annoying "no heat" or "no cool" emergencies, and ultimately helps your home run more efficiently. Plus, it's an excellent way to avoid unnecessary service calls for something you can easily do yourself in minutes!
Ready to be your own HVAC hero? Let's get started! You'll typically need two AA or AAA batteries (check your specific model, as some might use C or D). A small flathead screwdriver can be handy, but often, it's tool-free.
Must Read
Here’s your simple step-by-step guide:
- Step 1: Locate Your Thermostat. Ensure you're at the main unit.
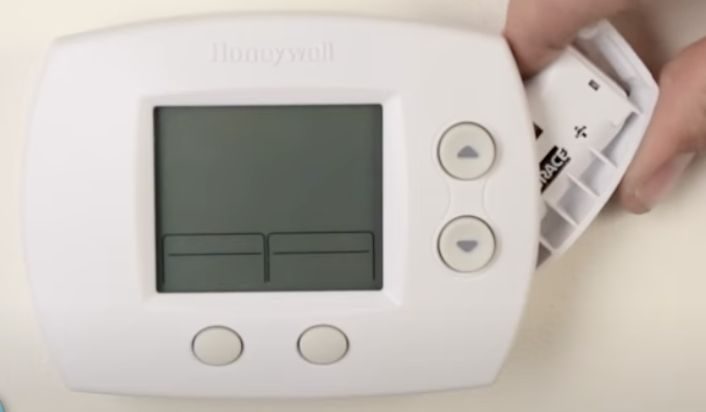
- Step 2: Find the Battery Compartment. This is often the trickiest part! For many Honeywell Home models, the faceplate simply pulls off towards you (look for a tab). Others might have a slide-out tray on the side, or you may need to gently push up and pull out the entire thermostat from its base plate to reveal the back.
- Step 3: Remove the Old Batteries. Note their orientation as you pull them out; this helps with the new ones. Don't worry if the screen was blank; they were just drained.
- Step 4: Insert the New Batteries. Pop in those fresh batteries, ensuring the positive (+) and negative (-) ends match the indicators inside the compartment. This is crucial for power!
- Step 5: Close It Up. Reattach the faceplate or slide the compartment back until it clicks securely.
- Step 6: Confirm Operation. Your thermostat screen should light up immediately! It might take a moment to "boot up" or re-display settings. If not, double-check your battery orientation.
And just like that, you've conquered a common household hiccup! See? Wasn't that easy? No expensive service call, no waiting, just you and a few minutes of DIY glory. Your Honeywell Home thermostat is back to its happy, temperature-regulating self. Go ahead, give yourself a pat on the back – you've earned it!