How To Change Battery In Honeywell Alarm

That insistent, high-pitched chirp. It starts subtly, a barely noticeable tickle in the background of your day. Then it grows louder, bolder, more demanding.
It’s not an emergency, not really. It’s just your Honeywell alarm, politely – or not so politely – informing you that it's feeling a bit parched.
It needs a new battery, desperately. And suddenly, that tiny chirping sound becomes the soundtrack to your home, a relentless, tiny drummer pounding away at your sanity.
Must Read
Most people hear that sound and immediately think: "Oh dear. This is a job for a professional." Or perhaps, "Time to call someone with actual tools and a degree in complicated electronics."
But here's a whisper of an
"unpopular opinion": you, my friend, are perfectly equipped for this mission. More than you know.
The alarm wants you to feel intimidated. It thrives on mystery and the perceived complexity of its inner workings. Don't fall for its subtle mind games.
Your first step, naturally, is to locate the demanding little sentinel. Where exactly did that installation crew put the main panel?
Sometimes it’s a proud fixture by the front door, a silent guardian. Other times, it lurks modestly in a hallway, almost blending into the wall, a forgotten rectangle.
You might have several keypads throughout your home, little command centers. But the main alarm unit, the true brain, is usually a slightly larger, often off-white box.
It might be slightly dusty, a testament to its long, diligent service. Give it a gentle tap, a quiet acknowledgment of its presence.
It might respond with an extra chirp, a little challenge. A playful jab to see if you're serious. Show it you are.
You are now on a quest, a domestic adventurer seeking the source of the incessant noise.
Now, for the moment of truth: opening the panel. This is often where people pause, trepidation setting in.
Will it blare? Will it suddenly demand a secret password? Will tiny warning lights flash an urgent message in an alien language?

Take a deep breath. It’s usually far less dramatic than assembling flat-pack furniture. Most panels have two tiny plastic tabs or clips.
Look very, very carefully. Those small grooves are your allies here. They might be hiding at the very top. Or perhaps coyly tucked away at the bottom edge of the alarm’s sturdy shell.
It’s a bit like a secret handshake. A gentle press inward, then a slight, confident tug outward. Think of it like coaxing open a stubbornly sealed tupperware lid.
Sometimes, a flathead screwdriver becomes your trusty sidekick. Just a little leverage, a gentle prod, never brute force. This is about finesse, not destruction.
You’re not performing surgery. You’re simply revealing its humble, mechanical core. Its secret inner life, briefly exposed.
The cover should pop right off. Not with a bang, but with a satisfying, almost apologetic click. Victory! The first barrier is breached.
Inside, you’ll see a maze of circuit boards. Wires, tiny components, all looking very official and important. Don't let the techy bits overwhelm you.
Your singular mission, should you choose to accept it, is to find the battery. It's the reason for all the drama, after all.
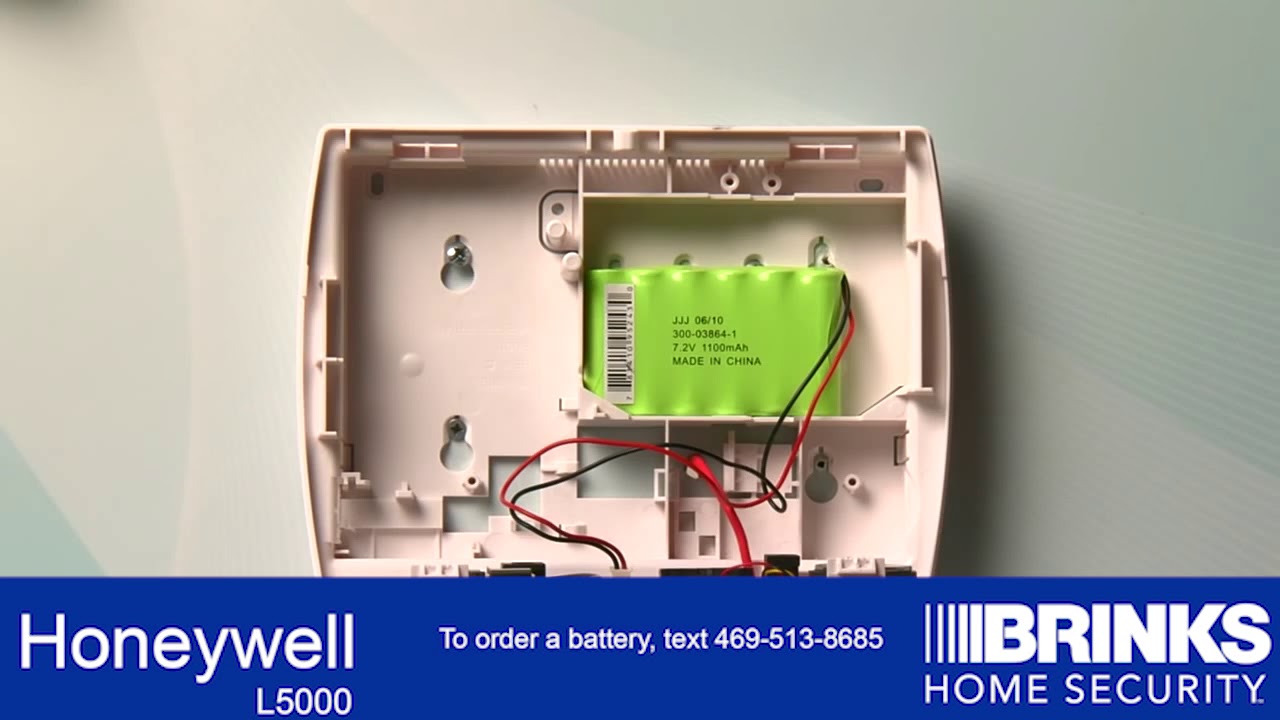
It’s usually a rectangular, somewhat heavy block. Often black or white, nestled snugly at the bottom of the alarm panel, like a hidden treasure.
You’ll spot two wires emerging from it. Typically red and black, classic power colors. These wires lead to a small plastic connector, usually white, plugged into the circuit board.
This is the lifeblood, the energy source, the very reason your alarm has been nagging you. It's almost poetic, isn't it?

Take a moment to truly see it. This silent workhorse has powered your peace of mind for years. It’s tired now, depleted.
It has earned its retirement. It’s ready for a well-deserved, quiet rest in the recycling bin.
You are now face to face with the heart of the matter. The undeniable source of your domestic discord.
Now, for the extraction. It's time for the old battery to depart. Be gentle, yet firm, like saying goodbye to a beloved, but very noisy, old friend.
Grasp the small plastic connector, not the delicate wires themselves. Wires are sensitive souls and prefer not to be yanked.
Wiggle it ever so gently. Sometimes it's a bit stubborn, clinging on like a child who doesn't want to leave the playground, resisting the inevitable.
A slight pull, a tiny twist. It will come loose. You'll feel a soft, satisfying click of release, like a tiny shackles being removed.
You’ve done it! The umbilical cord is severed. The old power source is officially disconnected. The alarm might even let out a single, surprised peep.
A last gasp, perhaps. A final, faint murmur of protest. Don't worry, it's just expressing its dramatic flair.
Place the old, spent battery aside. It has fulfilled its purpose with honor. A noble servant, truly, but now it's time for its replacement to shine.
You are now holding the key to silence. The old, depleted, soon-to-be-recycled key to your reclaimed domestic peace.
Now, the moment of rejuvenation. Introduce the new battery. It looks identical, but it hums with fresh potential, eager to spring to life.
Double-check that it’s the correct type. Often, the old battery proudly displays its specifications. Or a quick glance at your alarm's manual will confirm.
Examine the connector. It's designed to fit only one way, like a perfectly crafted puzzle piece. No guesswork needed, just alignment.
Line up the new clip. Push it firmly but gently onto its waiting counterpart on the circuit board. You’ll feel a satisfying click, a definite connection.
Energy flows once more. A silent, invisible current begins its work. You’ve brought life back to the slumbering beast.
Place the new battery snugly into its compartment. It should fit perfectly, settling in like it was always meant to be there.
Like a custom-made glove, a missing puzzle piece, a destiny fulfilled. This is the moment of power restoration, pure and simple.
The alarm might even emit a small, imperceptible sigh of relief. A new lease on life, ready to stand guard once more.
Time for the grand finale. It’s time to put everything back together. Reassemble your masterpiece, a true testament to your newfound skill.
Carefully line up the alarm’s cover. Ensure no rogue wires are pinched; wires, as we know, are rather particular about their personal space.
Gently push the cover back into place. You should hear a couple of satisfying clicks as the tabs engage. The little guardians you grappled with earlier will snap right back.

Providing both security and a neat, finished appearance. Your Honeywell alarm looks whole and renewed, almost like magic.
Stand back. Admire your handiwork. You are a conqueror of alarm systems. A master of mundane maintenance. A true hero of the quiet home.
The system might let out one final, confirmatory chirp, a last "thank you." Or perhaps a triumphant "I'm back!"
And then… silence. Glorious, beautiful, unbroken silence. No more incessant chirping. No more maddening demands.
The relentless beeping has ceased. Your ears can finally rest, unassaulted. Your sanity, quite frankly, is restored.
You’ve stared down the noisy beast. You’ve tamed it. You’ve given it new life, quietly and efficiently.
And you did it yourself. Without calling an expensive technician. Without losing your cool or resorting to desperate measures.
This, my friend, is the true
"unpopular opinion"you now hold: changing a Honeywell alarm battery is surprisingly empowering.
It feels like a major win for such a seemingly simple task. A small victory in a world filled with demanding technology and complicated gadgets.
So, the next time your Honeywell alarm begins its demanding, insistent symphony, don't despair or feel intimidated.
Just remember this little journey. Remember your hidden power. And remember the sweet, sweet, blissful sound of absolutely nothing.
You’re not just changing a battery. You’re reclaiming your peace. And that, truly, is pretty awesome.