How To Change Battery In Alarm Sensor

Alright, picture this: it's 3 AM. You're deep in the land of nod, probably dreaming of winning the lottery or finally figuring out why socks disappear in the dryer. Suddenly, CHIRP! Your eyes snap open. What was that? You wait. Nothing. You start to drift off again. CHIRP! Louder this time. Now you're wide awake, heart thumping, frantically trying to locate the source of this auditory torment. Is it a smoke detector? Is it a ghost? No, my friend, it's usually just your humble alarm sensor, gently (or not-so-gently) reminding you that its internal power source is giving up the ghost.
Sound familiar? You're not alone. That incessant, low-battery chirp from an alarm sensor is a common culprit for disrupted sleep and frayed nerves. But fear not, intrepid homeowner! Changing the battery in an alarm sensor is usually a surprisingly straightforward task. You don't need a degree in electrical engineering, just a little patience and maybe a tiny screwdriver. Consider this your friendly, non-technical guide to bringing peace back to your home (and your sleep schedule).
Why Bother? The Low Battery Saga
Before we dive into the nitty-gritty, let's just quickly underscore why this is important. A dead sensor battery isn't just annoying; it means that particular point of entry (a window, a door, a motion zone) is no longer actively protected by your alarm system. That's a security gap! Plus, let's be honest, who wants to live with that constant, nagging chirp? Not me, and I'm guessing not you either. So, let's get it sorted.
Must Read
Step 1: The侦探 Work – Finding the Culprit
First things first, you need to identify which sensor is the problem child. Most modern alarm panels will tell you, displaying a "low battery" message and often specifying the zone. For example, "Front Door Sensor - Low Bat." If you're not so lucky, you might have to play a game of "hot or cold" to locate the chirping fiend. Once you've found it, take a moment to admire it. It's about to get a new lease on life!
Step 2: Gearing Up – Your Handy Tool Kit
You won't need much. Probably just a small Phillips head or flathead screwdriver. Sometimes, a tiny jeweler's screwdriver comes in handy, especially for older or more compact sensors. And, of course, the new battery! Don't even think about opening it up without having a replacement ready. Trust me, you don't want to leave your sensor in pieces while you run to the store. Been there, done that, felt silly.

Step 3: Opening the Sensor – The Gentle Approach
This is where things can vary slightly, but the general principle is the same: find the opening mechanism. Most sensors have one of these:
- A tiny screw: Usually on the side or bottom. Unscrew it carefully. Don't let it vanish into the carpet abyss!
- A small tab or latch: Often on the side or top. You might need to gently pry it with a flathead screwdriver or even just your thumbnail.
- A twist-off cover: Less common, but some sensors require a slight twist to release the cover.
Whatever the method, be gentle. These plastic casings aren't designed for brute force. You're aiming for a clean pop or slide, not a plastic-shattering event. Seriously, no need to go full hulk on it.

Step 4: The Big Reveal – What Battery Do I Need?
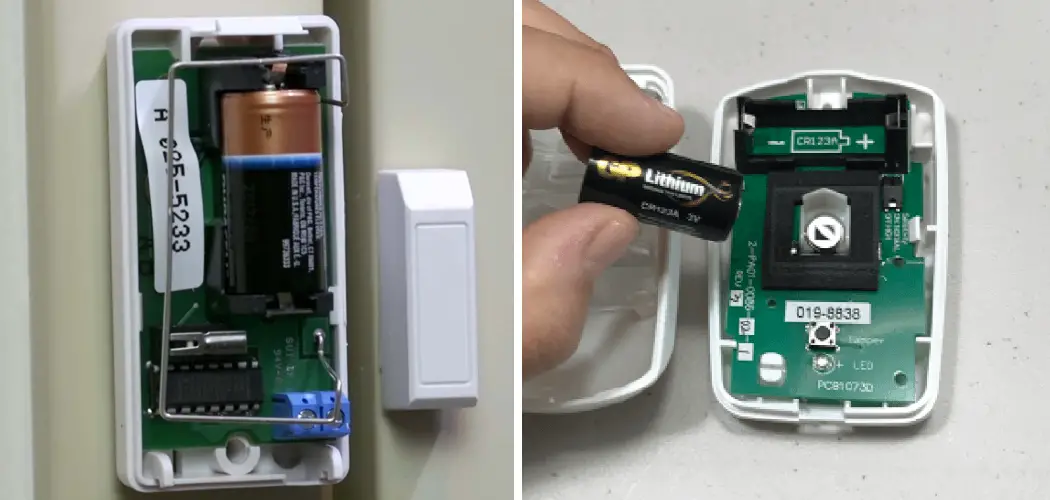
Once the cover is off, you'll see the old battery nestled inside. Pay close attention to its type and orientation. Common alarm sensor batteries include:
- CR123A: These look like chunky AA batteries, but shorter and fatter. Very common.
- AA or AAA: Some simpler sensors use standard household batteries.
- CR2032 or CR2025: These are coin-cell batteries, often found in very small, thin sensors.
The label on the battery will tell you exactly what it is. Take a picture with your phone! Seriously, this is a golden tip. It ensures you buy the correct replacement, especially if you have to make a quick dash to the hardware store. Note the positive (+) and negative (-) terminals as well, so you can put the new one in correctly.
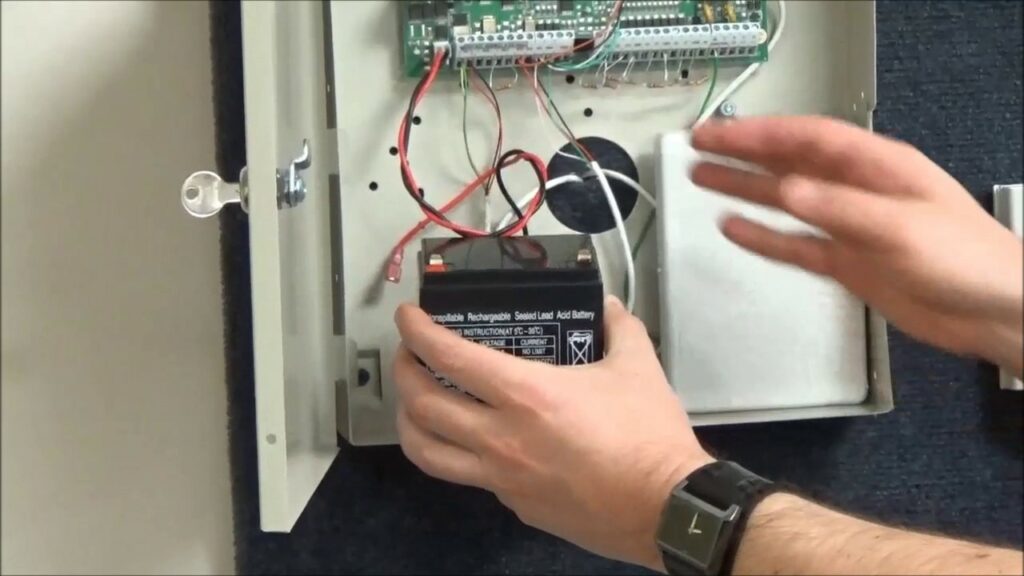
Step 5: The Swap – Out With the Old, In With the New
Carefully remove the old battery. It might be held in by clips, or simply resting in a cradle. Pop it out. Now, insert your shiny new battery, making absolutely sure it matches the polarity of the old one. The "+" on the battery should align with the "+" marked on the sensor's battery compartment. Don't force it. If it doesn't fit easily, double-check your battery type and orientation.
Step 6: Buttoning Up and Testing
Once the new battery is in, carefully replace the sensor cover. Screw it back on, snap the tabs shut, or twist it back into place. You should hear a satisfying click or feel it seat properly. Now, for the moment of truth! Most alarm systems will register the new battery almost immediately. Your alarm panel should clear the "low battery" error.
To fully test, arm your system and then activate that specific sensor (e.g., open the door or window it protects). Your alarm should trigger, or at least your panel should show that zone as "open." Disarm your system, and hopefully, that annoying chirp will be a thing of the past. Ah, the sweet sound of silence.
What If It Still Chirps or Doesn't Work?
Don't panic! A few things to check:
- Is the new battery actually good? It's rare, but sometimes you get a dud. Try another new one if you have it.
- Did you install it correctly? Double-check the polarity.
- Is the cover fully closed? Some sensors won't connect properly if the cover isn't secure.
- Give it a minute. Sometimes the system takes a moment to "check in" with the sensor.
If all else fails and you've tried these steps, it might be time to consult your alarm system's manual or call your alarm provider. But more often than not, you've just successfully completed your mission.
You Did It!
See? That wasn't so bad, was it? You've tamed the rogue chirping, restored a crucial part of your home security, and probably saved yourself a service call fee. Give yourself a pat on the back. You're officially a DIY alarm system maintenance guru. Now go forth and enjoy that uninterrupted sleep!