How To Blow Up Mylar Balloon With Straw
Okay, let's talk Mylar balloons. You know, those shiny, crinkly things that scream "celebration" even when you're just trying to survive another Tuesday? We've all been there. Birthday parties, graduations, maybe even a particularly triumphant trip to the grocery store (treat yourself!). But then comes the moment of truth: inflating the beast. And suddenly, that celebratory feeling deflates faster than, well, a regular balloon with a hole in it.
Forget those fancy helium tanks. Unless you're planning a full-blown Macy's Thanksgiving Day Parade recreation in your living room, chances are you're stuck with good old-fashioned lung power. But, wait! There's a better way. A less…panting…way. The straw. Yes, the humble straw, your weapon against Mylar balloon inflation frustration.
Straw Power: Your Secret Weapon
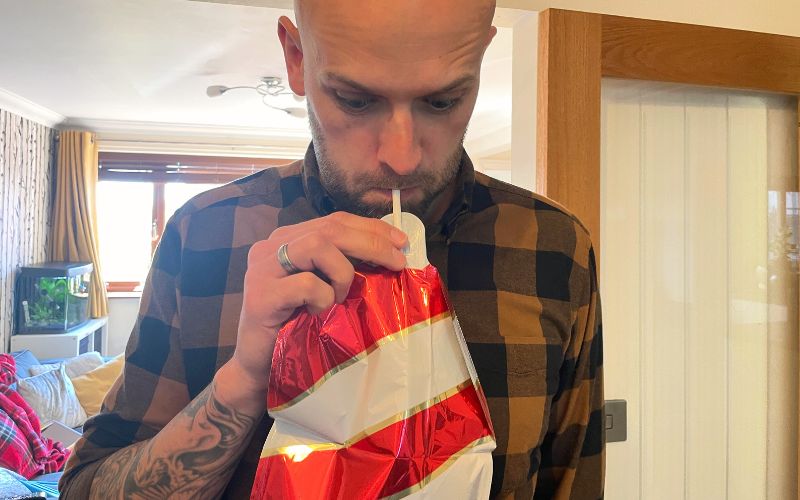
Think of it like this: you're a balloon-blowing ninja. The straw is your katana. (Okay, maybe a plastic katana, but work with me!). The first step is identifying the inflation point. It's usually a little colored tab, often red or blue, near the bottom of the balloon. Finding it can be like searching for your car keys after a particularly long day – you know it’s somewhere, but WHERE?
Must Read
Once you've located the inflation point, gently insert the straw. Don't be aggressive! You're not trying to perform balloon surgery. Aim for a smooth, controlled entry. You'll feel a slight resistance as you push past the seal. It's like finding the perfect parking spot – a little snug, but oh-so-satisfying.
Pro Tip: Make sure you insert the straw far enough! If you don't, all your hard work (and precious breath) will escape, leaving you feeling like you just lost a staring contest with a puppy.

The Inflation Station: Breath Control 101
Now for the main event: the blowing. Don’t go all out like you're trying to extinguish a five-alarm fire with your breath. Think slow, steady, and controlled. Imagine you’re serenading the balloon with a gentle lullaby. Or, if you're feeling particularly energetic, pretend you're a world-class trumpet player hitting that high note.
Keep blowing until the balloon is nice and firm. Not rock-hard, mind you. You want it to be pleasantly plump, like a well-fed hamster. Over-inflating is a recipe for disaster, and nobody wants a burst balloon confetti shower unless it's intentional.
Important: If you start to feel lightheaded, take a break! We don't want you passing out and becoming one with the balloon. Hydrate! Maybe grab a snack. This is a marathon, not a sprint. (Unless, of course, you’re racing against the clock to get the party decorations up before the guests arrive. In that case, good luck!).
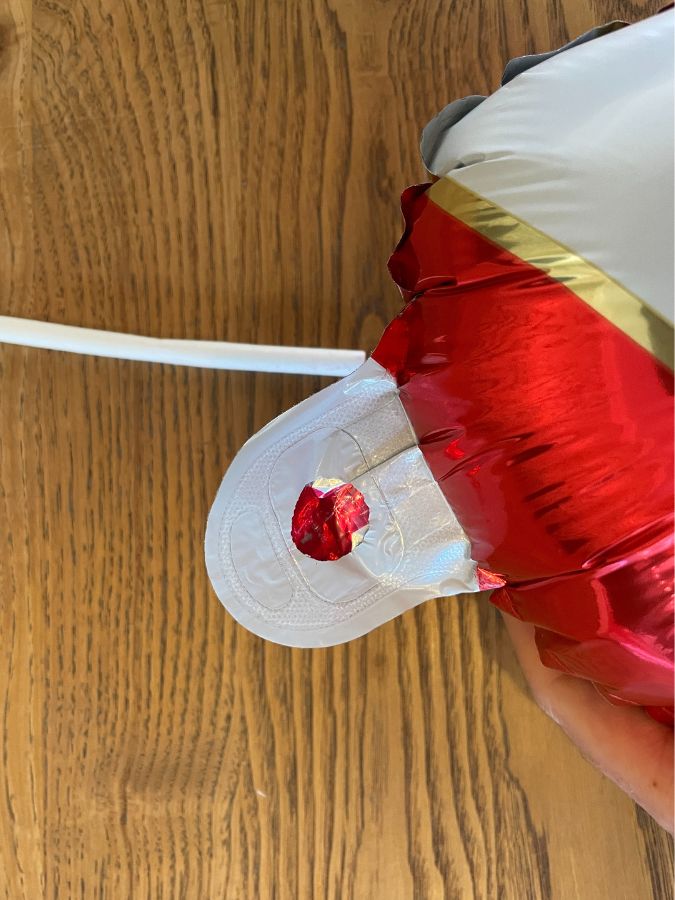
Sealing the Deal: Pulling Out Like A Pro
Once your balloon is sufficiently inflated, carefully remove the straw. The balloon should automatically seal itself. It's like magic! (Okay, it's just clever engineering, but let's not ruin the illusion). If you notice a slight leak, don't panic! Gently pinch the inflation point to encourage it to seal properly. Sometimes, a little coaxing is all it needs.
And there you have it! A perfectly inflated Mylar balloon, all thanks to you and your trusty straw. You've conquered the inflation beast! Now, go forth and celebrate! And remember, when someone asks how you did it, just smile mysteriously and say, "A magician never reveals their secrets."
Bonus Tip: Keep the straw! You never know when you might need it for future balloon-blowing adventures. It's also handy for…well, drinking things.
Congratulations, you are now a certified Mylar Balloon Master! May your celebrations be bright, shiny, and filled with perfectly inflated happiness!