Adt Glass Break Sensor Battery Replacement
Hey there, superstar! Ever woken up in the middle of the night to a tiny, incessant, incredibly annoying chirping sound? You know the one. It’s not your smoke detector (thank goodness!), it’s not a cricket, and it definitely isn't your overly enthusiastic alarm clock. Chances are, it's that little guardian angel of yours, the ADT glass break sensor, trying to tell you something important. And what is it saying? "Feed me a new battery, please!"
Don’t panic! There’s no need to call in the professionals (or the Ghostbusters) just yet. Replacing the battery in your ADT glass break sensor is super easy, surprisingly satisfying, and will make you feel like a total tech wizard. Seriously, if you can open a child-proof bottle, you can do this. Let’s get that little chirper quieted down and your home security back to 100%!
Why is My Sensor Beeping Like a Nagging Little Bird?
That persistent chirp is your sensor's way of saying, "My power is running low, boss!" It’s a low battery warning, designed to let you know it's time for a swap before it completely conks out. Think of it as your car's fuel light coming on – you wouldn’t ignore that, right? Your security system is no different!
Must Read
It's important to address this promptly because a dead battery means a dead sensor. And a dead sensor means a gap in your home's vigilant watch. We don't want any gaps, do we?
What You'll Need (Your Inner MacGyver Kit)
Good news: you won't need a toolbox full of obscure gadgets. Here’s your minimal, mighty arsenal:

- A small Phillips head screwdriver: Or sometimes just a flathead, depending on your sensor model.
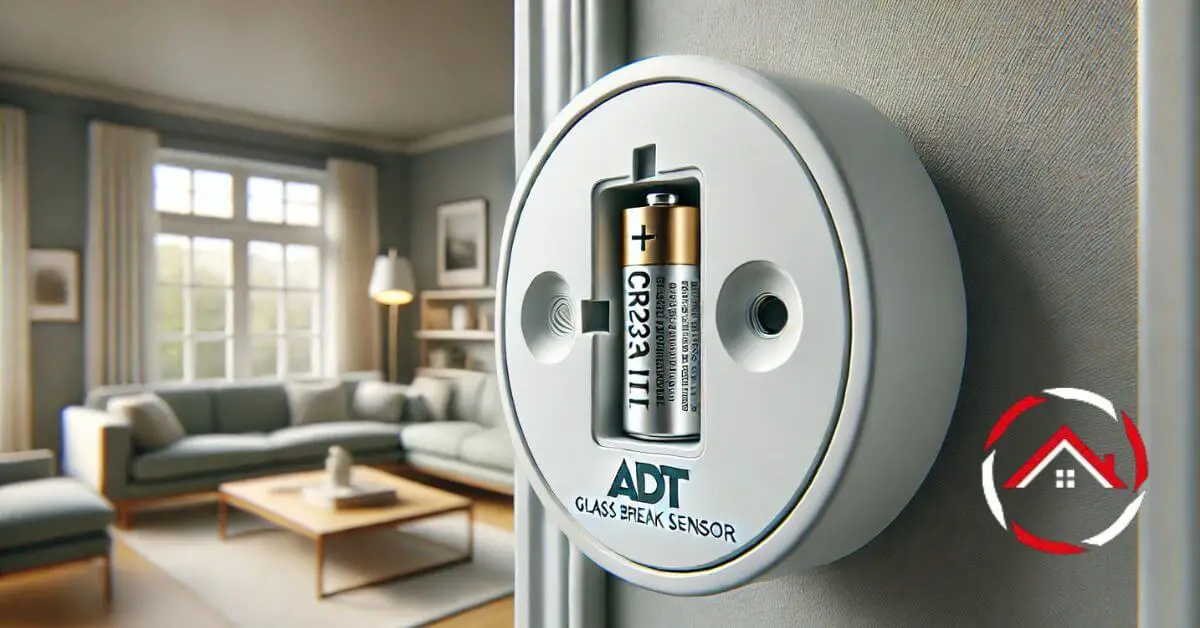
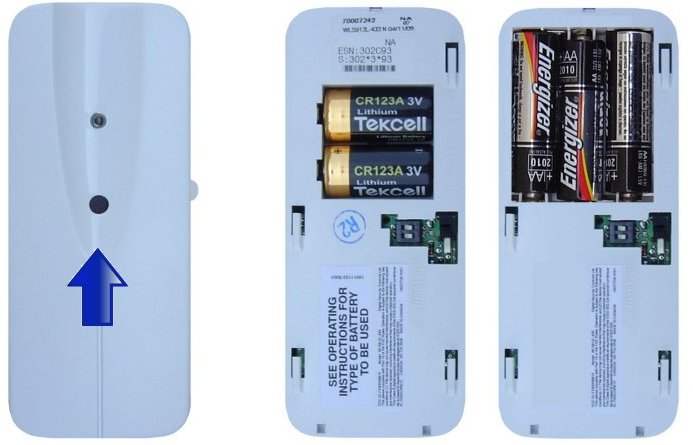
- A replacement battery: Most ADT glass break sensors typically use a CR123A 3V Lithium battery. Double-check your sensor or its manual if you’re unsure! You can usually find these at hardware stores, electronics shops, or even online. Grab a couple to have spares – future you will thank you!
- A steady hand: (Optional, but helpful for not dropping tiny screws into the abyss.)
- A sense of accomplishment: (Guaranteed to appear afterwards!)
Got your gear? Excellent! Let’s get this party started.
Let's Do This! Your Step-by-Step Battery Swap Adventure
Step 1: Locate the Chatterbox
First things first, find the actual sensor that's making all the noise. They're usually mounted on a wall or ceiling in rooms with glass, like living rooms or kitchens. The sound might seem to come from everywhere at once, but narrow it down! You might need to gently cup your hand around different sensors to identify the culprit.
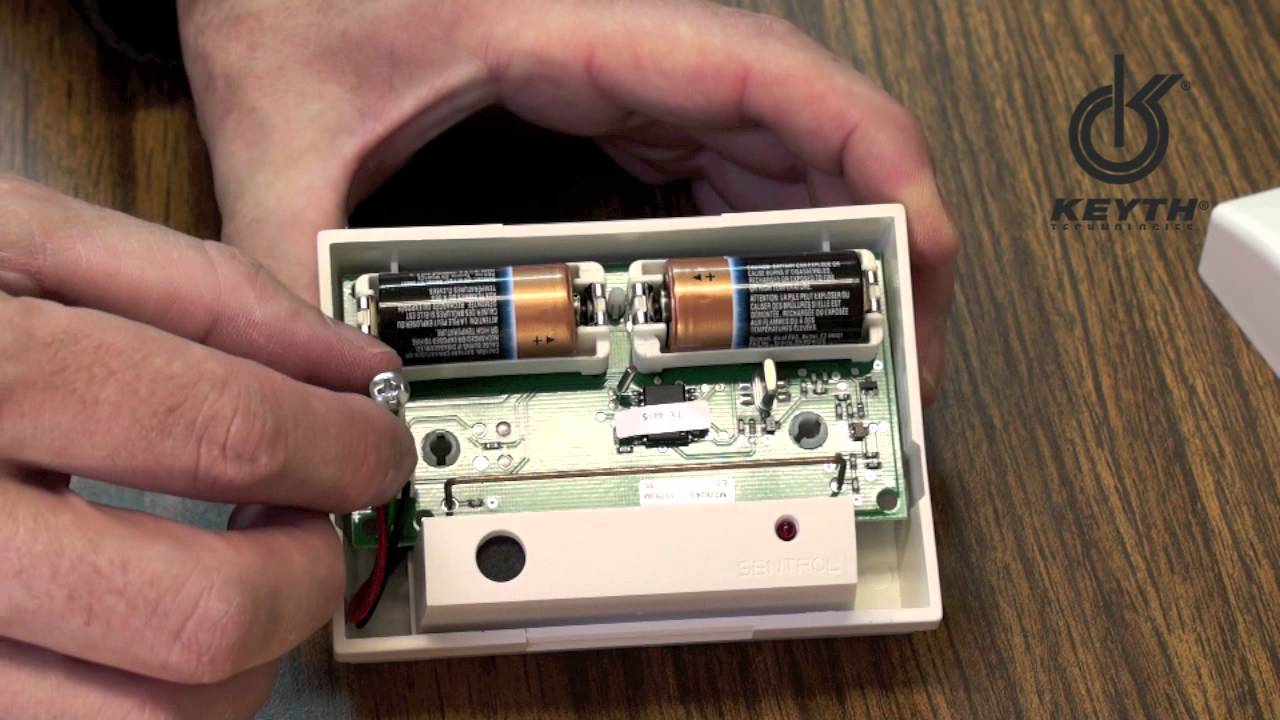
Step 2: Open 'Er Up!
This is where your screwdriver comes in. Look for a small screw (or screws) on the side or bottom of the sensor. Gently unscrew it. Some models might have a small tab you need to press and then twist, or simply pry open with a tiny flathead screwdriver. Be gentle! We're doing delicate surgery, not demolition.
Once the screw is out (if there was one), the cover should either slide off or pop open. You might need to gently pry it open with your fingers or a small tool. Don’t worry, you won't set off the main alarm system by opening the sensor itself.
Step 3: Meet the Old Battery (and Note Its Orientation!)
Inside, you’ll see the battery. It’s usually cylindrical, often silver or blue. Before you yank it out, take a quick mental picture (or an actual photo with your phone) of which way the positive (+) and negative (-) ends are facing. This is crucial for putting the new one in correctly!
The old battery might look a bit... spent. Like a potato that's given its all. Give it a silent thank you for its service.
Step 4: The Great Battery Swap!
Carefully remove the old battery. It might be snug in its compartment. Then, grab your shiny new CR123A battery (or whatever type your sensor uses) and insert it, making sure it matches the orientation you noted in Step 3. Positive to positive, negative to negative! It should fit snugly. Give it a gentle push to make sure it's fully seated.
You might hear a small chirp or see a light flash on the sensor, indicating it's powered up and happy again. Success!
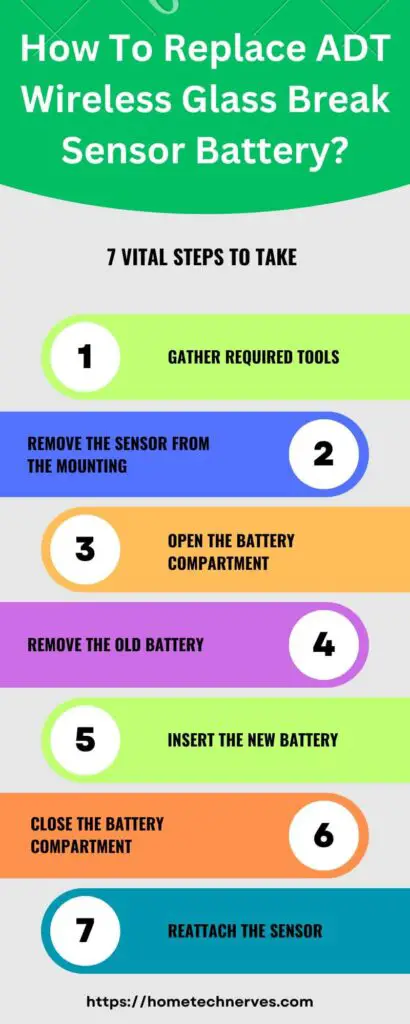
Step 5: Button Up Your Masterpiece
Now, carefully put the cover back on. Make sure all the tabs align. If there was a screw, gently re-insert it and tighten it. Don't overtighten – just snug enough to keep it secure.
Congratulations! You've successfully performed a battery transplant! Give yourself a little pat on the back.
A Few Friendly Nudges (Tips & Tricks)
- Dispose of old batteries responsibly: Don't just toss them in the regular trash. Many stores that sell batteries have recycling bins.
- Don't wait: If you hear that chirp, address it within a day or two. Don't let your sensor go completely dark!
- Test it: After replacement, if you have an ADT panel that shows sensor status, check to make sure it's back online. If you're feeling brave, you can try gently clapping loudly in the room to trigger a test, but don't go smashing any actual glass!
And there you have it! You've conquered the chirping sensor, saved yourself a service call, and proved once again that you're perfectly capable of tackling those little household mysteries. You’re not just a homeowner; you’re a home security maintenance pro! Revel in the silence and the peace of mind knowing your home is safely monitored again. Go forth and enjoy your quiet, secure abode, you magnificent problem-solver!