How To Wire A Doorbell With A Transformer
:max_bytes(150000):strip_icc()/SPR-how-to-install-a-doorbell-5214163-step-03_30271-2dbd37d14eaa4bac8bde1b94817409cf.jpg)
Alright, rockstars of the home improvement world! Ever dreamed of a doorbell that sings your guests' arrival with a clear, crisp chime instead of a meek little cough? Have you yearned to banish the silence of the unannounced, transforming your entryway into a welcoming concert hall? Well, buckle up, buttercup, because today we're going on an adventure! We're going to tackle the mighty, the magnificent, the surprisingly simple task of wiring a doorbell with a transformer. And by the end of it, you'll be high-fiving yourself and humming a victorious tune!
Your Toolkit for Triumph!
Before we dive headfirst into this electrifying escapade, let's gather our legendary gear. Think of it like assembling your superhero costume – each piece plays a vital role in your grand success!
- The Doorbell Chime: This is the star of the show, your mini orchestra conductor. Choose one that speaks to your soul, whether it's a classic "ding-dong" or something a bit more avant-garde.
- The Doorbell Button: The humble activator, the magic finger-presser. Make sure it's weather-resistant if it's going outside to brave the elements!
- The Transformer: Ah, the unsung hero! This little marvel is like a tiny power wizard, safely transforming your household electricity into the perfect voltage for your doorbell system. Don't worry, it's friendlier than it sounds!
- Low-Voltage Wire: Think of this as the spaghetti that connects all your delicious components. Two strands, usually 18-gauge, perfect for this delightful dance.
- Screwdriver: Your trusty companion for tightening screws and making secure connections.
- Wire Strippers: For gently nudging the insulation off your wire spaghetti, revealing its conductive heart.
- (Optional, but wise!) Voltage Tester: Just to double-check things are behaving nicely. Safety first, even in fun adventures!
Let's Get Wiring, You Wonderful Wizard!
Okay, deep breath! This isn't rocket science, it's more like a delightful puzzle. We're going to create a closed loop, a happy circuit where electricity can zoom around, making that chime sing!
Must Read
Phase 1: Befriending the Transformer
Your transformer is usually found chilling out near your electrical panel, often attached to a junction box. It might look unassuming, but it's where the magic begins!
You'll notice two screw terminals on your transformer – these are its friendly little output ports.
Grab one end of your low-voltage wire. You'll want to strip about half an inch of insulation from each strand. Now, take one strand and connect it securely to one of the transformer's output screw terminals. Twist it around the screw (clockwise is usually best for tightening!) and cinch it down tight with your screwdriver. This is your first secure handshake!
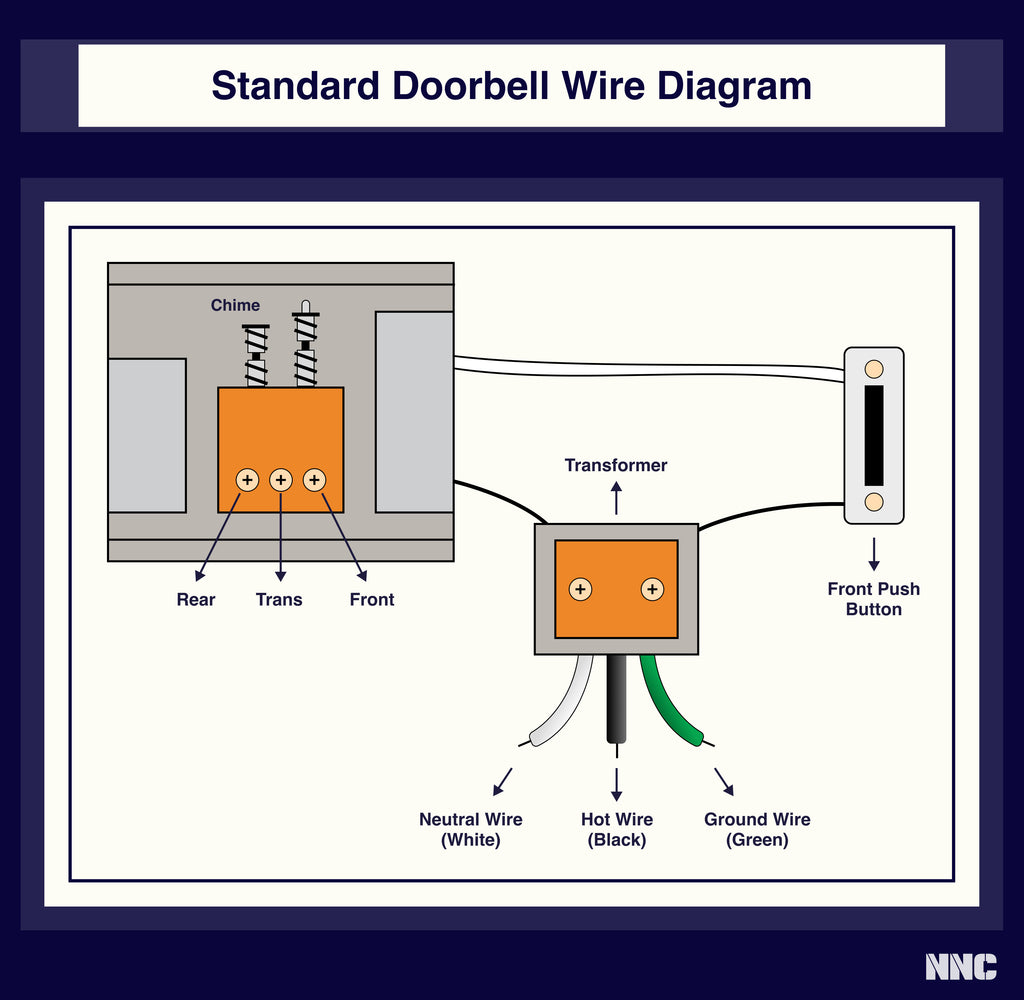
The other strand of that same wire? Just let it hang out for a moment. It's patient. We'll get to it.
Phase 2: Connecting to Your Chime's Heart
Now, let's journey to where your doorbell chime will live. It usually has three terminals: often labeled "Front," "Trans" (for transformer), and sometimes "Rear" (if you're feeling fancy with a second doorbell button).
Remember that first wire you connected to the transformer? Guide it gently (or excitedly, we're not judging!) to your chime. You'll connect the other end of the same wire to the terminal labeled "Trans" on your chime. Again, strip, twist, and tighten! You're creating a direct line from the power wizard to the music maker!

Phase 3: The Button's Big Moment
It's time for the star of the show's sidekick: the doorbell button! This little guy usually has two screw terminals on its back.
Take a new piece of your low-voltage wire. Strip both ends. Connect one end to the "Front" terminal on your chime. Yes, the one you just saw! Secure it down. Now, run this wire to where your doorbell button will be. Connect the other end of this wire to one of the screw terminals on the back of your doorbell button. Snug as a bug!
Phase 4: Completing the Circuit!
Almost there, champion! This is where we close the loop and prepare for the grand symphony.
You've got one screw terminal left on your doorbell button, right? And remember that lonely strand from the first wire that was just hanging out at the transformer? Well, they're about to meet!
Take a third piece of your low-voltage wire. Connect one end to the remaining terminal on your doorbell button. Run this wire back to your transformer. And there it is! Connect the other end of this wire to the last available output terminal on your transformer.
You've done it! You've created a complete circuit: Transformer -> Chime -> Button -> Transformer. A beautiful, electrifying circle of friendship!
The Moment of Truth!
Okay, the drumroll, please! Before you press that button like you've just won the lottery, do a quick visual check. Are all your connections tight? No stray wires causing mischief? Excellent!

Now, if your transformer was unplugged or switched off during this process (which is always a brilliant idea for safety!), go ahead and restore its power.
And then... go on! Give that doorbell button a firm, confident press!
DING-DONG! Or whatever glorious melody your chosen chime offers!
If it works, congratulations! You've not only wired a doorbell, but you've also proven yourself to be a wiring warrior, a circuit conqueror, a maestro of home melodies! You've transformed a silent entrance into an inviting announcement, all with your own two hands and a dash of can-do spirit. Give yourself a pat on the back, you magnificent human! Your house just got a whole lot more musical, thanks to you!