How To Replace Battery Of Honeywell Thermostat

You know that feeling? That tiny little blink, that subtle fade, the sudden, horrifying silence from your usually reliable home dictator: the thermostat.
Suddenly, your comfortable haven feels a little less certain. Is it broken? Did you break it? No, probably just a battery, right?
Ah, but replacing a thermostat battery, specifically for a Honeywell, isn't always the straightforward 'pop and go' affair you might imagine. In fact, it often feels like defusing a small, incredibly important, climate-controlling bomb.
Must Read
The Initial Awakening (or Lack Thereof)
First, there's the moment of realization. The screen goes dim, or maybe a tiny, insistent little battery icon starts flashing at you.
It’s the digital equivalent of a weary sigh, a polite but firm request for sustenance. Your Honeywell unit is making its demands known.
"Why can't it just be obvious where the batteries go?" you might grumble to an empty room, and honestly, you'd be right to.
This isn't like finding the battery in your TV remote; oh no, that would be far too simple and user-friendly for this particular adventure.
The Great Detective Work: Finding the Model
Before you even think about touching it, a quick peek at the model number can save a world of grief. It’s usually on the back, or maybe hidden on a pull-out tab.
This little piece of information is your secret weapon, your Rosetta Stone in the quest for power. Jot it down, memorize it, whisper it to your pets.
A Word on Thermostat Anatomy
Your Honeywell thermostat isn't just one solid block of plastic. Most models consist of two main parts: the display unit and the backplate.
The display unit is the fancy part with all the buttons and numbers you interact with daily. The backplate is boring, attached to your wall, holding all the wires.

Guess which part holds the batteries? If you guessed the backplate, you're probably an engineer. The rest of us naturally assume it's the easy-to-access display.
And here's where the fun begins: accessing the display unit. This is often the most nerve-wracking part of the whole operation.
The Battery Hunt: A Modern Odyssey
While you're contemplating the mysteries of modern HVAC design, let's talk batteries. Most Honeywell thermostats crave AA or AAA batteries.
Sometimes, just to keep you on your toes, they might ask for a CR2032 coin cell. Always check the manual, or better yet, wait until you open it up.
Have them ready. Nothing is worse than getting halfway through a delicate operation only to realize you're fresh out of the required power cells.
"I definitely have some of those... somewhere," is a phrase often uttered before a frantic rummage through the 'junk drawer.'
The Moment of Truth: Approaching the Beast
Okay, batteries acquired, model number noted. Take a deep breath. You're about to engage in a delicate dance with your home's climate control center.
Remember, we're aiming for finesse, not brute force. This isn't a wrestling match; it's more like a delicate surgical procedure, but with less actual surgery.
Phase One: The Gentle Prodding
Many Honeywell thermostats slide upwards and then tilt out from the wall plate. Others might have small tabs on the top or bottom you need to press.

Feel around the edges. Look for subtle indentations, tiny arrows, or even a barely visible seam. This is where your inner archaeologist comes out.
"Is it pushing? Pulling? Sliding? Am I going to snap this thing clean off the wall?" These are all valid questions, my friend.
If you're unsure, a very gentle upward tug on the bottom of the unit is often a good starting point. It feels wrong, but it's often right.
Phase Two: The Subtle Slide or Click
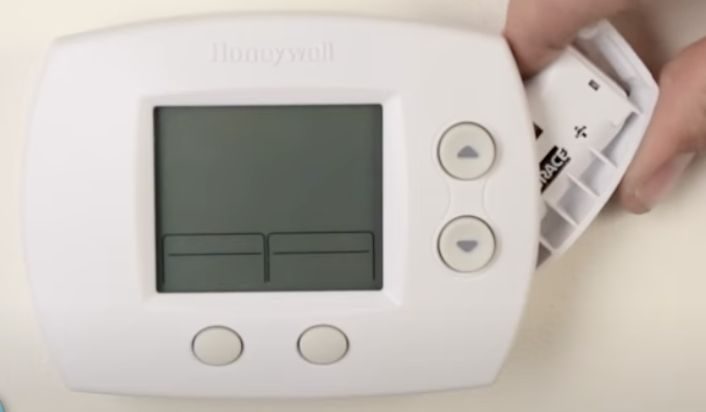
Once you’ve found the magical release mechanism, the display unit should separate from its wall plate. Don't pull too hard; there are wires behind it, usually!
It's like opening a secret compartment in a spy movie, except instead of top-secret documents, you find... more plastic and, hopefully, batteries.
Some models have a hinge-like design, others just pop off completely. Observe how it detaches; you'll need to reattach it the same way.
The key is not to force it. If it’s resisting, you’re probably doing it wrong. Step back, take a breath, and try a different angle.The Unveiling: Battery Compartment Revealed!
Voila! Once the display unit is in your hand, you'll finally see the elusive battery compartment. It might be on the back, or sometimes on the side.
Often, there’s a small, clearly marked door or slide-out tray. It’s almost as if they wanted you to find it once you got this far.
Notice the orientation of the old batteries. Take a mental snapshot, or even an actual photo. Seriously, it's easy to forget the positive and negative terminals.
Most likely, you're looking at slots for two AA or AAA batteries. They sit there, quietly drained, awaiting their replacements.
The Extraction: Old Friends Depart
Carefully remove the old batteries. They might be a bit snug, but they should pop out without too much fuss. Dispose of them responsibly; don't just chuck them anywhere.
Take a moment to appreciate their service. They powered your home's comfort for months, perhaps even years, silently doing their job.
"Out with the old, in with the slightly newer, shinier old," you might quip, feeling very accomplished already.
This is also a good time to wipe away any dust or grime that might have accumulated in the compartment. A clean energy source deserves a clean home.
The Installation: New Life Breathed In
Now, with your fresh batteries in hand, carefully insert them into the compartment. Pay close attention to the + and - markings.
This is crucial. Incorrect orientation means no power, and you'll just stare at a blank screen wondering what went wrong after all that effort.
Make sure they click securely into place. You want a firm connection, not a loose, wobbly one that might disconnect with a sudden temperature change.Once the new batteries are in, close the compartment door or slide the tray back into place. Listen for a satisfying click or feel it securely seated.
The Reassembly: Like a Puzzle Master
With fresh power coursing through its veins, it's time to reattach the display unit to the wall plate. Remember how it came off?

If it slid up, it will likely slide down onto the tabs of the wall plate. If it clicked, align the clips and gently press until it clicks back into place.
Again, no forcing. It should fit snugly and without significant resistance. If it feels stuck, check your alignment, not your strength.
The Grand Finale: Power On!
And then, the moment of truth. The screen flickers, lights up, and displays glorious numbers once more. The thermostat is alive!
You might hear a faint click or whir as it initializes. The unit might take a few moments to 'boot up' and display the correct settings.
"I did it! I am a modern-day hero, capable of taming even the mighty Honeywell!" you declare, perhaps a little too loudly.
Check the temperature settings, maybe adjust it up or down to ensure everything is functioning correctly. Revel in your victory.
A Final Unpopular Thought
Replacing a battery should be simpler, shouldn't it? A quick flick, a pop, and done. But with a Honeywell, it's often a minor expedition.
It's an adventure in home maintenance, a testament to your patience and mild detective skills. And honestly, it feels pretty good when it's done.
So next time your thermostat blinks its sad, low-battery eyes at you, remember: you're not just replacing batteries, you're embarking on a noble quest. Go forth and conquer!