How To Replace A Battery On A Honeywell Thermostat

Ah, the humble thermostat. It sits there, usually minding its own business, until one day, it decides to flash that little, oh-so-subtle battery icon. It’s like a tiny, passive-aggressive roommate demanding attention. But fear not, brave home-dweller, this isn't a summons to an ancient ritual. It's just a friendly nudge, or perhaps a tiny digital shriek, for new batteries.
Today, we tackle the legendary task of replacing batteries on a Honeywell thermostat. An epic quest, indeed, worthy of ballads and perhaps a small, celebratory dance once completed. You might even feel like a tech wizard.
The Initial Approach: Staring Down the Thermostat
First things first: locate your thermostat. It’s probably on a wall, silently judging your energy usage. Give it a good, firm stare. This is your mental preparation.
Must Read
Some might call this unnecessary. I call it vital. You are establishing dominance over a small, plastic box that controls your comfort.
Unpopular opinion: We all secretly talk to our appliances. And they definitely listen.
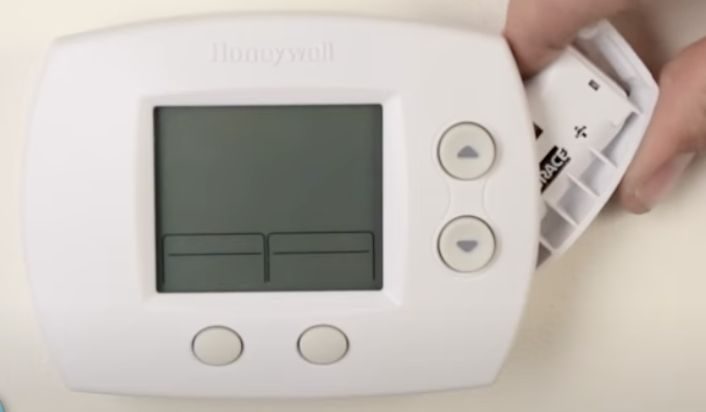
The Great Cover Mystery: To Pull or To Slide?
Now, for the main event: finding the battery compartment. This is where the plot thickens. Many Honeywell models are surprisingly intuitive, but others? They play hard to get.
Some have a little pull-down tab at the very bottom. You might see a small indent. Gently, but firmly, pull it downwards. It should swing open like a tiny drawbridge.

If it doesn't budge, it might be a slide-off cover. Look for a seam, perhaps on the side or top. A gentle push or slide might reveal its secrets. Don’t force it too much, though. We’re aiming for heroics, not thermostat destruction.
Remember that feeling when you try to open a stubborn pickle jar? This is like that, but with less potential for pickle juice everywhere. Take a breath. You've got this.
The Grand Reveal: Batteries! (Hopefully)
Once you've conquered the cover, you'll see them. The glorious, often slightly corroded, old batteries. They usually look like AA or AAA batteries. Make a mental note, or even a literal note, of which type they are.
Gently pop them out. Sometimes they’re snug, sometimes they practically leap out in joyful retirement. Bid them farewell. They’ve served their time.

This is also a prime moment to marvel at how something so small can hold so much power. Or, more accurately, how it can lose so much power at the most inconvenient times. Like during a heatwave. Or a blizzard.
Unpopular opinion: Batteries always die at 3 AM on the coldest night of the year. It's a universal law.
The Search for Replacements: The Sacred Hunt
Now, the truly challenging part. Finding the new batteries. Did you leave them in that kitchen drawer with the mysterious assortment of twist ties and expired coupons? Or perhaps in the utility closet, hiding behind the ancient can of paint?
This is a quest within a quest. May your battery drawer be bountiful. And may you actually have the correct size this time. There's nothing worse than finding three AAA batteries when you desperately need AA.
Once found, handle them with reverence. These are the lifeblood of your thermostat. They are the tiny power generators that will restore warmth, or coolness, to your domain.
The Insertion Ceremony: Polarity is Key (Mostly)
With fresh batteries in hand, look inside the compartment again. You’ll see little symbols: a plus (+) and a minus (-). These are your guides. Match the flat end of the battery to the flat end of the symbol, and the little bump to the little spring.
Most Honeywell thermostats use two batteries. Don't worry, it's pretty straightforward. Just ensure both are facing the right way. It’s like a tiny jigsaw puzzle.
Snap them into place. You might hear a satisfying click. This is the sound of success. This is the sound of comfort returning to your home.
Unpopular opinion: We all try to put batteries in backwards at least once, just to see if it works. It rarely does.
The Grand Finale: Closing and Celebrating
Once the new batteries are nestled snugly in their home, it’s time to close the compartment. If it pulled down, push it back up until it clicks. If it slid, slide it back into place. It should feel secure.

Then, watch. The screen on your Honeywell thermostat should spring back to life. Numbers will appear. The backlight might glow with renewed vigor. You might even hear a little whir.
The dreaded battery icon? Gone! Vanished into the digital ether. You’ve done it. You’ve tamed the wild thermostat. You are a hero.
Take a moment. Bask in the glory. Perhaps pour yourself a celebratory beverage. You've conquered a common household challenge with grace, humor, and minimal tools.
Who knew replacing two little batteries could feel so monumental? Now, go forth, and enjoy your perfectly regulated home. Until the next battery alert, of course. But that's a problem for future you.