How To Install Co Detector

Hey there, amazing human! Have you ever wanted a secret superpower? A way to feel just a little bit more in control, a little bit more secure, and frankly, a whole lot more relaxed in your own beautiful space? Well, buckle up, because today we’re talking about how to install a Carbon Monoxide (CO) detector, and trust me, it’s not just about safety – it’s about unlocking a new level of peace of mind that makes life, well, more fun!
You might be thinking, "A CO detector? Fun? Really?" And my answer is a resounding, "YES!" Because what’s more fun than knowing your home is a fortress of safety, allowing you to truly unwind, laugh louder, and dream bigger without a single lingering worry? It’s about creating a personal sanctuary where good vibes flourish, uninterrupted. So, let’s ditch the dread and embrace the ease. Installing a CO detector is one of the simplest, yet most profoundly impactful, ways to upgrade your home’s happiness factor.
Why Bother? A Quick, Gentle Nudge
Alright, let’s get the serious bit out of the way – gently, of course. Carbon Monoxide is often called the "silent killer" because it’s odorless, colorless, and tasteless. But here's the good news: a CO detector is your superhero sensor, always on watch, ready to alert you to its presence. It’s like having a tiny, vigilant guardian protecting your precious people and pets. Knowing you have this watchful friend in your corner? That’s the fun part – the freedom from worry, the pure, unadulterated relaxation.
Must Read
Your Superpower Installation Kit
Ready to assemble your peace-of-mind toolkit? You probably have most of this already!
- Your new CO detector: Choose one that’s either battery-operated, plug-in, or a hybrid. Many even combine with smoke detectors for double duty!
- A pencil: For making little marks, not for writing a novel.
- A drill or screwdriver: Depending on whether you're mounting it to a wall or just plugging it in.
- Batteries: If your unit requires them (and a few spares for later!).
- A step stool or ladder: For reaching those perfect spots.
- A positive attitude: Your most important tool!
Step 1: The Grand Unboxing!
Alright, tear open that box! Gaze upon your new guardian. Read the instructions – yes, really read them. Every detector is a little different, and the manufacturer’s guide is your secret map to success. Think of it as decoding ancient scrolls that hold the key to household serenity. It's usually just a few pages, easy peasy!
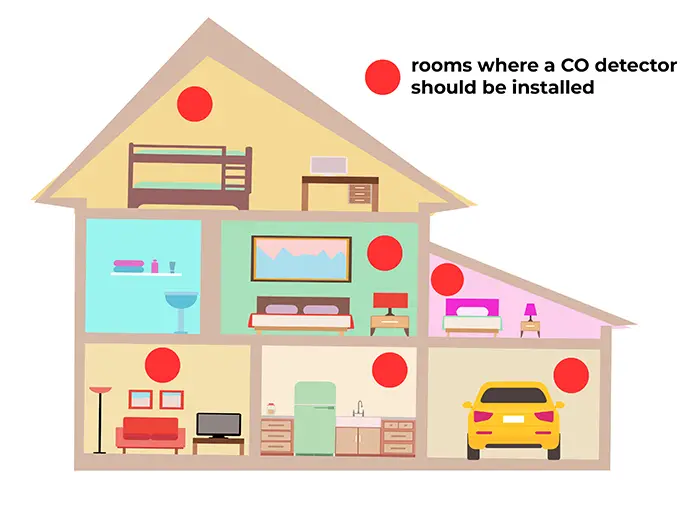
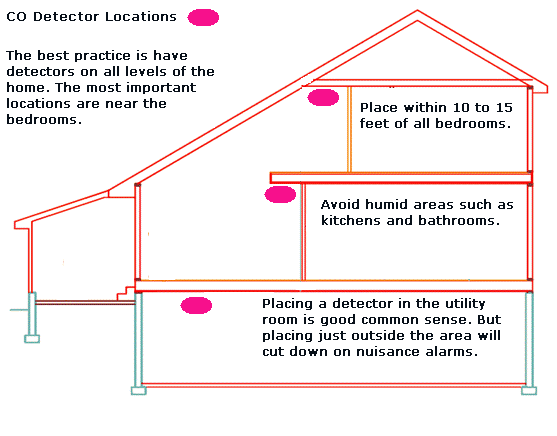
Step 2: Location, Location, Location!
This is arguably the most crucial step, so let’s make it count. CO gas spreads evenly through the air, but detectors work best when placed strategically. The golden rules are:
- Near sleeping areas: CO poses the greatest risk when you’re asleep. Place one in or near every bedroom. Imagine waking up refreshed, knowing your silent sentinel was on duty all night!
- On every level of your home: Basements, main floors, upstairs – give every zone a guardian.
- Near potential CO sources: Think furnace, water heater, gas fireplace, or an attached garage. Not directly on them, mind you, but within 10-20 feet.
- Avoid "no-fly" zones: Keep them away from direct sunlight, vents, windows, fans, and extremely humid areas like bathrooms. Also, don't place them right next to cooking appliances, as CO can be produced temporarily during cooking and trigger false alarms.
- Height matters: If it's a wall-mounted unit, place it about 5 feet from the floor, or at eye level. If it’s a plug-in unit, find an outlet high enough not to be blocked by furniture.
Take a moment to scope out the perfect spots. It’s like choosing the best vantage points for your home’s security detail!
Step 3: Power Up!
Time for the magic! If your unit takes batteries, pop those babies in. Listen for the satisfying beep or see the indicator light flash – that's your detector saying, "I'm alive! And I'm ready to protect!" If it’s a plug-in, simply find that strategically chosen outlet and plug it in. Voila! You've just brought a protector to life!

Step 4: The Test Drive (aka, "Is it working?!")
Every detector has a "Test" button. Press and hold it for a few seconds. You’ll hear a loud, piercing alarm. Don’t panic! This is a good thing! It’s confirming that your unit is fully functional and ready to do its job. It might make your cat jump, but hey, it’s all part of the fun, right? This little test is your assurance, a tiny celebration that you've just done something really smart for your household.
Step 5: The Grand Mounting (if applicable)
For wall-mounted units, use that pencil to mark where the screws will go. Gently drill pilot holes (if needed) or just use a screwdriver to secure the mounting plate. Then, simply twist or slide your detector onto the plate. Stand back and admire your handiwork! You’ve not just installed a device; you’ve installed a piece of mind, a slice of calm, and a whole lot of security.

A Quick Word on Maintenance
Your CO detector is a tireless worker, but even superheroes need a little TLC. Remember to:
- Test monthly: Just a quick press of that "Test" button.
- Change batteries annually: A good rule of thumb is to do it when you change your clocks for daylight saving time.
- Replace the unit every 5-7 years: They don’t last forever! Check the manufacturer’s date on the back.
Feel That Freedom?
See? That wasn’t scary at all! You’ve taken a proactive step to safeguard your loved ones and your sanctuary. Now, when you curl up with a good book, enjoy a family meal, or simply relax on the couch, you can do so with an added layer of peace. No more nagging "what ifs," just pure, unadulterated living. That’s what makes installing a CO detector so incredibly fun – it frees you up to enjoy life’s little moments without a shadow of doubt.
You’ve just demonstrated an incredible act of care, competence, and a touch of DIY wizardry. You are capable, you are amazing, and your home is now even safer and happier thanks to you. So go on, give yourself a pat on the back! What other simple steps can you take to make your home an even greater haven of joy? The possibilities are endless when you approach them with curiosity and confidence. Now go forth and enjoy your brilliantly protected home!