
How To Draw A Boxing Glove
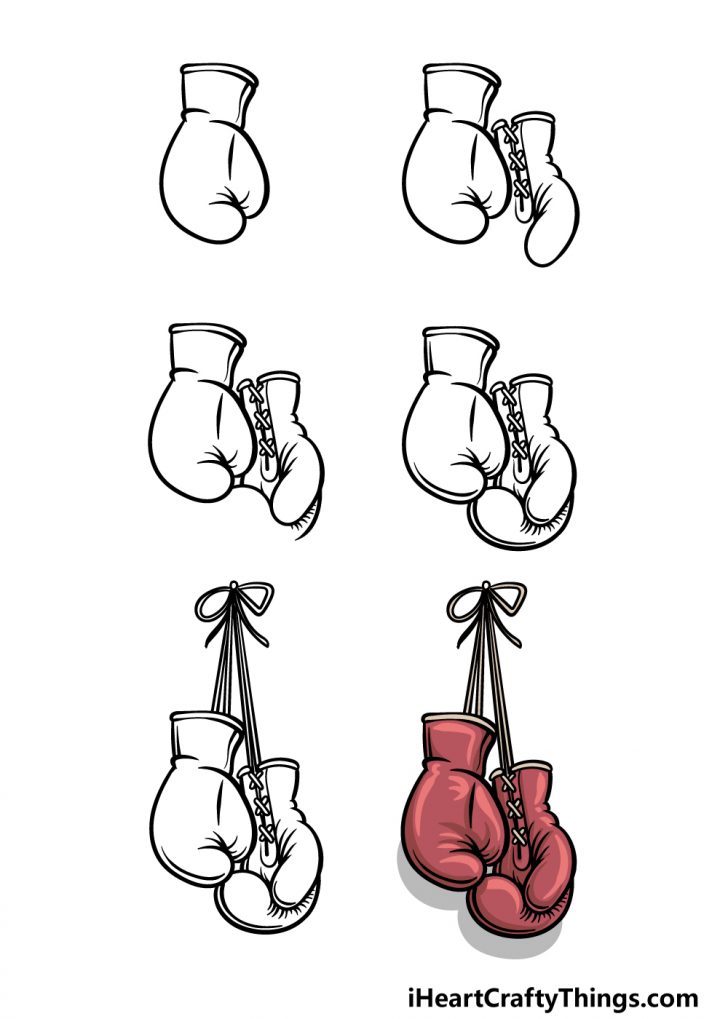
Ever wanted to unleash your inner artist and create a knockout drawing? Well, put on your creative gloves because today, we’re tackling the mighty boxing glove!
Don't worry, you don't need to be Picasso. If you can draw a potato, you can draw a boxing glove. Trust me!
Round 1: The Basic Shape
Let's start with the foundation. Imagine a slightly squashed oval, like a loaf of bread that’s been working out.
Must Read
This will be the main body of the glove, the part that delivers the punch. You know, the business end.
Now, add a smaller, slightly flatter oval on top of the first one. This is where the fingers will eventually go. Think of it like a hat for your loaf of bread.
Pro Tip
Don't stress about perfection! Boxing gloves aren't perfectly symmetrical anyway. Embrace the wonk!
We are going to adjust the shape many times during the drawing. Remember, drawing is about building up the final image.
Round 2: The Thumb
Every boxing glove needs a thumb, right? Let's add a small, sausage-shaped oval sticking out from the side of the main body.
Angle it upwards slightly, as if it's eagerly waiting to give a thumbs-up to a victorious fighter.
The thumb is important, so we can emphasize by putting the thumb shape in there.
Easy Peasy
If you’re feeling fancy, curve the sausage slightly. Give it some personality!
But, remember, keep it simple. We are not drawing the Mona Lisa here.
Round 3: The Wrist Wrap
Now for the wrist wrap, the part that keeps the glove securely on the fighter’s hand. Imagine a wide bracelet around the bottom of the main body.

Draw two curved lines parallel to each other, wrapping around the base of the oval. Make it look snug, but not too tight!
This is like the belt holding the whole operation together.
Details Matter
Add a few vertical lines within the wrist wrap to suggest folds and wrinkles. Remember, details make all the difference!
Even if those details are imaginary. No one will know!
Round 4: Adding Definition
Okay, time to give our glove some depth! Using your pencil, lightly sketch in some curves and lines to define the shape further.
Around the finger section, add some rounded bumps to suggest the individual knuckles. Think of little hills forming on your bread-hat.
These bumps doesn't have to be accurate. We are not drawing an anatomy chart.
Shadow Play
Consider where your light source is coming from. Darken the areas opposite the light to create shadows and give the glove a three-dimensional feel.
If you don't know where the light source is, just pick a direction. No one is judging!
Round 5: The Laces (Or Velcro!)
Now for the closure! Most modern gloves use Velcro, but we can draw laces for a classic look.

Draw a series of small "X" shapes down the back of the wrist wrap. These are the laces! You can even add little loops at the top.
If you prefer Velcro, simply draw two parallel lines with some small squares to represent the fuzzy part and the hook part.
Customize It
This is your chance to add some flair! Get creative with the laces or Velcro design. Make it uniquely yours.
Remember, this is your boxing glove.
Round 6: Refining and Detailing
Take a step back and look at your drawing. What needs tweaking? What needs more definition?
Erase any unnecessary lines and refine the overall shape. Darken the lines you want to emphasize and add more shadows for depth.
Now is the time to make the drawing look like how you envision it.
Texture Time
Add some texture! Use short, light strokes to create a leather-like appearance. You can even add some scuff marks or wrinkles for a more realistic look.
Or don't. Your choice! This is art, after all.
Round 7: Color (Optional)
If you're feeling adventurous, grab some colored pencils or markers and add some color! Red, blue, black, or even neon green – the choice is yours!

Consider adding highlights to the shiny areas of the glove and deeper shadows to the recessed areas.
You can always just use black and white. Classic and timeless.
Experiment!
Don't be afraid to experiment with different colors and shading techniques. Have fun with it!
This is the part where you get to be a little crazy.
Round 8: The Background (Also Optional)
Want to set the scene? Add a background! Draw a boxing ring, a crowd of cheering fans, or even just a simple gradient.
A simple background can make your boxing glove drawing pops!
Or don't. A white background is perfectly acceptable.
Keep It Simple
If you do add a background, keep it simple and avoid distracting from the main subject: the boxing glove!
We want the star of the show to be the glove, not the audience.
Round 9: The Signature Move!
Don't forget to sign your masterpiece! Add your signature in the corner to claim your creation.

Now you are ready to frame and hang this wonderful piece of art.
Congratulation!
Share It!
Share your boxing glove drawing with the world! Post it on social media, show it to your friends, or even frame it and hang it on your wall!
Get the recognition you deserve!
Final Round: You Did It!
Congratulations! You've successfully drawn a boxing glove! See? I told you it was easier than you thought.
Now go forth and create more amazing art! The world needs your talent.
And remember, practice makes perfect (or at least, pretty darn good!).
Key Takeaways
Remember the basic shapes, the importance of adding depth and detail, and most importantly, to have fun! Drawing should be an enjoyable experience.
So grab your pencil and unleash your inner artist. The possibilities are endless!
Keep drawing!