How To Copy And Paste Frames In Clip Studio Paint

Ever felt like you're drawing the same pose over and over again in your comic, animation, or even just when creating a dynamic illustration in Clip Studio Paint? Do you wish there was a magical button to just duplicate a section and tweak it? Well, good news! While it's not exactly magic, copying and pasting frames (or sections within frames) in Clip Studio Paint is a super useful trick that can save you tons of time and effort. Think of it as digital cloning for your artwork – pretty cool, right?
So, what exactly is this whole copying and pasting frames thing about? Essentially, it allows you to duplicate sections of your timeline or canvas, whether it's an entire frame in animation or a specific selection of your artwork. The core purpose is to speed up your workflow and maintain consistency. Instead of redrawing the same element multiple times, you can simply copy, paste, and make minor adjustments. This is particularly helpful for animation sequences, where you might have several frames with very similar poses or backgrounds.
But the benefits don't stop there! Copying and pasting also ensures consistency in your artwork. If you've meticulously crafted a particular design element, you can easily replicate it across your project, guaranteeing a unified look and feel. Think of repeating patterns, character details that need to stay consistent, or even just a specific color palette you want to reuse throughout. You avoid subtle variations that might creep in if you redraw everything from scratch.
Must Read
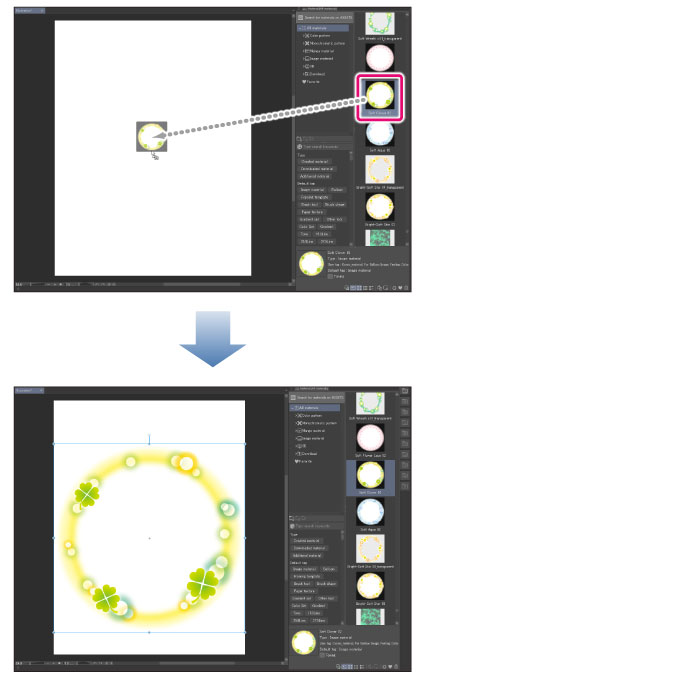
How can you use this in the real world? Imagine a student creating a short animated explainer video for a science project. Instead of redrawing the same molecule repeatedly, they can draw it once, copy and paste the frame, and then slightly rotate or reposition the molecule in each subsequent frame to show movement. In daily life, maybe you're designing a greeting card with a repeating floral border. Copying and pasting sections of the floral design makes creating a balanced and professional-looking border a breeze.

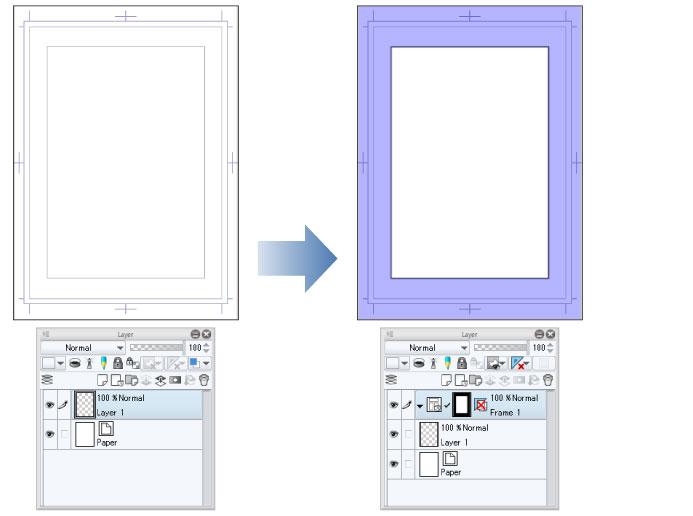
So, how do you get started exploring this handy feature? The specifics depend on whether you're working with the timeline (for animation) or just a static illustration. Generally, you'll use the selection tools (like the lasso or rectangle select) to define the area you want to copy. Then, use the Edit menu or shortcut keys (like Ctrl+C or Cmd+C for copy, and Ctrl+V or Cmd+V for paste) to copy and paste. When working with animation frames, be sure to explore the timeline options for duplicating frames directly – often a more efficient way to go.
A practical tip: experiment with pasting into different layers. This gives you greater control over positioning and adjustments. Also, don't be afraid to transform the pasted content. Use the scaling, rotation, and skew tools to create variations on the original element. Explore Clip Studio Paint's documentation and online tutorials for detailed instructions specific to your version and workflow. The more you experiment, the more comfortable you'll become with this powerful and time-saving feature. So, go forth and clone...your artwork, that is!