How To Change Battery In Philips Sonicare Toothbrush

So, your trusty Philips Sonicare, your pearly white protector, has started sputtering like a grumpy old car? Fear not, intrepid teeth-cleaning warrior! It probably just needs a little battery pick-me-up. Think of it as giving your toothbrush a caffeine shot!
Tools of the Trade (aka Things You'll Need)
Before we dive in, let's gather our supplies. This isn't brain surgery, but a little preparation goes a long way! Imagine trying to bake a cake without flour – chaos!
Essential Gear
You will absolutely need the following items. Not having them is like trying to paint a masterpiece with a toothbrush (ironic, huh?).
Must Read
- A brand new rechargeable battery of the correct type. Check your Sonicare model number!
- A small Phillips head screwdriver. We're talking small, like the size they use on eyeglasses.
- Some patience. This isn't a race; it's a spa day for your toothbrush!
Optional (But Handy) Extras
These aren't strictly necessary, but they'll make your life easier. Think of them as training wheels for toothbrush battery replacement!
- A small container to keep screws safe. Those little guys love to disappear!
- A soft cloth to wipe down your toothbrush. A little pampering never hurt anyone.
- A magnifying glass. If you're like me and need help reading the back of a shampoo bottle.
Operation Battery Swap: Let's Get Started!
Alright, time to get our hands dirty! Don't worry, it's not actually dirty. Unless you haven't cleaned your toothbrush in a while… in that case, maybe give it a rinse first!
Step 1: The Disassembly Begins
Locate the screw(s) at the bottom of your Sonicare handle. They're usually hiding under a cap or a rubber seal. Finding them is like a mini treasure hunt!
Using your tiny screwdriver, carefully remove the screw(s). This is where that small container comes in handy! We don't want any runaway screws staging a disappearing act.
Once the screw(s) are out, gently wiggle and pull the bottom cap off. It might be a little snug, but don't force it! We're going for finesse, not brute strength.
Step 2: Battery Extraction
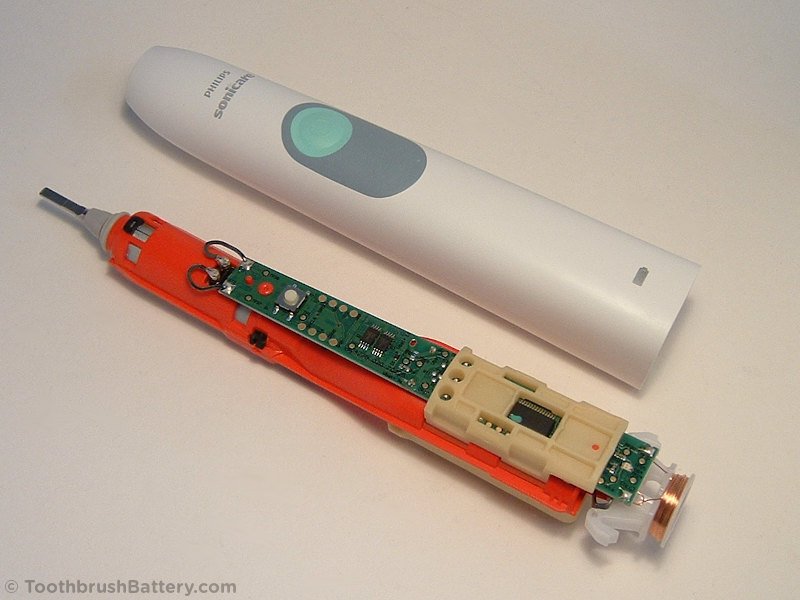
Now you should be able to see the old battery. This is the culprit behind your toothbrush's sluggish performance. Time to give it the boot!

Sometimes the battery is held in place by a clip or some adhesive. If so, gently pry it loose with your screwdriver or a small plastic tool. Be careful not to damage anything!
Disconnect the battery from the circuit board. There will likely be wires connected to the battery terminals. Pay close attention to how they're connected! Take a picture if you need to.
Gently pull the wires off the battery terminals. They might be a little stubborn, but don't yank them! We're aiming for a clean break, not a wire massacre.
Step 3: Battery Installation
Now for the fun part: installing the new battery! This is where we bring your Sonicare back to life. Prepare for a toothbrush resurrection!
Connect the wires to the new battery terminals. Make sure you connect them in the same way they were connected to the old battery! This is crucial.
Place the new battery into the handle. Make sure it's securely in place. We don't want it rattling around like a loose marble.
Step 4: Reassembly Time!
Now we put everything back together. This is like solving a puzzle, but with fewer pieces!
Carefully slide the bottom cap back onto the handle. Make sure it's aligned properly.
Replace the screw(s) you removed earlier. Tighten them gently, but don't overtighten! We don't want to strip the threads.
Give your Sonicare a quick wipe down with that soft cloth. It deserves a little spa treatment after all that hard work.
Testing, Testing, 1, 2, 3...
Time to see if our efforts were successful! Plug your Sonicare into its charger and let it charge for a few hours. This is like giving it a good night's sleep.
After charging, turn it on and see if it vibrates with its former glory. If it does, congratulations! You've successfully replaced your Sonicare battery. Give yourself a pat on the back (and maybe brush your teeth to celebrate!).

Troubleshooting: Uh Oh, Something's Not Right!
Sometimes things don't go according to plan. Don't panic! Even the best mechanics have their off days.
It's Not Turning On!
If your Sonicare isn't turning on after charging, double-check your connections. Make sure the wires are securely attached to the battery terminals.
Also, make sure you're using the correct type of battery. Using the wrong battery is like trying to fuel a car with orange juice – it's just not going to work.
It's Making Weird Noises!
If your Sonicare is making strange noises, it could be that something is loose inside. Open it up again and make sure everything is securely in place.
It could also be a sign that the motor is failing. In that case, it might be time for a new toothbrush. Think of it as giving your old friend a well-deserved retirement.
Screws Are Stripped!
If you stripped the screws, you're not alone. This happens to the best of us.
Try using a rubber band or a piece of steel wool between the screwdriver and the screw head for better grip. If that doesn't work, you might need to use a screw extractor.
Disposal: Saying Goodbye to the Old Battery
Now that you've replaced the battery, you need to dispose of the old one properly. Don't just toss it in the trash!
Rechargeable batteries contain harmful chemicals that can pollute the environment. Take it to a battery recycling center or a household hazardous waste collection site.
Doing your part to recycle is like giving the planet a big hug. It feels good!
Congratulations! You're a Toothbrush Battery Replacement Pro!
You've successfully replaced your Philips Sonicare battery! You're now a certified toothbrush battery replacement expert! Feel free to add that to your resume.
Go forth and conquer plaque! Your pearly whites will thank you for it. And remember, a happy toothbrush means a happy smile!
"The key to a successful battery replacement is patience, preparation, and a healthy dose of enthusiasm!" - Your Friendly Neighborhood Toothbrush Repair Guru
Now, if you'll excuse me, I need to go change the battery in my electric nose hair trimmer… wish me luck!