How Do You Change The Battery In A Nest Thermostat
How Do You Change The Battery In A Nest Thermostat?
Ah, the Nest Thermostat. It's sleek, it's smart, it learns your habits. It silently judges your energy consumption from its perch on the wall.
But then, one day, it throws you a curveball. A tiny, almost imperceptible message pops up, hinting at its dwindling energy reserves. It needs new batteries.
Panic might set in. How do you even change the battery in something so high-tech? It looks like it belongs on a spaceship, not your living room wall.
Must Read
Here's my big, bold, possibly controversial take: changing the battery in a Nest Thermostat is not a secret mission to the moon. It's actually… surprisingly simple. Don't tell anyone I said that. We need to maintain the mystique, of course.
The Initial Stare-Down
First, you approach the Nest. It sits there, all knowing, perhaps silently judging your lack of preparation. It looks so smooth, so seamless.
Where are the screws? The hidden compartments? The tiny lever only visible under a full moon? You might even ask it politely, "Hey Nest, what's up?" It won't answer.
It just waits for you to figure it out. Some might suggest Googling. Others, like me, prefer the direct, slightly confused approach. It builds character.
Remember that time you tried to open a child-proof bottle? This is similar, but for adults who just want consistent heating. Deep breaths. It's not a puzzle from a spy movie, even though it feels like one.
The Grand Dislodgement
Here's the trick, the big reveal: the main display unit of your Nest Learning Thermostat? It just… pulls off. Yes, I know. It sounds too easy.
Almost suspiciously easy. No twisting, no unscrewing, no secret handshakes. It’s like discovering that the fancy cake you bought just needed a simple twist to open, not a full engineering degree.
Gently but firmly, grab the circular display. Imagine you're taking a fancy lid off a very expensive jar. Pull it straight towards you. Don't wrench it sideways; we’re aiming for finesse, not brute force.
You'll feel a satisfying little click, or maybe a soft pop. That's the sound of victory, my friend.
Voila! The display unit is now in your hand. Feel powerful? You should.
This is often where people get stuck. The fear of breaking something so elegant. But trust me, it’s designed for this. Think of it as the Nest’s secret handshake. A gentle tug reveals its inner workings.
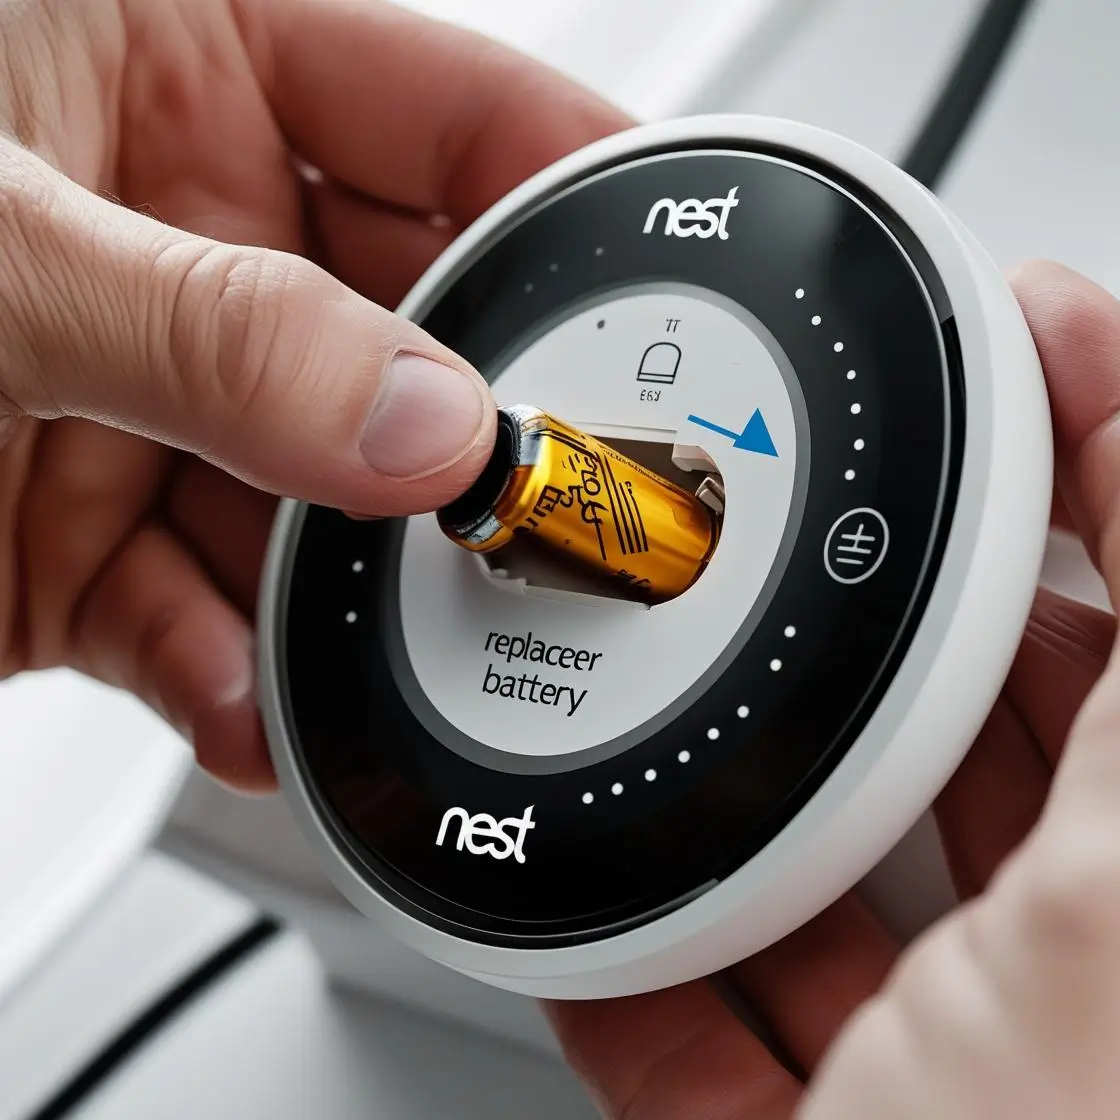
The Battery Reveal
Flip the detached display over. What do you see? Tiny little batteries! Usually two of them. Like secret candy hiding in a sophisticated wrapper.
They're typically standard AAA alkaline batteries. The unsung heroes of countless remote controls and flashlights. No exotic ion-flux capacitors here.
Just good old everyday power cells. Isn't that a relief? Sometimes they might be slightly embedded, but don't fret. A gentle nudge is all they need.
Notice their orientation. The plus and minus signs are important. Take a mental snapshot, or an actual photo if you're feeling extra cautious.
This is the moment of truth. The heart of the matter. The actual power source of your smart home guru.
The Hunt for Replacements
Now, for the true adventure: finding replacement batteries. This is where real life kicks in. Do you have a junk drawer overflowing with mysterious batteries of unknown charge?
Will you raid the remote control for the TV you rarely watch? The flashlight you haven't used since the last power outage? Or will you bravely venture to the store, accepting your fate as a battery-purchasing adult?
Pro tip: Always have a pack of AAA batteries on hand. It's like having spare socks. Essential, yet often overlooked. The good news? The Nest is pretty forgiving.
It doesn't demand proprietary, space-age power cells. Just grab some fresh, reliable alkaline AAA batteries. The fresher, the better for that long-lasting warmth.
Avoid rechargeable ones here, usually. The Nest prefers its energy delivered consistently, like a good butler. So, your quest for fresh power is usually a quick win.

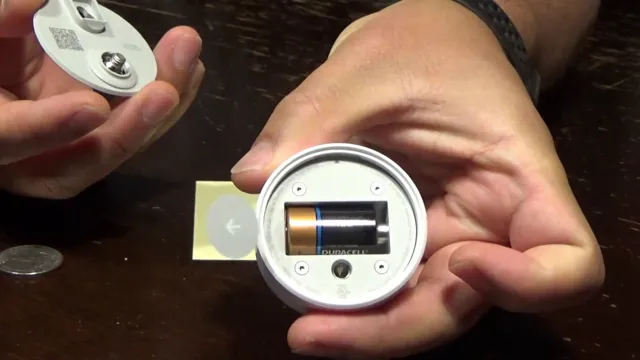
The Sacred Swap
Out with the old, in with the new! Carefully pop out the depleted batteries. A small screwdriver might help if they're snug, but usually, a fingernail or a gentle tap will suffice.
Dispose of the old ones responsibly, of course. We're not savages, we're smart thermostat owners. Now, take your fresh, shiny AAA batteries. Insert them, paying close attention to the polarity.
Plus to plus, minus to minus. It's like a tiny electrical puzzle, but one you've probably solved a thousand times. A satisfying little click as they snap into place. That's the sound of renewed life for your Nest.
Feel the power surge (metaphorically, of course). You've just performed minor surgery on your home's brain! It's a small victory, but a victory nonetheless.
The Re-attachment Ritual
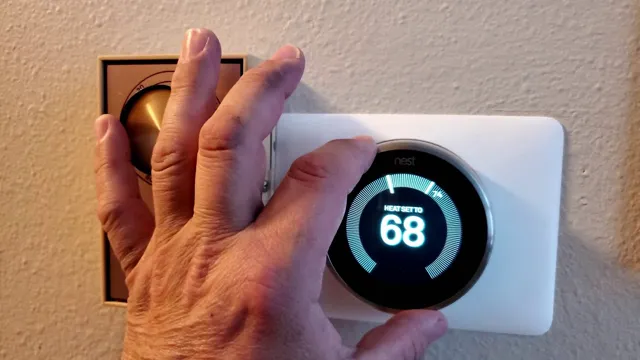
Time to put everything back together. It's usually easier than taking it apart, isn't it? Hold the display unit with the newly installed batteries. Align it with the base unit still on the wall.
There's usually a small connector, like a dock. Just make sure it lines up. Gently push the display back onto the base. You'll feel it seat itself. Another soft click. The reunion is complete. The Nest is whole again.
It should feel sturdy, not wobbly. Give it a gentle wiggle to ensure it's securely attached. Congratulations, you’ve basically reassembled a miniature piece of modern art. A functional, temperature-controlling piece of art.

The Grand Reawakening
Now, watch. The Nest should wake up, often with its familiar welcoming chime or logo. It might cycle through a quick startup routine. Don't panic. It's just stretching its digital muscles.
Check the display. Is it back to showing the temperature? Is it connected to your Wi-Fi? It should remember all your settings. Your schedules, your preferences, your ideal cozy temperature.
If it asks for Wi-Fi again, just follow the on-screen prompts. It's rare, but sometimes a full power cycle makes it a little forgetful. But most often, it just springs back to life, ready to keep your home perfectly comfortable.
The Unpopular Opinion Confirmed
And there you have it. The grand, epic, totally not-at-all-daunting task of changing your Nest Thermostat batteries. See? It wasn't a Herculean feat.
No specialized tools, no secret incantations. Just a gentle pull, a quick swap, and a satisfying push. My unpopular opinion stands: we make these things harder in our heads than they actually are.
The Nest is designed to be smart, yes, but also user-friendly. Even its battery changes are surprisingly considerate. So next time your Nest whispers its low-power secret, don't dread it.
Embrace it as a moment of simple DIY triumph. You’re now a certified Nest Battery Changer Extraordinaire. Go forth and enjoy your consistently comfortable home!