Hardwired Smoke Detector Keeps Chirping
There it is again. That insidious, high-pitched "chirp" that cuts through the quiet of your home, seemingly at random. It's the kind of sound that slowly, surely, grates on your nerves, turning your peaceful sanctuary into a game of "locate the annoyance." And the worst part? It's your hardwired smoke detector, the one you thought was immune to battery woes. "But it's hardwired!" you exclaim, shaking your fist at the ceiling. Ah, my friend, that's where the plot thickens, and where a little insider knowledge turns frustration into a simple, satisfying fix.
You see, even your robust, grid-connected smoke detector isn't entirely self-sufficient. While it draws its primary power from your home's electrical system, it also houses a crucial component: a backup battery. This little powerhouse is there for one vital reason – to keep you safe during a power outage. Think of it as its own personal emergency generator. And like any good backup, it eventually needs to be replaced.
That persistent chirp? It's not a cry for help because it's broken; it's a polite (albeit irritating) notification that its backup battery is running low. It's the device doing its job, letting you know it can't guarantee your safety during a blackout without a fresh boost. So, let's silence that siren of discontent and restore peace to your abode.
Must Read
Finding the Chirper: A Domestic Detective Story
First things first, you need to identify the culprit. If you have multiple smoke detectors, it can feel like a game of "hot or cold." Go room to room, listening carefully. Sometimes, pressing the test button on each detector can help you pinpoint the one with the weak battery, as its chirp might sound weaker or it might not test properly. Keep your ears peeled – that sound often reverberates, making it tricky!
The Fix: A Step-by-Step Guide to Silence
Once you've identified the chirping offender, it's time for action. Don't worry, this isn't rocket science, and you won't need a toolbox full of obscure gadgets. Just a few simple steps stand between you and blessed quiet.
Step 1: Safety First! Flip the Breaker. This is crucial. Before touching any electrical device, locate your home's circuit breaker box and turn off the power to the circuit that powers your smoke detectors. Better safe than sorry when dealing with household electricity.
Step 2: The Twist and Release. Most hardwired smoke detectors are mounted to a ceiling or wall plate with a simple twist-and-lock mechanism. Gently twist the detector counter-clockwise (about an eighth of a turn), and it should detach from its base. You'll see a small wire harness connecting it to your home's wiring – typically with a quick-connect plug. Leave this connected if you can work comfortably, or carefully unplug it if needed.
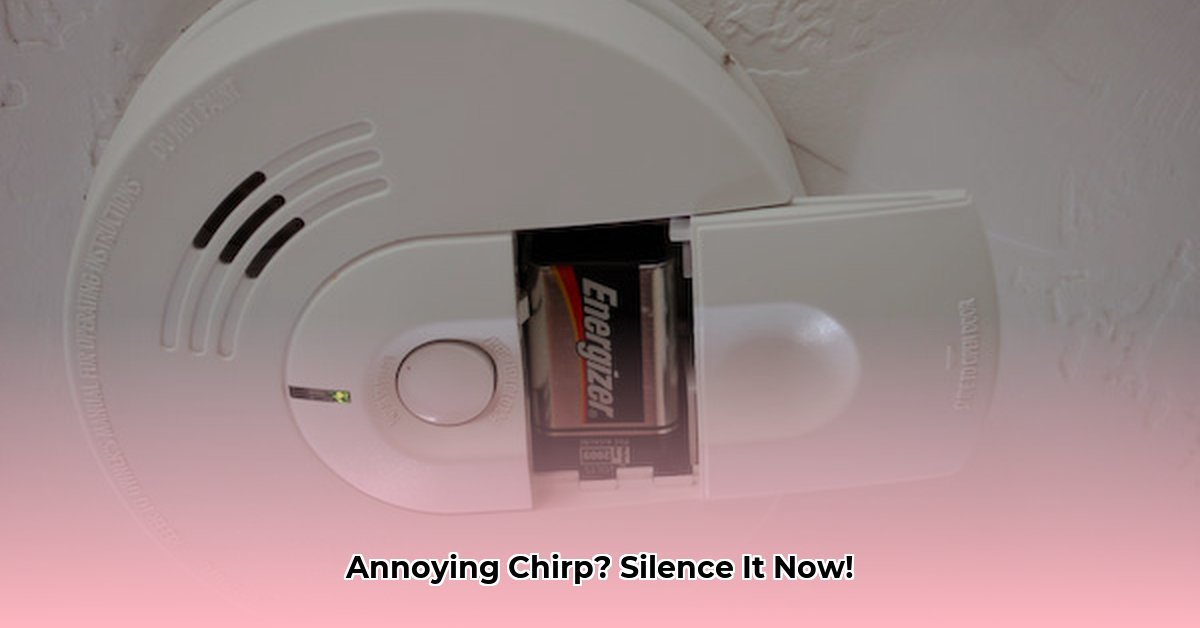
Step 3: Replace the Battery. Flip over the detached unit. You'll find a battery compartment, often housing a 9-volt battery. However, some newer models might use AA or AAA batteries. Take out the old, depleted battery and replace it with a brand-new one. Always use fresh batteries; don't reuse old ones from other devices.
Step 4: A Quick Clean-Up. While it's down, give the detector a gentle clean. Dust, cobwebs, and even tiny insects can interfere with the sensor. Use a soft brush attachment on your vacuum cleaner or a can of compressed air to clear out any debris from the vents and sensor chamber. It's a small step that can prolong its life and accuracy.
Step 5: Reattach and Restore Power. Carefully reattach the detector to its base, twisting clockwise until it locks securely. Go back to your circuit breaker and flip the power back on. Wait a moment, and you should hear a single, reassuring chirp as the unit powers up and tests itself.

Step 6: The All-Important Test. Once power is restored, press and hold the test button on the front of the detector for a few seconds. It should emit a loud, piercing alarm – a clear sign it's working correctly. This is also a good habit to practice monthly to ensure continuous functionality.
Still Chirping? The Reset Button (Literally!)
Sometimes, even after a battery change, a stubborn hardwired detector might continue to chirp. This can happen if residual charge remains in its capacitors, confusing the system. The trick? Once you've replaced the battery and reattached the unit, flip the breaker back on, then press and hold the test button for a good 15-20 seconds. This long press can help drain any leftover charge and fully reset the unit, usually silencing it for good.
The 10-Year Rule: When to Replace the Whole Shebang
Here's a fun fact that's also a crucial safety tip: smoke detectors don't last forever. Regardless of whether they're battery-powered or hardwired, all smoke detectors have a lifespan, typically 10 years from the date of manufacture. You can usually find this date printed on the back or inside the detector. After a decade, the sensors can become less effective, making them unreliable. Think of it like a car tire – even if it looks okay, the rubber degrades over time. When your detector hits the big 1-0, it's time to replace the entire unit. It's a small investment for continuous peace of mind.
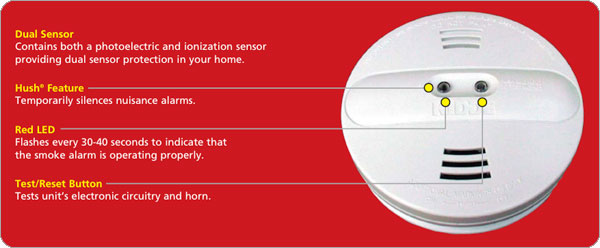
There are two main types of smoke detector sensors: ionization (better at detecting fast-flaming fires) and photoelectric (better at detecting slow, smoldering fires). Many modern homes now use dual-sensor or combination smoke/CO detectors for comprehensive protection.
Connecting the Dots: Beyond the Chirp
Dealing with that chirping smoke detector, though initially annoying, is a small reminder of the larger picture of home maintenance. It's about being proactive, understanding the subtle signals our homes give us, and taking the small, necessary steps to ensure our environment is safe and comfortable. Just like checking the oil in your car or watering your houseplants, tending to your smoke detectors is a simple act of care that contributes significantly to your well-being. So, next time you hear that chirp, don't just get annoyed; get empowered. You've got this!