Replacing Battery In Firex Smoke Detector
Okay, so listen, we've all been there, right? You're just chilling, maybe binging your favorite show, or finally, finally getting that baby to sleep, and then... CHIRP. Just one little chirp. But it’s enough to send a shiver down your spine, isn't it? Because you know. You just know what's coming next. It's the sound of impending doom, or at least, impending annoyance: your smoke detector telling you it's hungry. Or, more accurately, its battery is.
And let's be real, it's never a convenient time. Is it ever? It's always 2 AM, or when you have guests over, or when you're literally just about to walk out the door. The little beep turns into a regular, rhythmic reminder of your neglect. It’s like your house is passive-aggressively shaming you. "Hey! Remember me? The thing that could save your life? My battery is dying!"
The Great Chirp Hunt: Identifying the Culprit
First things first, you've got to find the offender. And if you're like me, you probably have a few of these trusty Firex smoke detectors scattered around. They're good, solid units, but when they start chirping, they all sound exactly the same, don't they? It's like a game of audio "Hot and Cold." You wander around, tilting your head, trying to pinpoint which one is making that tiny, infuriating sound. You might even grab a broom handle and start poking them, hoping to silence it by sheer will. (Spoiler: It doesn't work.)
Must Read
Usually, after a few minutes of what I affectionately call "smoke detector roulette," you'll narrow it down. You'll stand under it, look up, and there it is: your old friend, the Firex, blinking its little light, practically winking at you with a mischievous grin. "Found me, did ya?"
Gather Your Arsenal (Which Is Mostly Just a Battery)
Alright, mission accepted. Your house will know peace again. What do you need? Honestly, probably just two things. A step stool or a sturdy chair (unless you're, like, seven feet tall, in which case, lucky you!). And, of course, a fresh 9-volt battery. Don't even think about trying to use an old one from the junk drawer. This is no time for shortcuts, my friend. Treat your life-saver well!
Some people recommend gloves. Me? I'm usually just winging it, but hey, safety first if you're a bit clumsy. Or if your ceilings are particularly grimy. No judgment here!
Operation: Battery Swap!
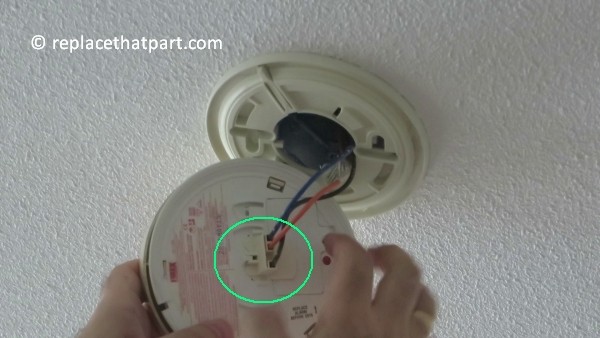
Okay, you've got your tools. Now for the actual surgery. Most Firex models are pretty straightforward. You'll usually find little arrows or an instruction on the side that says "twist to remove" or "slide off." Give it a gentle but firm twist counter-clockwise (lefty-loosey, remember?) and it should pop right off its base. Don't be shy! Sometimes they can be a little sticky, especially if they haven't been moved in a while. Just don't rip it off the ceiling entirely, that's not the goal.
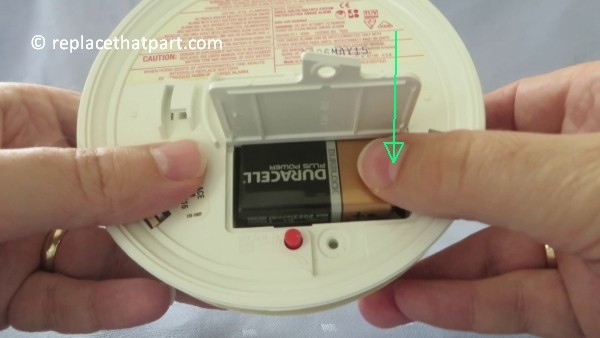
Once it's in your hand, flip it over. You'll see the battery compartment, often with a little door or just the battery itself staring back at you. It's almost always a 9-volt battery, that chunky rectangular one with the two little snaps on top. Give the old, expired battery a good tug or pry it out carefully. It might be a little stiff if it's been in there for ages. A gentle push on the side often helps dislodge it.
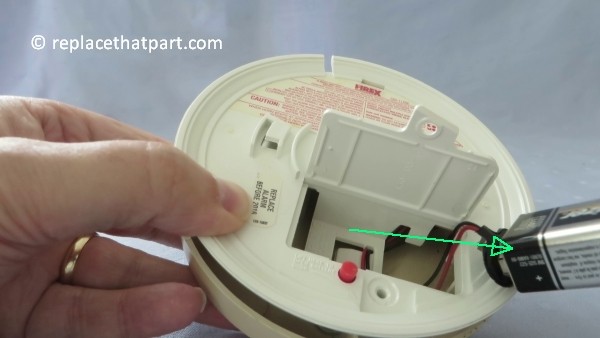
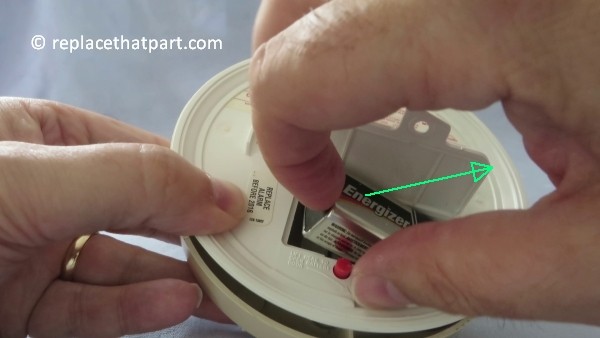
Now, here's the satisfying part. Grab that brand new, fresh-out-of-the-package 9-volt battery. Line up the positive and negative terminals (the round and hexagonal snaps) and simply push it into place. It should click in quite nicely. You might even hear a little beep or see the light flash right away – that's a good sign! It's saying, "Ah, sustenance! Thank you, kind human!"
The Moment of Truth: The Test Button
Before you reattach it, do yourself a favor. See that little button labeled "TEST"? Push it. And hold it for a second or two. Brace yourself, because it's going to be loud. Like, really loud. Your ears might ring for a second. This is important! It confirms the new battery is working and the detector is still operational. A loud, obnoxious squeal is actually a sign of success here. Embrace the noise, for it means safety!

Once you've confirmed it's working, simply line up the detector with its base on the ceiling. There are usually little notches or grooves. Push it up gently and twist it clockwise (righty-tighty!) until it clicks securely into place. Give it a gentle tug to make sure it's firmly attached. You don't want it falling on your head in the middle of the night, right?
Ahhh, Sweet Silence
And there you have it. The glorious, beautiful, deafening silence. Your house is once again a peaceful sanctuary, free from the tyrannical chirps. You've conquered the beast, saved your sanity, and ensured your home is still protected. Take a moment. Bask in the glory. Maybe even treat yourself to that extra cookie. You earned it!
It's such a small task, really, but it makes a huge difference. And now you know how easy it is! So, next time that dreaded chirp begins, you won't dread it quite so much. You'll just calmly grab your stool and a fresh 9-volt, knowing you're about to be a home maintenance hero. Go forth and enjoy your quiet, safe home!