Nest Doorbell Wired 2nd Gen Installation
Alright, let's chat about something that sounds a little bit techy, a little bit daunting, but is actually super empowering to tackle: installing the Nest Doorbell Wired 2nd Gen. You might be thinking, "Me? Install something electrical? No way, Jose!" But trust me, friend, if you can follow a recipe or put together a flat-pack shelf (mostly correctly!), you've got this.
Why Even Bother with a Smart Doorbell?
Imagine this: You’re snuggled up on the couch, binge-watching your favorite show, and a package delivery alert pops up on your phone. Instead of sprinting to the door to beat the notorious "porch pirates," you can simply open an app and see your shiny new gadget being placed safely on your stoop. That's peace of mind, folks, and it’s priceless!
Or maybe you’re waiting for a friend to arrive for your weekly board game night. No more awkwardly peeking through the blinds or wondering if they’re just late. Your Nest Doorbell will politely let you know they're there, even if they're still fumbling for their keys. It's like having a super polite, ever-vigilant doorman, but without the fancy uniform. Plus, you get to feel like a total tech wizard when you show it off!
Must Read
"But... Electricity?" Don't Fret!
The word "wired" might make your eyes widen a little, conjuring images of sparks and complicated diagrams. But let's pump the brakes on that anxiety train! Think of it less like rewiring your entire house and more like a very satisfying game of "connect the dots" or putting together a fancy LEGO set. The Nest Doorbell Wired 2nd Gen is designed to work with your existing doorbell wiring. So, you're not starting from scratch; you're upgrading!
The main "scary" step is usually turning off the power. And honestly? It's just like giving your house a little nap for a bit. Find your breaker box, flip the switch for your doorbell (or the main one if you're unsure – better safe than sorry!), and suddenly, the once-intimidating wires are just... well, wires. Harmless, sleepy wires.

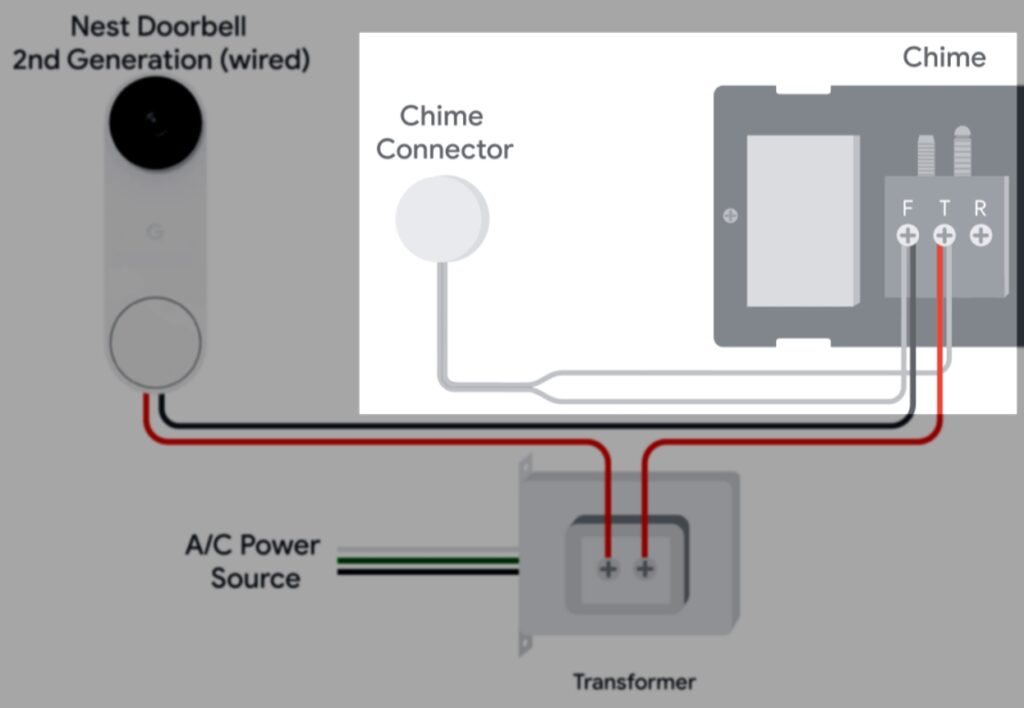
The Magical Chime Connector (It's Not a Dragon!)
One key player in this installation adventure is the chime connector. Sounds like something out of a fantasy novel, right? In reality, it’s a small, clever device that makes your existing indoor chime play nice with your new smart doorbell. Think of it as a friendly translator between old technology and new. You pop it into your existing chime box (the thing that goes "ding-dong!") and connect a couple of wires. It’s usually the part that makes people pause, but Nest's instructions are surprisingly clear, almost like a step-by-step cartoon guide.
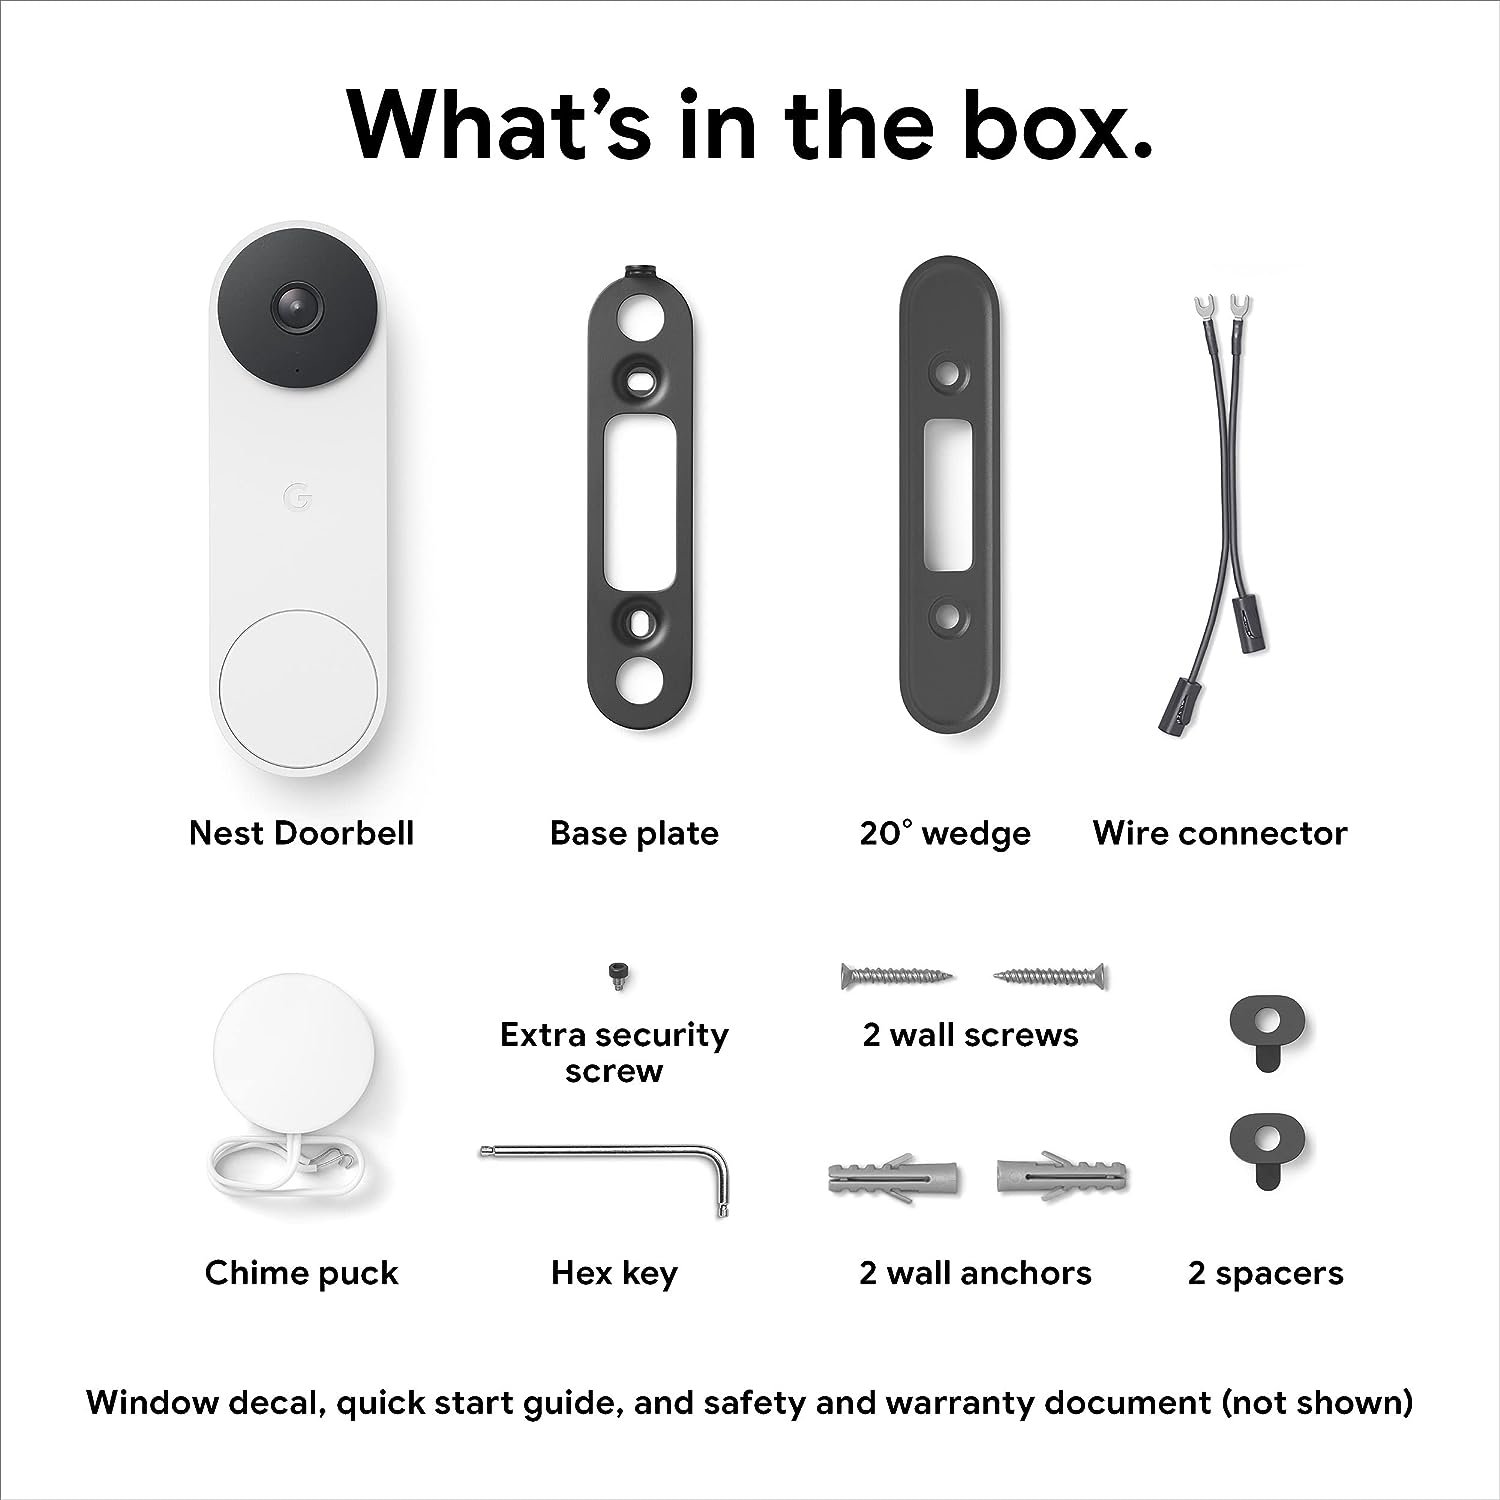
The Tools You'll Need (Spoiler: Not Many!)
You're not going to need a full engineer's toolkit. Most likely, you'll just need a screwdriver (often both Phillips and flathead), perhaps a drill if you need to make new mounting holes, and maybe some pliers. Nest even provides a handy little plate to help you angle your doorbell perfectly. It's truly a "most-of-what-you-need-is-in-the-box" kind of deal, which is always a pleasant surprise in our "assembly required" world.
The Big Reveal: Installation Day!
-
Power Down: As mentioned, flip that breaker. Safety first, always! Imagine you're powering down the mothership for maintenance.
-
Old Doorbell Out: Gently unscrew and remove your old doorbell. It's time for its well-deserved retirement. Disconnect its wires – they're usually just two.
-
Chime Connector In: Go to your indoor chime box (that noisy box on your wall). Open it up, attach the little chime connector, and close it back up. This is where the magic happens!
Google Nest Doorbell (Wired, 2nd Gen) - Video Doorbell Security Camera -
New Doorbell Mount: Attach the base plate for your Nest Doorbell. Connect those two wires from your house to the back of the new doorbell. It's color-coded and almost impossible to mess up, like matching socks.
-
Click It In: Snap your new Nest Doorbell onto its base. It should feel secure and satisfying, like closing a perfectly fitting lid.
How To Install Nest Doorbell Wired 2nd Generation — Home Essentials -
Power Up & App Setup: Flip the breaker back on! Then, the fun part: open the Google Home app, and it'll guide you through connecting your new doorbell to your Wi-Fi and setting up all its cool features. Voila!
The Payoff: Convenience and Bragging Rights
Once you're done, you'll have more than just a smart doorbell. You'll have that incredible feeling of "I did that myself!" You’ll be monitoring packages, seeing who’s at the door from anywhere, and chatting with visitors even when you're not home. Plus, you’ll have a fantastic story about how you conquered your fear of wires and emerged victorious.
So, don't let the "wired" part scare you off. The Nest Doorbell Wired 2nd Gen installation is a completely achievable DIY project that rewards you with peace of mind and some serious tech cred. Give it a go – you might just surprise yourself!