Kwikset Door Lever Installation Instructions

Ever found yourself looking at a door handle and thinking, "You know, this could really use an upgrade?" Or perhaps you've moved into a new place and decided the existing hardware just isn't your style. Well, you're in luck! Swapping out an old doorknob for a sleek, modern Kwikset door lever is one of those incredibly satisfying DIY projects that delivers a big impact with surprisingly little effort. It’s not just about functionality; it’s about giving your space a fresh, updated look and enjoying the satisfaction of doing it yourself.
Installing Kwikset door levers is a fantastic entry point into the world of home improvement, making it perfect for several different audiences. For the absolute beginner, it’s a confidence-builder. You don't need a massive toolbox or specialized skills – just a few basic tools and a can-do attitude. Families will appreciate the enhanced convenience; levers are often much easier to operate, especially for little hands, seniors, or when your own hands are full with groceries or laundry. It instantly boosts the accessibility and user-friendliness of your home. And for the seasoned hobbyist, it’s another enjoyable feather in your DIY cap, allowing for customization and saving on professional installation costs.
One of the great things about Kwikset is the sheer variety. You’re not just installing "a lever"; you’re choosing one that fits your home's aesthetic. You might opt for a passage lever for hallways and closets that don't need a lock, a privacy lever for bedrooms and bathrooms offering a simple turn-button lock, or a keyed entry lever for exterior doors, providing robust security. They come in an array of beautiful finishes, from classic polished brass and antique bronze to sleek matte black and modern brushed nickel. Each choice offers a subtle yet significant opportunity to define the character of a room. Plus, Kwikset's innovative SmartKey Security feature, available on many of their keyed entry levers, lets you re-key your locks yourself in seconds, which is incredibly handy if you ever lose a key or want all your exterior locks to work with a single key.
Must Read
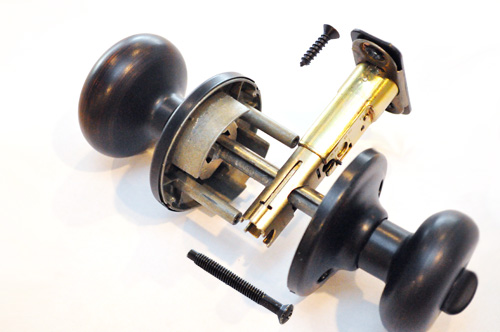
Ready to jump in? Here are a few simple, practical tips to ensure a smooth installation. First, gather your tools: typically, all you’ll need is a Phillips head screwdriver. Your Kwikset lever set will come with detailed instructions, and honestly, reading them is your best friend. They’ll walk you through checking your door’s backset (the distance from the door edge to the center of the bore hole), which Kwikset levers are usually designed to accommodate both common sizes (2-3/8" or 2-3/4"). When assembling, ensure the latch mechanism is correctly oriented for your door's handing (some levers are reversible, but it's good to check). And finally, don’t overtighten the screws! Hand-tight is usually sufficient to secure the lever without damaging the door or the hardware. Once installed, always give your new lever a quick test – make sure it turns smoothly, and if it has a lock, confirm that it engages and disengages properly.
See? It’s not daunting at all! Installing a Kwikset door lever is a fantastic way to add a personal touch to your home, improve functionality, and gain a sense of accomplishment. It’s a small project that yields a noticeably positive change, proving that sometimes, the most rewarding improvements are the ones you do yourself. So go ahead, pick out that perfect lever, and enjoy the ease and style it brings to your everyday living!