How To Wire A Google Nest Thermostat

Alright, future climate commander! Are you ready to ditch that ancient, clunky thermostat that looks like it's from a bygone era? Get set to welcome the future, a sleek, intelligent gadget that’s about to make your home feel like a sci-fi movie set. Wiring a Google Nest Thermostat might sound like a job for a seasoned electrician, but guess what? It’s surprisingly simple, totally doable, and dare we say it, a little bit fun!
Imagine, in just a little while, you'll be controlling your home's comfort with a tap on your phone or a friendly chat with your smart speaker. No more guessing games, no more tiptoeing to adjust the temperature. Just pure, unadulterated, smart home bliss. Let's make this happen!
The Great Power-Off Adventure (Safety First, Superstars!)
Before we dive into anything remotely electrifying, we need to ensure everything is super safe. This is like the first rule of DIY club: always, always, always turn off the power. Think of it as hitting the pause button on your home's electrical system, specifically for your heating and cooling.
Must Read
Head to your circuit breaker box. It might be in the garage, a utility closet, or even the basement. Look for the breakers labeled "Furnace," "AC," or "HVAC." Sometimes they're just numbered, so you might need to do a quick sleuth job if you're not sure.
Pro Tip: Flick the appropriate breaker switch to the "off" position. Your house will hum a little quieter, and that's your cue that we're good to go. It’s like silencing a noisy neighbor, but for your house’s electrical current!
Once you've done that, double-check that the thermostat is indeed dead. Try to turn it on or change the temperature. If it's unresponsive, dark, and decidedly un-thermostat-like, you've nailed it. Mission accomplished on the safety front!
Bidding Farewell to the Relic (The Old Thermostat, That Is!)
Now for the grand unveiling of the existing wiring! Most old thermostats have a cover that simply pops off. Gently pull or pry it to reveal the guts underneath. It might feel a bit stiff, like opening a really old jar of pickles, but don't be shy.
Before you touch a single wire, grab your phone. Yes, your phone! Take a super clear, well-lit photo of how all the wires are connected to the terminals. This photo is your secret weapon, your map to success, your DIY superpower. Seriously, take multiple photos from different angles if you need to!
Your Photo is GOLD: This image will be your guiding star when connecting the new Nest. Do not skip this step!
You'll see letters next to each wire, like R, C, G, Y, W. These are like a secret code, and your photo has captured their meaning. If you see any wires that aren't connected to anything, just gently push them aside.
Next, it’s time to disconnect those wires. Each terminal usually has a small screw holding the wire in place. Grab a screwdriver – a small Philips head usually does the trick – and gently loosen each screw. You don't need to remove them entirely, just enough so the wire slides out.
As you free each wire, immediately grab the handy labels that came with your Nest. Or, if you’re feeling extra resourceful, use a piece of tape and a marker. Label each wire with its corresponding letter (e.g., if a wire came from the R terminal, label it R). This step is crucial for smooth sailing!
Once all the wires are labeled and disconnected, you can unscrew the old thermostat base from the wall. Gently pull it away, revealing a tidy bundle of wires sticking out. Congratulations, you’ve just retired an antique! Give yourself a pat on the back.
The Nest’s Grand Entrance (Mounting the New Base)
Open up your shiny new Google Nest box. You'll find the elegant Nest base plate, which is where all the magic happens. Hold it up to the wall, lining up the bundle of wires through the center opening. You'll probably want to use the existing screw holes if they line up, making your life even easier.
If the old holes aren't a match, no worries! The Nest usually comes with a handy little bubble level built right into its base. Use a pencil to mark where the new screws will go. Think of yourself as an interior designer, perfectly placing your new decor!
Grab your drill (if you need it for new holes) and gently make those pilot holes. Remember, a little goes a long way. Then, using the screws provided with your Nest, attach the base plate to the wall. Make sure it's snug and level – nobody likes a crooked thermostat!
Level Up: A perfectly level Nest just feels right. Take a moment to admire its straightness!
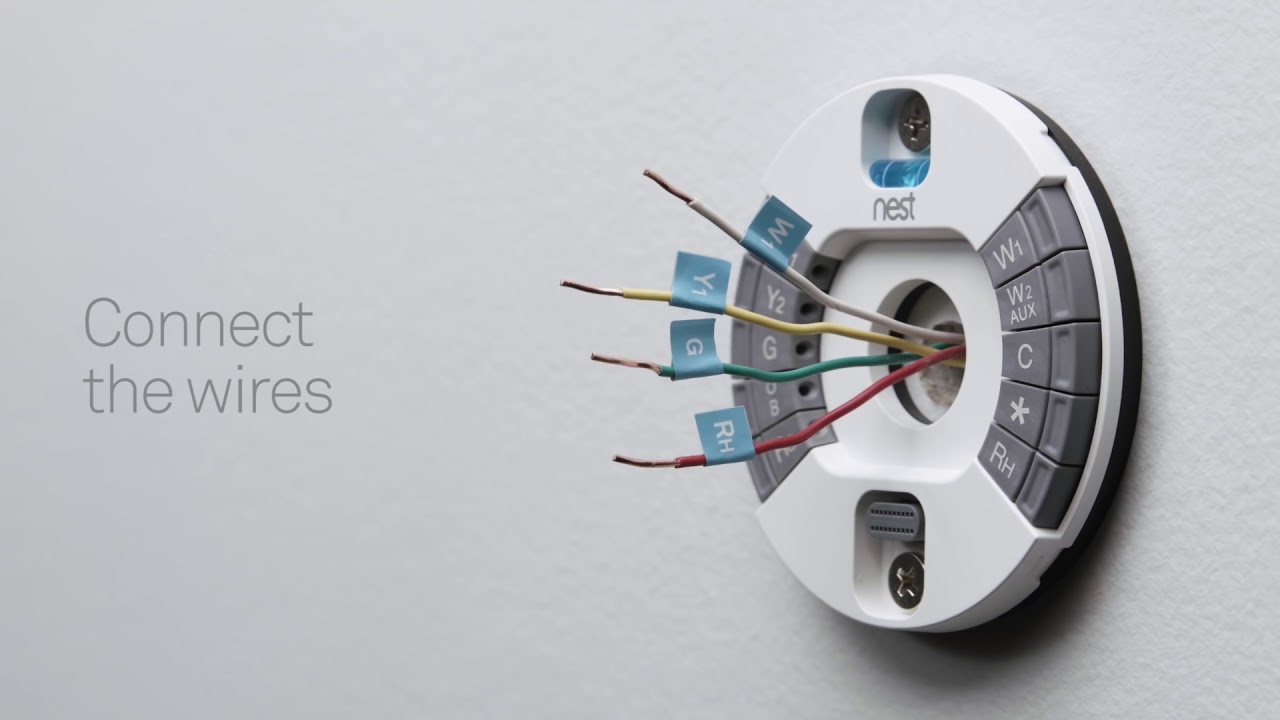
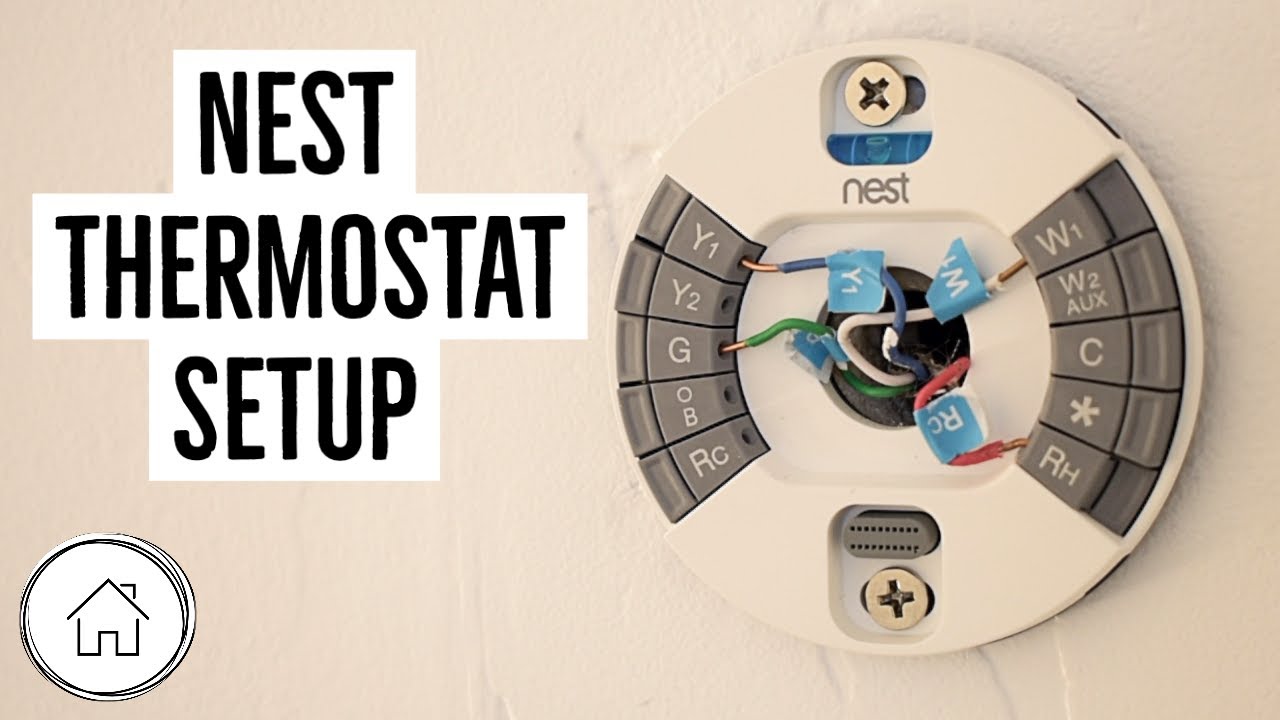
With the base securely mounted, it’s time for the true artistry: connecting those labeled wires.
The Wiring Tango (Connecting to Your Nest)
Now, pull out that glorious photo you took earlier! It's your ultimate cheat sheet. You'll notice the Nest base has similar lettered terminals to your old thermostat. Each terminal has a small, push-down button or a lever.
Take your labeled wires one by one. Gently push down the button for the corresponding letter on the Nest base, and slide the bare end of the wire all the way in. Release the button, and give the wire a very gentle tug to make sure it’s securely seated. It should feel like a firm handshake.
Match R to R, C to C, G to G, and so on. It’s like a sophisticated game of matching, but with real-world comfort as the prize! If you have a wire that was connected to a terminal like O/B, W2, or Y2, consult your Nest guide for specific placement. They’ve got you covered.
The Mighty C-Wire: If you have a C-wire (connected to the C terminal), you're in luck! This wire is like the unsung hero, providing consistent power to your Nest. If you don't have one, don't fret; the Nest can often work without it, but it might just need to charge its internal battery from time to time.
Make sure no bare copper wire is showing outside the terminals. You want clean, snug connections. This prevents any little electrical shenanigans and keeps everything running smoothly. It’s all about neatness and precision, like wrapping a perfect gift.
Once all your wires are firmly in place, gently push any excess wire back into the wall opening. You want the space around the connections to be neat and tidy, like tucking in a bedspread.
The Moment of Truth (Attaching the Display)
You're almost there! This is the part where your Nest truly comes alive. Grab the actual Nest display, the round, sleek part that everyone recognizes.
Align the display with the base plate you just installed. You’ll see pins on the back of the display and corresponding holes on the base. It’s designed to fit only one way, so don’t force it. Gently push the display onto the base.
The Click of Success: You'll hear a satisfying "click" when it's properly seated. That's the sound of victory, my friend! It's like the final piece of a puzzle locking into place.
Take a moment to admire your handiwork. Your new Nest is proudly displayed on your wall, looking futuristic and ready for action. You've transformed your wall from bland to brilliant!

Awakening the Smart Home Guru (Power On and Setup)
It’s time for the grand reawakening! Head back to your circuit breaker box. Find that switch you flipped earlier and confidently flick it back to the "on" position.
Rush back to your Nest. It should power on, displaying the iconic Nest logo or perhaps greeting you with a friendly chime. This is the moment your home officially gets smarter.
The Nest will then guide you through its initial setup. This usually involves connecting to your home's Wi-Fi network, setting your location, and telling it a little bit about your heating and cooling system. Follow the on-screen prompts; they're super intuitive, like having a friendly co-pilot.
Wi-Fi Warrior: Make sure you have your Wi-Fi password handy! The Nest needs to chat with the internet to unlock all its smart features.
Once the setup is complete, give it a quick test! Turn the heat up a few degrees, then down a few degrees for the AC. Listen for your system to kick on. Feel that delightful blast of warm or cool air. It’s not just working; it’s working because you made it happen!
There you have it! You’ve successfully wired your Google Nest Thermostat. You’re now officially a smart home maestro, a climate control wizard, and a DIY superstar. Go forth and enjoy your perfectly optimized, effortlessly comfortable home. You've earned it!