How To Test A Carbon Monoxide Sensor

Ever feel like a secret agent for home safety, effortlessly keeping your loved ones out of harm's way? Well, get ready, because checking your carbon monoxide (CO) sensor is exactly that kind of mission – simple, quick, and incredibly impactful! It’s one of those tiny tasks that delivers a massive dose of peace of mind, making you feel like a true home hero. Plus, there’s something genuinely satisfying about pressing a button and hearing that reassuring, albeit loud, chirp!
So, what's the big deal with CO, and why do these sensors matter so much? Carbon monoxide is often called the "silent killer" for a very good reason: it’s an invisible, odorless, and tasteless gas. You literally can't detect it with your own senses. It's produced by fuel-burning appliances like furnaces, water heaters, gas ranges, or even cars in an attached garage, if they're not venting properly. The scary part is, CO poisoning can mimic flu symptoms, making it hard to diagnose until it's too late. This is where your trusty CO sensor steps in! It acts as your home's nose, constantly sniffing for this dangerous gas and sounding the alarm before it can harm you or your family. It’s not just a gadget; it’s a life-saver.
Alright, mission briefing complete! Let's get to the fun part: how to test this vital piece of equipment. It’s so easy, you’ll wonder why you haven’t been doing it regularly!
Must Read
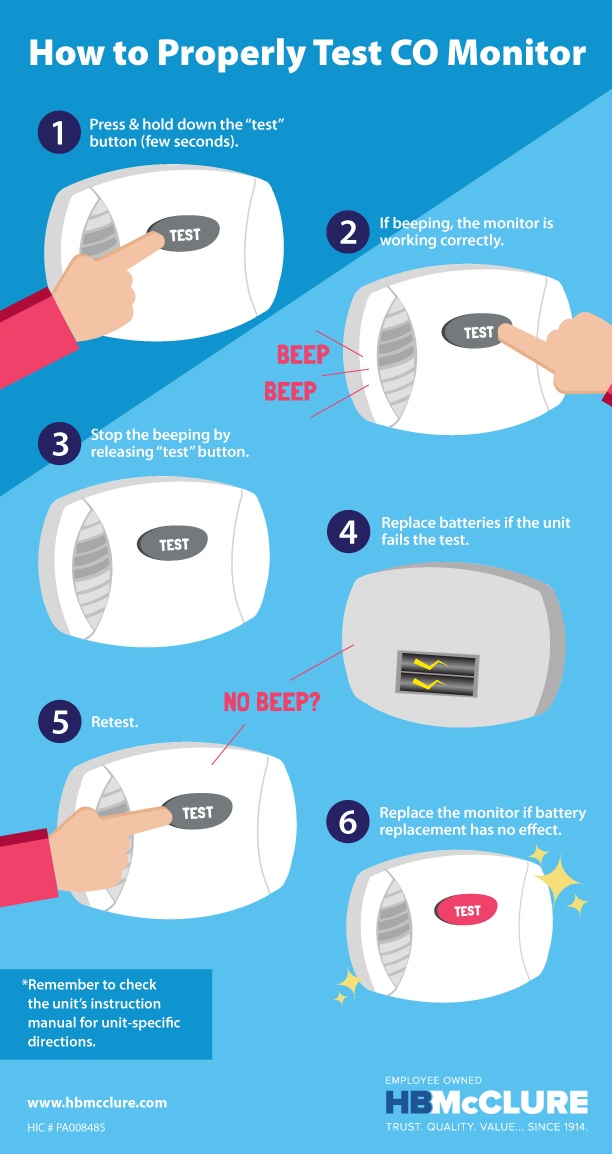
Step 1: The "Push the Button" Test. Locate your carbon monoxide alarm. Most models, whether they're plug-in, battery-powered, or hardwired, will have a clearly marked button, often labeled "Test" or "Test/Reset." Simply press and hold this button for a few seconds. You should hear a very loud, ear-piercing alarm – this is a good thing! It means the speaker is working, and the sensor is ready to alert you if real danger strikes. Some models might also flash lights. The alarm will typically stop once you release the button. If it doesn’t go off, or if it sounds weak, it's time to investigate further. First, try replacing the batteries (if applicable). If that doesn't work, it's likely time for a new unit.
Step 2: Check the Expiration Date. Did you know CO alarms don't last forever? Like milk in your fridge, they have a shelf life! Most carbon monoxide sensors are designed to last about 5 to 7 years. Look on the back or side of your unit for a manufacturing date or an explicit "replace by" date. If your sensor is past its prime, even if the test button works, its ability to accurately detect CO might be compromised. Don’t gamble with safety – replace it!

Step 3: Battery Check (for battery-powered units). Even if your unit has a "test" button, it's a good habit to replace the batteries annually, just like you do with smoke detectors. A good memory trick is to change them when you change your clocks for daylight saving time. A chirping sound every 30-60 seconds usually indicates low batteries – don’t ignore it!
Regularly testing your carbon monoxide sensor takes less than a minute but provides invaluable protection. Make it a habit – maybe once a month, or when you clean. It’s a small effort for a huge reward: the continued safety and peace of mind for everyone under your roof. Be that home hero!