How To Replace Battery On Honeywell Thermostat

You know that heart-stopping moment? The one where you wake up in the dead of winter, teeth chattering so hard you could play a xylophone, only to glance at your trusty Honeywell thermostat and find its screen… blank? Or maybe it's doing that sad, little "Low Batt" flicker, like a forgotten digital pet begging for attention. My first thought, every single time, is "Oh no, the entire HVAC system is kaput! This is going to cost a fortune, and I'll have to wear a ski suit indoors for a week." Dramatic? Absolutely. But hey, we've all been there, right? Staring down what seems like a monumental household crisis, only to discover the culprit is something so disarmingly simple, it almost makes you want to laugh (after you've stopped hyperventilating, of course).
And guess what that monumental, system-crippling crisis usually boils down to? Yep, you guessed it: a couple of humble AA or AAA batteries. It’s like discovering your super-fancy, smart TV won’t turn on because someone unplugged it. The most advanced technology, often powered by the most basic means. So, if your Honeywell thermostat is giving you the silent treatment, refusing to regulate your home's climate, or just looking generally unwell, chances are it's crying out for a fresh set of batteries. And lucky for you, dear reader, replacing them is about as complicated as making toast. (Maybe even easier, no risk of burning!).
Why Bother with Battery Replacement, Anyway?
Seriously, this isn't rocket science. It’s one of those DIY tasks that feels incredibly satisfying because it fixes a potentially annoying problem with minimal effort. Plus, keeping those batteries fresh ensures your thermostat is always reading the temperature accurately and communicating properly with your heating and cooling system. Think of it as preventative care for your home's comfort nerve center. You don’t want your thermostat to flatline during a heatwave or a cold snap, do you? Of course not!
Must Read
Alright, Let's Get This Done! What You'll Need:
Before you dive into this thrilling adventure (I promise, it's thrilling in its simplicity), gather your tools. You won't need much, which is part of the beauty.
- New Batteries: Most Honeywell thermostats use either AA or AAA batteries. Crucially, check your specific model! Some might even take C batteries, but AA/AAA are the most common. Don't be shy; get alkaline ones for longer life.
- A Small Flathead Screwdriver (Optional): Sometimes the cover needs a gentle nudge to pop open.
- A Little Patience (Mostly for yourself, for ever doubting your DIY skills): You've got this.
Step-by-Step: The Grand Battery Swap Expedition!
Step 1: The Great Thermostat Face-Off
First things first, take a good look at your Honeywell thermostat. Is it a modern digital one, or one of those older, more classic models? The process is similar, but the exact location of the battery compartment can vary. Most modern ones are pretty intuitive. You’re looking for a way to gently pull the front cover off, or perhaps slide it upwards. Some might have little tabs on the side or bottom. Don't force anything! A little gentle pressure is usually all it takes. If you hear a click, you're probably doing it right.
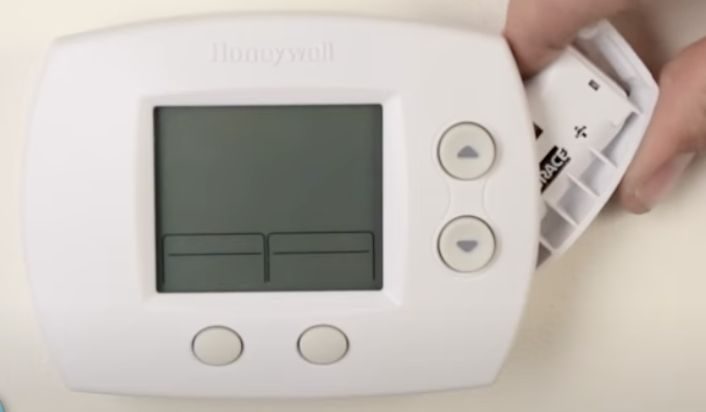
Step 2: Locate the Battery Stash
Once you've got the front cover off, or the main unit unclipped from its base plate, you'll likely see the battery compartment staring right back at you. It’s usually on the back of the faceplate or sometimes tucked away on the side of the main body. It often has a little door or a clear outline indicating where the batteries reside. See? Not so scary, is it?
Step 3: Evict the Old-Timers
Now for the satisfying part! Pop out those dead batteries. Pay attention to the polarity (the `+` and `-` signs) as you remove them. It's a good mental note for when you put the new ones in. Old batteries sometimes look a bit corroded, especially if they’ve been in there for ages. If you see any white powdery residue, be careful. You can gently wipe it away with a damp cloth (and maybe wear gloves). Just don't get it on your skin or in your eyes, okay?

Step 4: Welcome the New Blood
Grab your fresh, energetic batteries. Insert them carefully, making sure you match the correct `+` and `-` orientation that was marked inside the compartment. This is crucial! Installing them backward won't damage anything immediately, but your thermostat definitely won't power on. Double-check your work here; it’s the most common hiccup.
Step 5: The Moment of Truth (and Reassembly)
Once the new batteries are snugly in place, carefully reattach the faceplate or main unit to its base. It should click back into place without much fuss. As soon as it's connected, you should see your thermostat screen spring back to life! Glorious, isn't it? It might run through a quick boot-up sequence, showing all the segments on the display, and then settle back into displaying the time and temperature. Victory!
A Few Quick Pointers (Just in Case!)
- Still Blank? Double-check the battery orientation. Seriously, it happens to the best of us. Also, make sure the cover is fully seated and making proper contact.
- Specific Model Woes? If your Honeywell thermostat is being particularly stubborn, a quick search on Google for "Honeywell [Your Model Number] battery replacement" will usually yield a specific diagram or video. The model number is often on the back of the unit once you remove it.
- Don't Toss Batteries in the Trash! Be a good global citizen and recycle your old batteries. Many stores have drop-off points, or you can check your local waste management guidelines.
See? Wasn't that incredibly painless? You just saved yourself a potential service call, restored comfort to your home, and proved once again that sometimes, the biggest problems have the simplest solutions. So next time your Honeywell thermostat starts acting funny, don't panic. Just remember: it probably just needs a little juice. Go forth and conquer your climate control, you magnificent DIYer!

