How To Open Honeywell Thermostat To Replace Batteries

Alright, settle in, grab a cuppa. We need to talk about something profoundly dramatic, yet utterly mundane: the day your Honeywell thermostat decided to stage a silent protest. One minute, your house is a cozy haven; the next, you’re looking at a blank screen, wondering if the apocalypse started while you were napping, or if a tiny, digital vampire just drained the life out of your heating and cooling system.
Fear not, my friend! This isn't a job for NASA, nor does it require a mystical incantation. It’s almost certainly dead batteries. And today, we’re going to perform a heroic, yet surprisingly simple, operation: opening that enigmatic box to bring it back to life.
The Case of the Silent Thermostat
First, a moment of silence for your home's suddenly erratic climate. It’s either arctic tundra or the fiery pits of Mordor in here, isn't it? The villain isn’t some rogue algorithm or a cosmic ray. It’s just good old-fashioned power depletion. Those little AA or AAA batteries, tucked away inside, have finally thrown in the towel. They've served their time, bless their tiny hearts.
Must Read
Honeywell thermostats are generally robust, but even the strongest need a snack. Think of it as feeding a very demanding, plastic parrot that dictates your home's temperature. It looks complicated, but it's really just a front for two small cells of power.
Gearing Up for Glory (Mostly Just Batteries)
What do you need for this grand adventure? Brace yourself, because it's pretty low-tech:

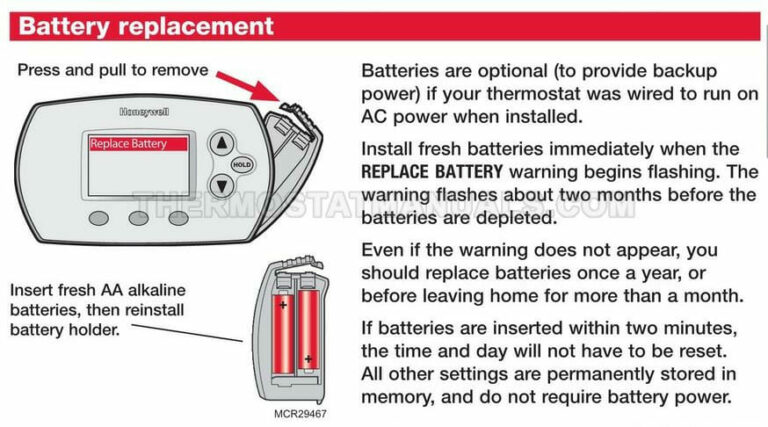
- New Batteries: Usually AA or AAA. Do not try to put in some obscure 9-volt you found in the back of a drawer. Check your thermostat's manual if you're truly unsure, but it's almost always AA or AAA.
- A Gentle Touch: No sledgehammers, please.
- Maybe a Flathead Screwdriver: For prying, but only if absolutely necessary and with extreme caution. We're aiming for surgery, not demolition.
- A Sense of Adventure: Or at least, a desire for your home to stop being an icebox/sauna.
Decoding the Honeywell Enigma: Types and Tactics
Honeywell makes a lot of thermostats. They’re like potato chips – you can’t have just one model. But for battery replacement, they generally fall into two broad categories: the "pull-it-off" kind and the "flip-it-down" kind.
The "Pull-It-Off" Gambit (The Most Common)
This is your bread and butter. Most modern Honeywell digital thermostats are designed to simply pull straight off their base plate. It sounds too easy, right? Like there must be a hidden button, a secret handshake, a riddle to solve.
Nope. Just pull. But here's the trick:
- Locate the Seam: Look at the edges of the thermostat. You’ll usually see a distinct separation where the main screen unit meets the wall plate. This is your target.
- Grip Firmly: Place your hands on either side of the thermostat.
- Pull Directly Towards You: Imagine you’re trying to gently detach a particularly stubborn LEGO brick. Don’t twist it, don’t yank it sideways, just pull straight out. It might make a satisfying pop sound. Don’t panic; that’s the sound of success, not destruction.
Sometimes, there are small clips at the top and bottom. A gentle squeeze might help release them, but usually, a straight, firm pull is all it takes. Think of it like a polite but firm handshake with your wall. You’re acknowledging its boundaries, then gently persuading it to let go.
Once it's off, you’ll typically see the battery compartment on the back of the detached unit. It’s often clearly labeled with a little door.
The "Flip-It-Down" Maneuver (For the More Reserved Models)
Some Honeywell models, particularly older programmable ones or those with a sleeker design, have a little secret door. Instead of pulling the whole unit off, you might find a small latch or button on the bottom, or sometimes the side.

- Check the Bottom or Side: Feel around for a tiny tab or a push-button.
- Press or Slide: Actuate the latch.
- Flip or Swing: A front panel or the entire bottom section will then swing open or flip down, revealing the battery compartment. It’s like discovering a secret hideaway for AA cells!
This type is often more intuitive once you find the release. It's designed to keep the main unit fixed while allowing access to the power source.
The "Screw-It-In" Relics (Rare, But Worth a Mention)
For truly ancient Honeywell units, you might actually find small screws holding the faceplate on. If you see tiny screws, well, you know the drill (pun intended). Unscrew them, gently remove the faceplate, and there’s your battery tray. But honestly, most people have moved past these charmingly old-school models.
The Sacred Battery Swap
So, you’ve opened the beast. You see the batteries. They probably look like sad, tired little cylinders. Don't be fooled by their innocent appearance; these are the culprits!

- Note Polarity: Before yanking out the old ones, take a mental picture (or an actual one) of which way the positive (+) and negative (-) ends are facing. This is crucial.
- Remove Old Batteries: Pop them out. Dispose of them responsibly; don't just chuck them into the abyss.
- Insert New Batteries: Carefully slide in your fresh, glorious power cells, making absolutely sure the positive and negative ends match the diagram inside the compartment. This is the moment your house's climate control system holds its breath.
Once the new batteries are in, the thermostat should instantly spring back to life! You might see a Honeywell logo, a quick boot-up sequence, or your familiar settings reappear. This is your cue to do a little victory dance.
The Glorious Reassembly and Triumph
Now, simply reverse the process:
- If you pulled it off, align the thermostat with its base plate on the wall and gently push it back on until you hear that satisfying click.
- If it flipped down, simply close the panel until it latches securely.
Stand back and admire your handiwork. You've tamed the wild Honeywell, conquered the battery beast, and restored order to your indoor climate. You are, for all intents and purposes, a domestic hero. Go forth and enjoy your perfectly regulated temperature. You've earned it!