How To Make An Auto Smelter In Minecraft
Okay, let's talk about something truly magical in Minecraft: the auto smelter. Think of it as your personal little chef, constantly cooking up delicious iron ingots, smooth stone, or even turning that mountain of cobblestone into something actually useful. And the best part? You don't have to stand there and babysit it! Seriously, who has time for that? We've got dragons to slay and bases to build!
Why should you care? Well, imagine this: you've just spent hours mining. Your inventory is overflowing with raw iron, gold, and enough cobblestone to pave a small country. Now you have a choice: spend the next eternity manually smelting everything, or, build an auto smelter and go... well, go do literally anything else! Read a book, build a giant creeper statue, practice your parkour skills – the possibilities are endless!
The Basic Auto Smelter Recipe: A Piece of Cake (or, a Pile of Bricks)
Don't worry, this isn't some super complicated redstone contraption requiring a PhD in Minecraft engineering. It's actually pretty straightforward. We're going for simplicity and efficiency here, folks. Think of it like baking cookies – you just need the right ingredients and a little bit of layering.
Must Read
Here's what you'll need:
- Chests: Lots of them! At least three, but more is always better. Think of these as your ingredient storage and finished product bins.
- Furnaces: One (or more!) for the actual smelting. The heart of our operation.
- Hoppers: The unsung heroes of automation! These guys are like little conveyor belts, moving items around for you.
Okay, gather your supplies. Imagine you're setting up your kitchen. We need a clean workspace and all the ingredients ready to go.
Building the Auto Smelter: Step-by-Step
Alright, let's get building! Here's the recipe for our delicious auto-smelting goodness:
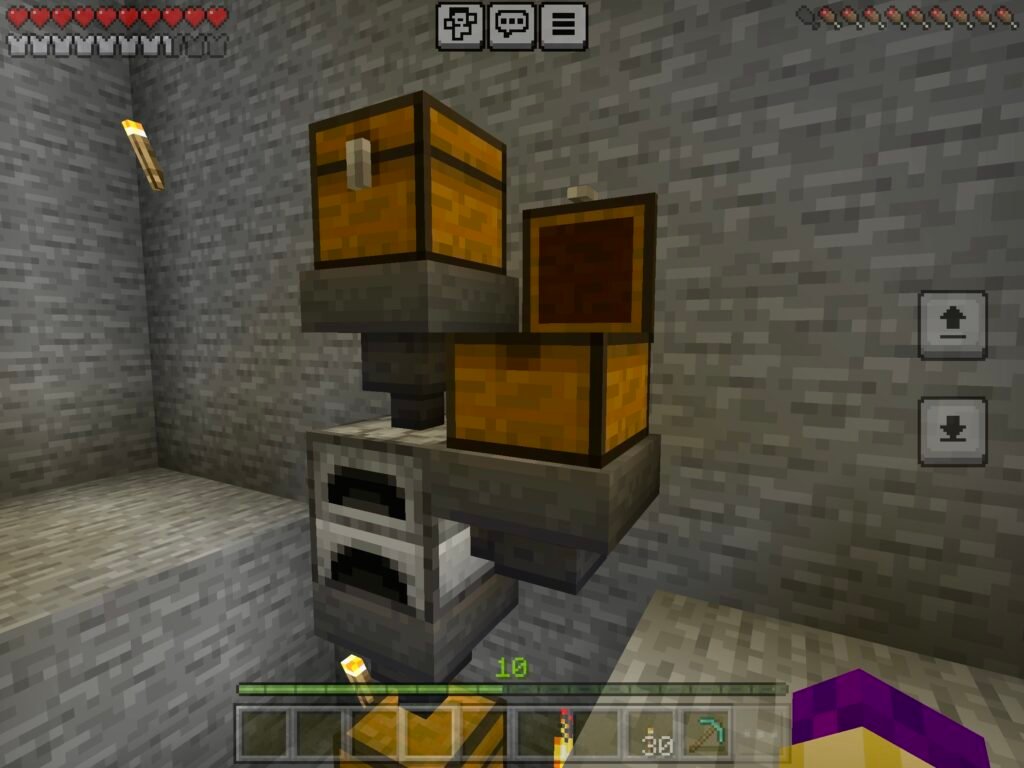
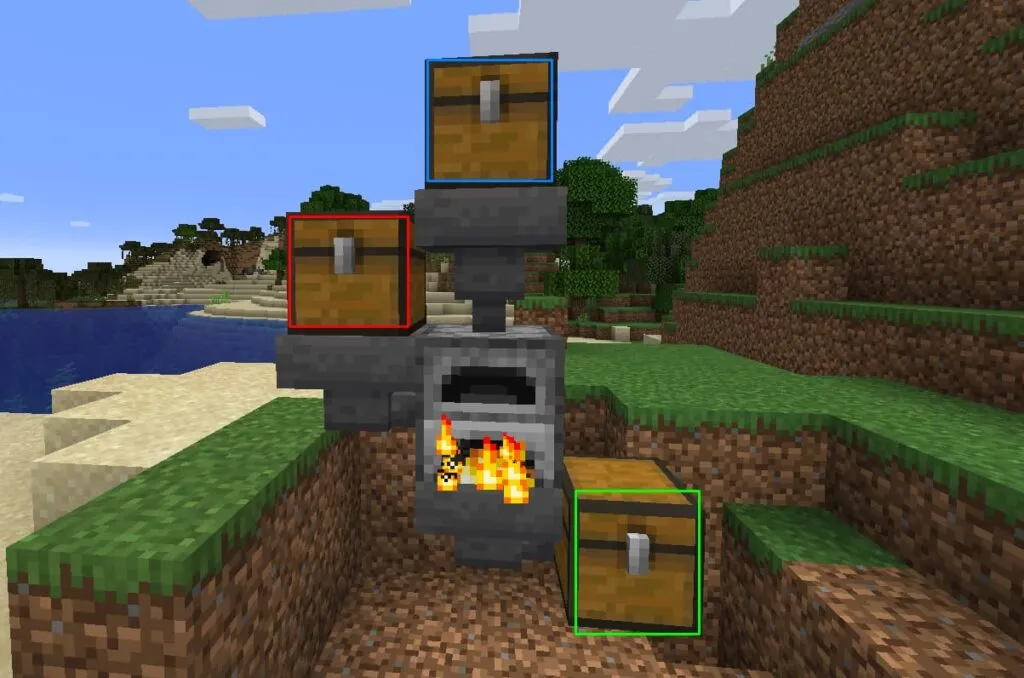
- Place a Double Chest: This is your input chest. It's where you'll dump all your raw ores and fuel. Think of it as the pantry.
- Place a Hopper on Top: Sneak-click (shift-click) to place a hopper on top of the chest. This hopper will suck all the goodies out of the chest.
- Place the Furnace: Now, sneak-click and place the furnace on top of the hopper you just placed. This makes sure the hopper feeds directly into the furnace.
- Place Another Hopper on the Side: Sneak-click and place another hopper on the side of the furnace. This hopper is for your fuel (coal, charcoal, etc.). It's important to place it on the side so it goes into the fuel slot.
- Place the Fuel Chest: Place a chest directly behind the fuel hopper. This is where you'll store all your fuel.
- Place a Hopper Underneath: Sneak-click and place a hopper underneath the furnace. This hopper will collect all the smelted goodies.
- Place the Output Chest: Finally, place a chest under the hopper. This is your treasure chest! Your beautiful, smelted ingots will end up here.
Pro Tip: Use signs to label your chests! "Raw Ore," "Fuel," and "Smelted Goodies" will help you stay organized and prevent accidental explosions (probably not explosions, but definitely frustration!).
How It Works: The Magic Behind the Machine
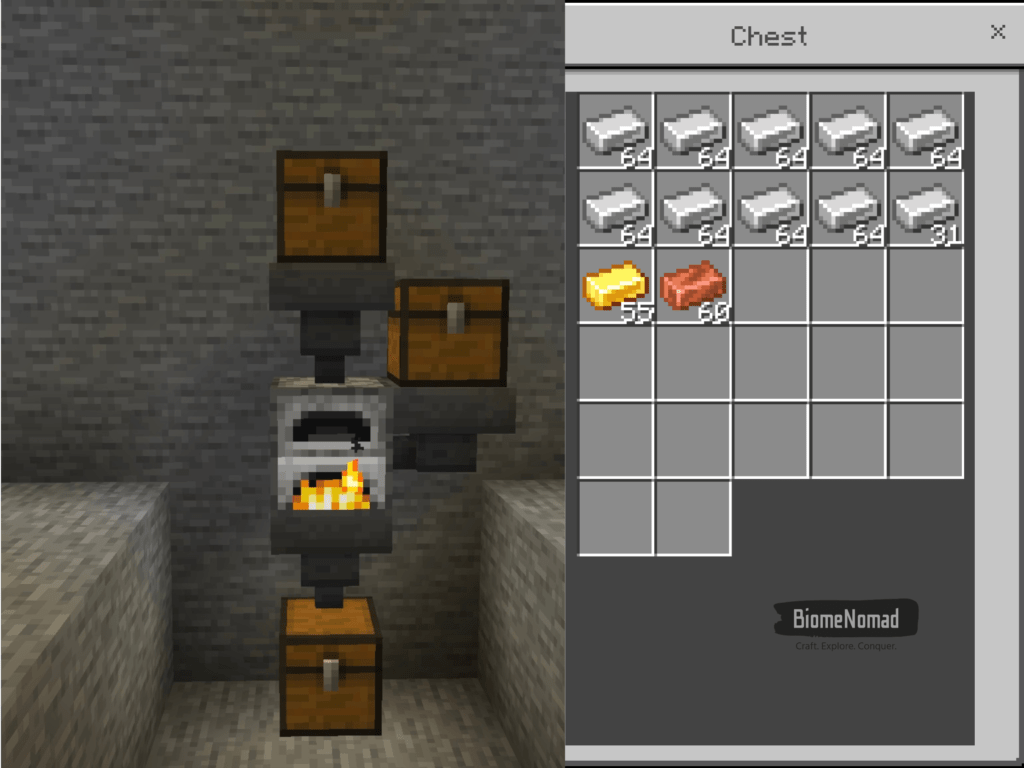
So, what's actually happening here? It's pretty simple, really. The top hopper pulls items from the raw ore chest into the top slot of the furnace. The side hopper pulls fuel from the fuel chest into the fuel slot of the furnace. The furnace does its job, and then the bottom hopper pulls the smelted items into the output chest. It's a beautiful, self-sustaining cycle of metal-melting goodness! No more clicking necessary.
It’s like setting up a self-serve buffet! You provide the raw materials, and the auto smelter handles the cooking, delivering delicious, perfectly-smelted items right to your plate (or, chest, in this case).
Making It Even Better: Upgrades and Expansion
Once you've got the basic auto smelter down, you can start thinking about upgrades. Want to smelt faster? Add more furnaces! Want to handle more items? Add more chests and hoppers! You can even create entire smelting complexes, capable of processing vast quantities of resources. Think of it like expanding your restaurant! More chefs, more ovens, more delicious food!
Things to Consider:
- Multiple Furnaces: Run them parallel to each other for faster smelting.
- Sort Your Fuel: Use different chests for different fuel types.
- Redstone Automation: Get really fancy with redstone to control the flow of items and automate even more processes. (But let's not get too carried away just yet!).
So there you have it: your very own auto smelter! Now go forth, mine, build, and conquer the Minecraft world, knowing that you have a tireless, automated chef working for you, day and night. Happy smelting!
Remember, practice makes perfect! Don't be discouraged if your first attempt isn't flawless. Just keep tweaking and adjusting, and you'll be smelting like a pro in no time. And most importantly, have fun!
