How To Hook Up A Transformer For Door Bell

Ever walked up to a door, pressed the bell, and... crickets? Or perhaps you're building a smart home dream and realize your existing doorbell setup just isn't cutting it. Don't let a silent chime or an outdated system dampen your spirits! Learning how to hook up a doorbell transformer might sound like a daunting electrical task, but trust us, it's far simpler than you think and incredibly satisfying. It's a fantastic little DIY project that gives you a tangible "ding-dong" reward and the proud feeling of mastering a household essential.
So, what exactly is this magical doorbell transformer, and why do we need it? Think of your doorbell transformer as the bouncer for your chime. Your house's main electrical supply is typically 120 volts – way too much power for a delicate doorbell chime, which usually only needs 10 to 24 volts. The transformer's main purpose is to step down this high voltage to a safe, low voltage that won't fry your chime or, more importantly, put you or your visitors at risk. It ensures your doorbell system operates correctly and safely, providing that cheerful sound every time someone visits.
The benefits are clear: a functioning doorbell ensures you never miss a package or a guest. A new transformer can also provide the necessary power for modern video doorbells or illuminated buttons. Plus, tackling this yourself saves you the cost of an electrician, gives you a deeper understanding of your home's systems, and provides that lovely boost of confidence that comes from a successful home improvement feat. Ready to get ringing? Let's dive in!
Must Read
First things first, and this is crucial: Before touching any wires, you absolutely must turn off the power to your doorbell circuit at your main electrical panel. Safety is paramount! Use a non-contact voltage tester to double-check that the power is indeed off before proceeding. Your tools for this job will be minimal: a screwdriver, wire strippers, and your trusty voltage tester.
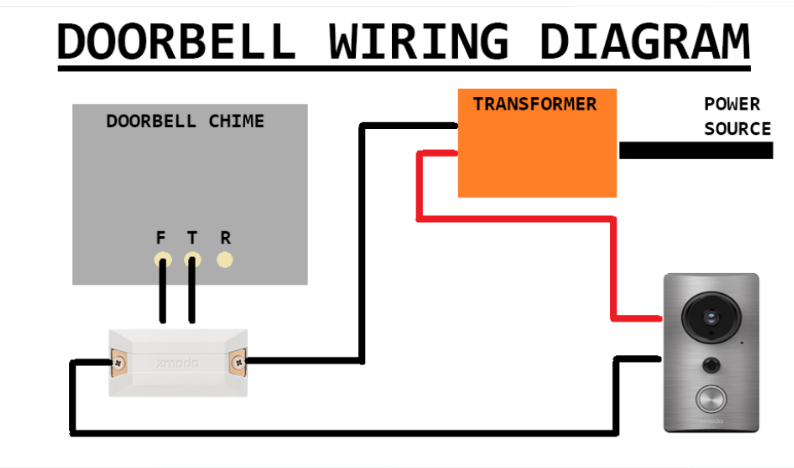
Now, let's locate your transformer. It's often found near your main electrical panel, in a basement, an attic, or sometimes attached to a junction box. Your new transformer will have two sets of terminals: a high-voltage (primary) side and a low-voltage (secondary) side. The high-voltage side is where it connects to your house's power, usually via two wires (black and white, or colored according to your local codes).

Here’s the step-by-step:
- With power off, disconnect the old transformer (if replacing) or identify the power source wires for a new installation.
- Connect the transformer's primary (high-voltage) wires to your house's 120V power supply. Typically, one transformer wire connects to the "hot" (usually black) wire, and the other connects to the "neutral" (usually white) wire from your house circuit. Secure these connections with wire nuts.
- Next, locate your doorbell chime. It usually has three terminals: "Trans" (for transformer), "Front" (for the front doorbell button), and "Rear" (if you have a second button).
- Connect one of the transformer's secondary (low-voltage) wires to the "Trans" terminal on your doorbell chime.
- The other low-voltage wire from the transformer will typically run directly to your front doorbell button (and if you have a rear button, a separate wire would go to that). Each button then has a second wire that runs back to its respective "Front" or "Rear" terminal on the chime. In essence, the low-voltage circuit runs from the transformer, through the button, and back to the chime.
Once all connections are secure, double-check everything one last time. Then, head back to your electrical panel and turn the power back on. Go to your front door, take a deep breath, and press that button! You should hear a satisfying ding-dong! If not, don't fret. The most common issues are loose connections or swapped wires. Re-check your wiring, ensure all wire nuts are tight, and try again. You've got this – welcome to the symphony of your new, fully functional doorbell!
:max_bytes(150000):strip_icc()/SPR-how-to-install-a-doorbell-5214163-step-03_30271-2dbd37d14eaa4bac8bde1b94817409cf.jpg)