How To Fit A Carbon Monoxide Detector

Ever think about how some of the most important things in life are also the most… invisible? Like good vibes, a fresh cookie smell, or that one sock that always vanishes in the dryer. Well, there’s another invisible thing that's super important, and surprisingly, fitting a detector for it can be a blast. We're talking about Carbon Monoxide, or CO, and getting your house ready for its own little safety superhero!
Now, CO is like the ultimate ninja. It’s a gas. It’s odorless. It’s colorless. It’s tasteless. Basically, it’s the super-stealthy party crasher you never invited, but who could potentially ruin your whole shindig. It comes from things like furnaces, gas stoves, fireplaces, and even your car if you're doing something wild like running it in an attached garage (don't do that, by the way!). So, how do you fight an enemy you can't even see? You bring in the big guns: a Carbon Monoxide detector!
Your Home's New Nose Knows Best
Think of a CO detector as your home's personal sniffing expert. It's got the nose you don't have, working 24/7, even when you're dreaming of pizza. And the best part? Setting it up is way easier than assembling that flat-pack furniture you bought last year. No arguments, no missing screws (usually!), just pure, unadulterated home safety satisfaction.
Must Read
First off, let’s talk about the types of detectors. You’ve got your plug-ins, your battery-powered pals, and the hardwired heroes. For most of us, a simple plug-in or battery model is perfect. They’re like the smartwatches of home safety – sleek, efficient, and always on guard. Plus, the battery ones are great because they work even if the power goes out, which is exactly when you might be lighting candles or running a generator, increasing CO risks. Smart, right?
Where to Put Your Sniffing Superhero?
This is where the real fun begins. It’s like a treasure hunt, but instead of gold, you’re finding the perfect spot for maximum safety. And there are some delightfully quirky rules to this game:
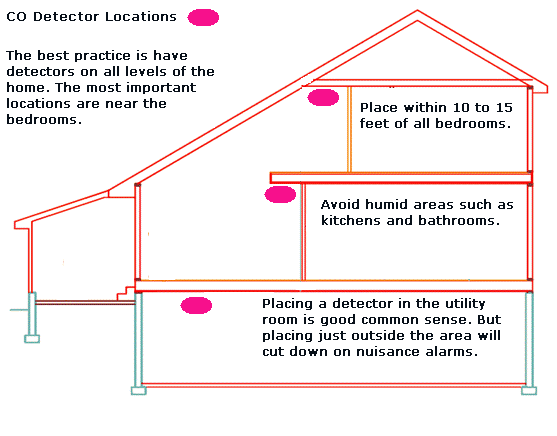
Rule #1: Near the Sleepy Zones! You want at least one detector near or in every separate sleeping area. Why? Because CO hits hardest when you're asleep. It's the ultimate sneak attack. So, right outside the bedroom, or even inside if it's a large master suite, is a prime location. Think of it as a nightlight, but for gas.
Rule #2: By the Burny Bits! Any floor with fuel-burning appliances (hello, furnace! Hey there, water heater!) needs a detector. These are the usual suspects for CO production. Keep it within 10-15 feet of these appliances, but not right next to them. Why not? Because a little puff of CO when an appliance starts up is normal, and you don't want a false alarm every time your furnace kicks on. That'd be like your smoke alarm going off every time you toast bread. Annoying!

Rule #3: Eye-Level or Higher. While CO mixes with air, it's slightly lighter than air. So, mounting it on a wall, generally at eye level or a bit higher, is a solid plan. Some manufacturers even recommend ceiling mounting. Just don't put it near vents, windows, or doors, as drafts can mess with its readings. It needs a good, calm spot to do its job.
Rule #4: Every Floor, Everywhere! Ideally, you want a CO detector on every single level of your home, including the basement. CO can travel, and you want full coverage. It's like having multiple security guards instead of just one sleepy dude at the front door.

Rule #5: Avoid the Quirky No-Nos! Don't put it behind curtains or furniture where air can't reach it. Don't put it in direct sunlight or really humid areas like bathrooms (unless it's specifically designed for it), as extreme temps and moisture can mess with its sensors. You wouldn't want to work in a sauna, would you? Neither does your detector!
The Grand Installation & The Joy of the Test Button
Once you’ve found its happy spot, installation is usually a breeze. For plug-ins, just plug it in! For battery-powered or hardwired, it usually involves a couple of screws into a wall stud or anchor. Seriously, if you can hang a picture frame (mostly straight), you can do this. The feeling of accomplishment? Priceless.

After it’s installed, there's one final, glorious step: pressing the test button. This button is like the "fire drill" for your detector. It lets out a loud, attention-grabbing beep that's designed to wake the dead (or at least your grumpy teenager). Test it monthly! It's a quick, satisfying way to ensure your little superhero is still ready for action. Your pets might give you the side-eye, but hey, it's for their safety too!
The Long Haul: Keeping Your Hero Happy
Just like your car needs oil changes, your CO detector needs a little love. If it's battery-powered, change those batteries at least once a year, or whenever it chirps annoyingly to tell you it's low. And here's a quirky fact: CO detectors don't last forever! They usually have a lifespan of 5-7 years, after which the sensors lose accuracy. Check the manufacture date on the back – it’s like an expiry date for safety. When it's time, replace it! It’s a small investment for peace of mind.
So there you have it! Fitting a carbon monoxide detector isn't a chore; it's a fun, empowering act of home heroism. You're bringing an invisible guardian into your home, ensuring your family stays safe from a sneaky threat. Go forth, embrace the installation, and enjoy the quiet confidence of a well-protected home. You got this!