How To Change Evaporative Cooler Pads

Alright, folks, gather 'round! Let's talk about something exciting. No, not rocket science. Even better: Swamp cooler pads! Yes, you heard right.
Seriously, changing those bad boys is easier than making toast. So let's get this show on the road!
Step 1: Unplug That Beast!
First things first, treat your swamp cooler like a grumpy badger. Unplug it! We don't want any shocking surprises. Literally.
Must Read
Seriously, unplug it. Twice. Just kidding. Once is fine. But be sure!
Step 2: Access the Inner Sanctum
Now comes the Indiana Jones part. Finding the entrance to the pad compartment. This usually involves some clips, screws, or maybe even a secret handshake (just kidding…mostly).
Don’t worry, most coolers are pretty user-friendly. Unless yours was designed by a team of mischievous gnomes.
Usually you can figure it out by just looking, or in a worst-case scenario, consult the manual. Yes, I know. The horror!
Step 3: Evict the Old Tenants (The Gross Ones)
Okay, prepare yourselves. This is where things might get a little…funky. Those old pads? They've been through a lot.
Think of them as sponges that absorbed every airborne dust bunny and rogue dandelion seed in a five-mile radius. Maybe they even have their own ecosystem.

Don't be surprised if you find a fossilized insect or two. Just be brave and pull those soggy, sad pads out. Wear gloves if you're squeamish!
Step 4: Give It a Scrub-a-Dub-Dub
Now that the old pads are out, it's time for a little spa treatment for your cooler. Grab a hose and give the inside a good rinse.
Blast away any lingering grime and debris. Think of it as spring cleaning…for your cooler.
If you're feeling ambitious, you can even use a mild soap and a brush. Just rinse thoroughly afterwards. A clean cooler is a happy cooler!
Step 5: The Grand Pad Replacement Ceremony
This is it! The moment you've been waiting for. Time to install the new pads. New pads, new life, new cooler performance!
Unwrap those fresh, clean pads and marvel at their pristine glory. They’re ready to soak up water and bring cool, refreshing air to your abode.
Make sure you install them correctly. Most pads have a specific orientation. Consult the instructions (yes, again!) if needed. Proper installation is key.
Step 6: Button It All Up
Now that the new pads are in place, it's time to reassemble the cooler. Put the panels back on, secure the clips, and tighten the screws.
Basically, reverse the process you used to take it apart. If you have any leftover screws, don't panic. That just means your cooler is extra secure. (Just kidding! Try to find where they go).
Just make sure everything is snug and secure. You don't want any parts flying off when you turn it on!
Step 7: The Moment of Truth
Okay, deep breath. It's time to plug that baby back in. Cross your fingers, say a little prayer to the cooling gods, and flip the switch.
Listen for the satisfying hum of the pump and the gentle whoosh of air. Feel that cool breeze caressing your face.
Congratulations! You have successfully changed your swamp cooler pads. You are now a certified cooling champion. Go forth and conquer the heat!
Bonus Tip: Pad Selection 101
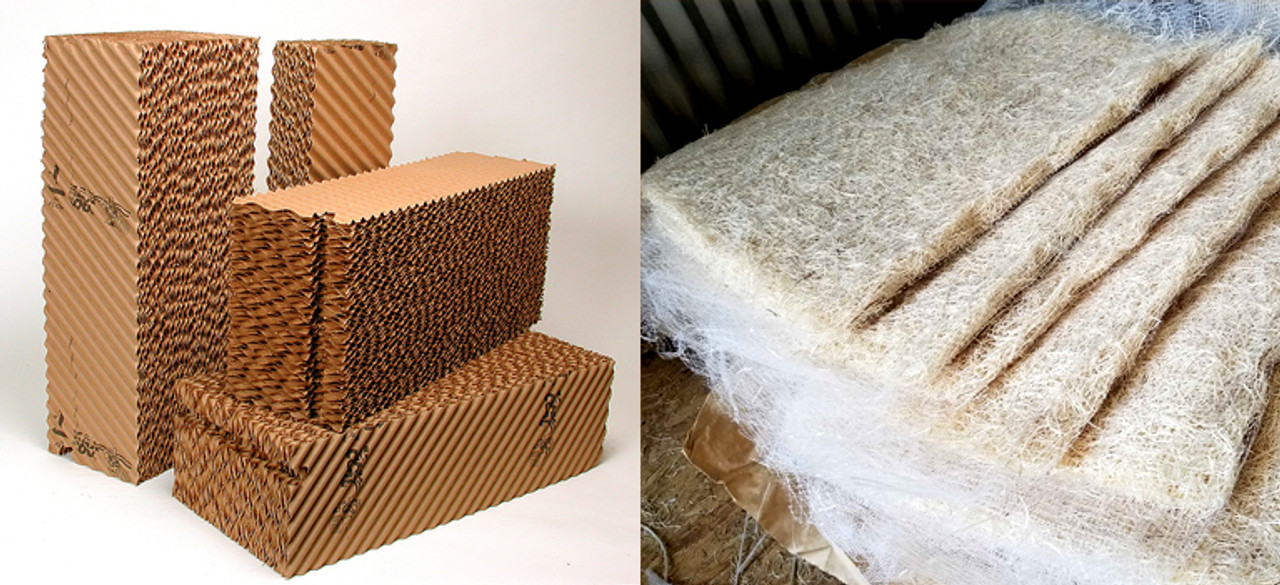
Not all swamp cooler pads are created equal! You've got your standard aspen pads, your more durable cellulose pads, and even some fancy synthetic options.

Aspen pads are the cheapest, but they don't last as long. Cellulose pads are a good middle ground, offering decent performance and longevity. Synthetic pads are the most expensive, but they can last for several seasons.
Consider your budget, your climate, and how much you value convenience when choosing your pads. Talk to the folks at your local hardware store if you're unsure which type is best for you. Do your research!
Bonus Tip: Extend Pad Lifespan
Want to get the most out of your swamp cooler pads? Here are a few tricks of the trade:
First, keep your cooler clean. Regularly rinse out the water reservoir to prevent mineral buildup. And give the pads a periodic cleaning with a soft brush.
Second, use a water treatment product. These products help prevent scale and algae growth. Keeping everything clean will keep your cooler running efficiently, and your air smelling fresh. Cleanliness is next to coolness!
Bonus Tip: The Great Pad Disposal Dilemma
So, what do you do with those old, funky pads? Don't just toss them in the trash! (Unless you really want to attract every stray animal in the neighborhood).
Aspen pads are biodegradable, so you can compost them if you're feeling green. Cellulose pads can sometimes be recycled, so check with your local recycling center. And synthetic pads? Well, they're probably destined for the landfill. But hey, at least you tried!

Proper disposal is important. Don't be a pad polluting menace!
Troubleshooting Time!
Sometimes, even with new pads, your swamp cooler might not be performing at its peak. Don't despair! Here are a few common problems and their solutions:
If the air isn't cool enough, make sure the pads are properly saturated. They should be damp to the touch. If they're dry, check the water pump.
If the cooler is making strange noises, it could be a sign of a failing motor or a clogged pump. Consult the manual or call a qualified technician.
The End (But the Cooling Continues!)
And there you have it! Everything you need to know about changing your swamp cooler pads. It’s not rocket surgery! And probably more fun than rocket surgery.
With a little effort and some elbow grease, you can keep your cooler running smoothly and your home feeling cool and comfortable all summer long. Now go forth and conquer the heat! You are a master of cooling!
Remember, stay cool and have fun! You are now an expert on swamp coolers. You're ready to teach a masterclass!