How To Add Screen Record To Control Center
Ever had that moment where you're trying to explain something super simple on your phone to a friend or, even better, your beloved aunt who thinks the internet is a series of tubes? Or maybe you just discovered a hilarious bug in your favorite game and want to immortalize it before it vanishes into the digital ether? You frantically try to describe it, waving your hands, making sound effects, and ultimately just wishing you could, you know, show them exactly what's happening on your screen. Well, my friend, prepare to have your life subtly, yet profoundly, changed. We're talking about bringing the screen record button out of its hiding spot and right into your phone's control center, where it belongs.
Your Control Center: More Than Just a Flashlight Button
Think of your phone's Control Center like the Swiss Army knife of your device – you know, that handy panel you swipe down (or up, depending on your phone model, no judgment here!). Most of us use it for the big hitters: turning Wi-Fi on and off, adjusting brightness, maybe firing up the flashlight when you're rummaging under the couch for a lost snack. But beneath the surface, it's got some serious superpowers. And one of the most underutilized, yet utterly fantastic, is the ability to customize it. Today, we're giving it a glow-up by adding a little red recording button that's about to become your new best friend.
Why Screen Record is Your New Digital Secret Agent
Let's get real for a sec. Screen recording isn't just for tech gurus or budding YouTubers. It's for you. It's for when you finally nail that impossible combo in a mobile game and want bragging rights. It's for when you're trying to show customer support that weird glitch they refuse to believe exists. It's invaluable for those "how do I...?" questions from your parents, so you can record a quick tutorial instead of typing out a novel. It's like having a tiny, dedicated camera person living inside your phone, ready to capture whatever digital shenanigans you're up to. Trust me, once you have it, you'll wonder how you ever survived without this digital superpower.
Must Read
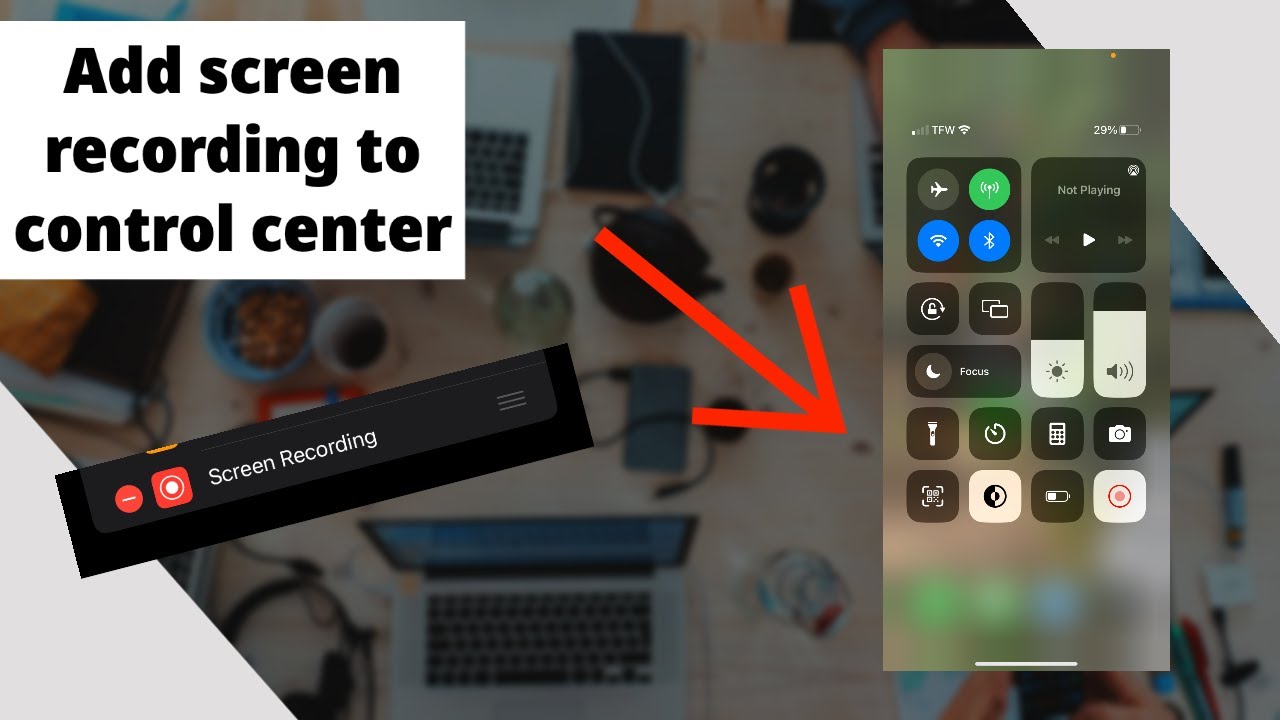
The Grand Reveal: Adding Screen Record to Your Control Center
Alright, enough preamble! Let's get down to brass tacks. This is easier than trying to explain cryptocurrency to a pigeon. Seriously.
Step 1: Into the Digital Command Center (Settings)
First things first, find that iconic gear icon on your home screen. That's your "Settings" app. Tap it like you're tapping for extra fries.

Step 2: Locating the Control Center's Lair
Once inside Settings, scroll down a bit. You're looking for an option that says "Control Center." It might be nestled between "General" and "Display & Brightness." Tap it with confidence!
Step 3: Customizing the Control Freaks (Controls, That Is)
Now you'll see "Customize Controls" (or "More Controls" depending on your phone's iOS version). This is where the magic truly happens. Tap it, and you'll see a list of "Included Controls" (stuff already in your Control Center) and "More Controls" (the hidden gems waiting to be added).
Step 4: Summoning the Screen Recording Beast!
Scroll through the "More Controls" list. Keep your eyes peeled for "Screen Recording." You'll see a little green circle with a white plus sign (+) next to it. Tap that plus sign like it owes you money! Poof! It's now moved up into your "Included Controls" list. Congratulations, you're practically a tech wizard.

Step 5: Optional but Recommended: The VIP Treatment
See those three horizontal lines (the "hamburger" icon) next to "Screen Recording" in your "Included Controls"? You can tap and drag that to reorder where the button appears in your Control Center. If you're going to be a frequent screen recorder, I suggest dragging it somewhere prominent, maybe right under your flashlight. Because, let's be honest, those two are probably going to be your most-used features now.
Testing Your Newfound Power
Okay, the hard part's over (and it wasn't even hard, right?). Now, swipe down (or up) to reveal your Control Center. Voilá! You should now see a new button: a solid circle inside another circle, usually red or white. That, my friend, is your Screen Record button.

To use it, simply tap it. You'll get a satisfying 3-second countdown (giving you just enough time to panic, then compose yourself), and then it's recording! A little red indicator (usually in your status bar or around your clock) will let you know you're live. To stop, just tap the button again in the Control Center, or tap the red indicator at the top of your screen. Your recorded masterpiece will be saved directly to your Photos app, ready for viewing, sharing, or showing off to your bewildered aunt.
Pro Tip: Don't Forget Your Voice!
Here's a little bonus for becoming a screen record pro: If you want to narrate your recording (like explaining to your aunt where to tap), long-press (or 3D Touch) the Screen Record button in the Control Center before you start recording. A little pop-up will appear, giving you the option to turn your Microphone Audio On or Off. This is a game-changer for those quick tutorials or "look at this funny thing!" moments.
So there you have it. You've officially upgraded your phone's functionality with minimal effort and maximum reward. Go forth and record your digital adventures, troubleshoot like a champ, and finally show, rather than tell, all the amazing (and sometimes frustrating) things happening on your screen. You're welcome.
