How Do I Change The Battery On My Nest Thermostat
Alright, smart home aficionados and comfort connoisseurs, let's talk about that unsung hero hanging on your wall: your Nest Thermostat! These clever gadgets are fantastic at keeping our homes cozy, saving energy, and generally making life a little smoother. But even the smartest tech needs a little TLC now and then. And guess what? Sometimes that TLC involves a simple, yet mighty, battery change. Far from a chore, this is actually a fun, empowering little DIY task that keeps your Nest purring like a kitten!
So, why bother? Well, your Nest Thermostat, particularly models like the Nest Thermostat E or the newest Nest Thermostat, relies on batteries (often backed up by your home's wiring) to keep its smart features running smoothly. When those batteries get low, you might start seeing warnings, or worse, your Nest could go completely dark, leaving you without control over your heating and cooling. A fresh set of batteries ensures uninterrupted comfort, keeps your schedule intact, and lets your Nest continue its energy-saving magic without a hiccup. It’s like giving your best friend a much-needed energy drink!
Ready to be your Nest's personal pit crew? Here’s how you can swap out those batteries in a flash:
Must Read
What You'll Need:
- Two fresh AAA alkaline batteries (make sure they’re not rechargeable, as these can have different voltage characteristics).
- Your hands! That's usually it – no tools required for most models!
The Super Simple Steps:
- Safety First! (And Power Off): Before you do anything, it’s always a good idea to head to your circuit breaker and turn off the power to your heating and cooling system. This isn't strictly necessary for a battery swap, but it's a great habit for any thermostat fiddling. Better safe than sorry!
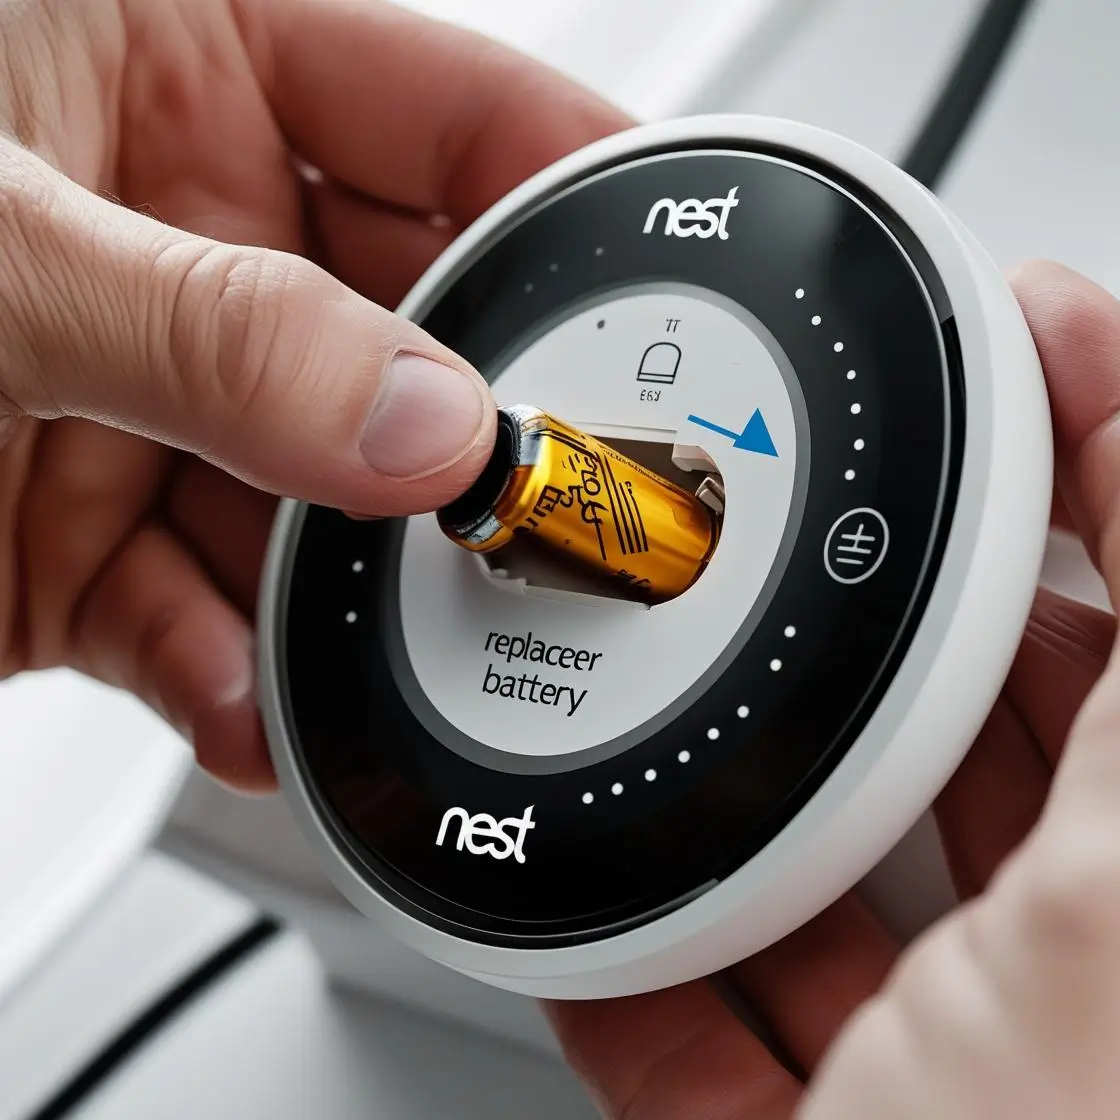
- Pop Off the Display: Your Nest Thermostat usually consists of two parts: the display unit (the round or rectangular screen you interact with) and the base plate, which is wired into your wall. To remove the display, simply gently pull it straight out from the wall. It’s often held on by magnets, so it should detach with minimal effort. You might hear a soft click.
- Locate the Battery Compartment: Once you have the display unit in your hand, flip it over. You'll see the back of the unit. For models that use user-replaceable batteries, you'll typically find a small compartment or visible slots for two AAA batteries.
- Swap 'Em Out: Carefully remove the old AAA batteries. Take note of the polarity (the + and - symbols) as you do. Now, insert your two fresh AAA alkaline batteries, making sure they match the correct polarity. This is crucial for your Nest to power up correctly!
- Reattach the Display: With the new batteries snugly in place, line up the display unit with the base plate on your wall. Gently push it back until it clicks securely into place. It should feel firm and stable.
- Power Up and Celebrate: Head back to your circuit breaker and turn the power back on to your HVAC system. Your Nest should spring back to life, likely displaying the Nest logo and then reconnecting to your Wi-Fi. Give it a moment to boot up and get back online.
And there you have it! You've successfully performed a battery transplant, extending the life and reliability of your smart thermostat. You're not just changing batteries; you're ensuring your home stays comfortable and smart without missing a beat. Go forth and enjoy your perfectly tempered home – you earned it!