Craftsman Riding Mower Drive Belt Diagram

Hey there, lawn warriors! Ever feel like your trusty Craftsman riding mower is suddenly...well, not riding? Like it's lost its get-up-and-go? Before you panic and start picturing a future of sweaty manual labor (shudders!), let's talk about something surprisingly simple: the drive belt. Yep, that unassuming rubber loop can be the key to unlocking lawn-mowing glory once again.
Now, I know what you might be thinking: "A drive belt diagram? Sounds complicated!" But trust me, it's way less intimidating than it looks. Think of it like a treasure map for your mower – a guide to getting it back on the road to perfectly manicured lawns. And who doesn't love a good treasure hunt?
Why a Drive Belt Diagram Matters (More Than You Think!)
Okay, so why should you even bother with a diagram? Let's break it down:
Must Read
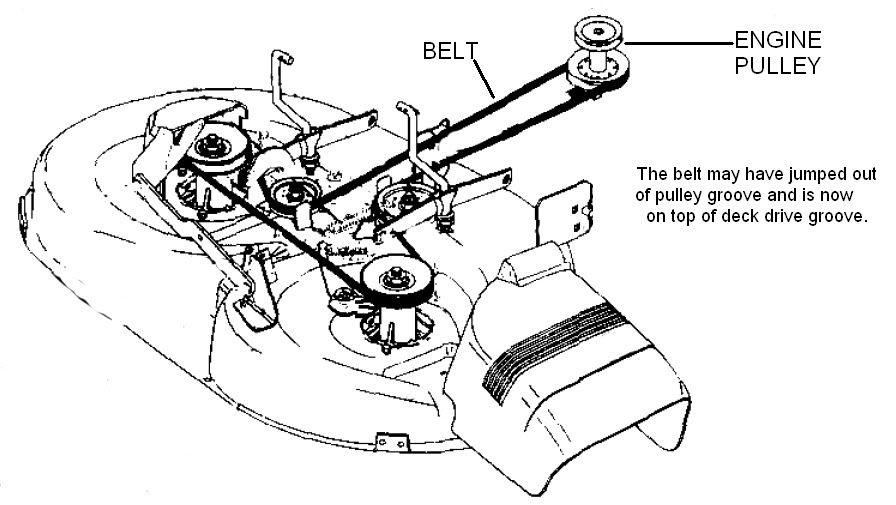
- Correct Installation: The most obvious reason! A drive belt has to be routed just right around the pulleys to work effectively. The diagram shows you exactly how it's done. Get it wrong, and your mower will either move at a snail's pace (or not at all!)
- Prevent Damage: Installing the belt incorrectly can put undue stress on it and the pulleys. That means premature wear and tear, and potentially costly repairs down the road. We want to avoid that, right? Right!
- Troubleshooting Made Easy: Sometimes, problems aren't obvious. But if you know how the belt should look according to the diagram, you can quickly spot if it's slipped off, worn out, or damaged.
- DIY Pride: There's something deeply satisfying about fixing things yourself. Knowing you can troubleshoot and replace a drive belt? That's a serious confidence booster. Prepare for envious glances from your neighbors!
Decoding the Diagram: It's Easier Than You Think!
Don't let those lines and circles scare you. Most Craftsman riding mower drive belt diagrams are surprisingly straightforward. Here's what to look for:
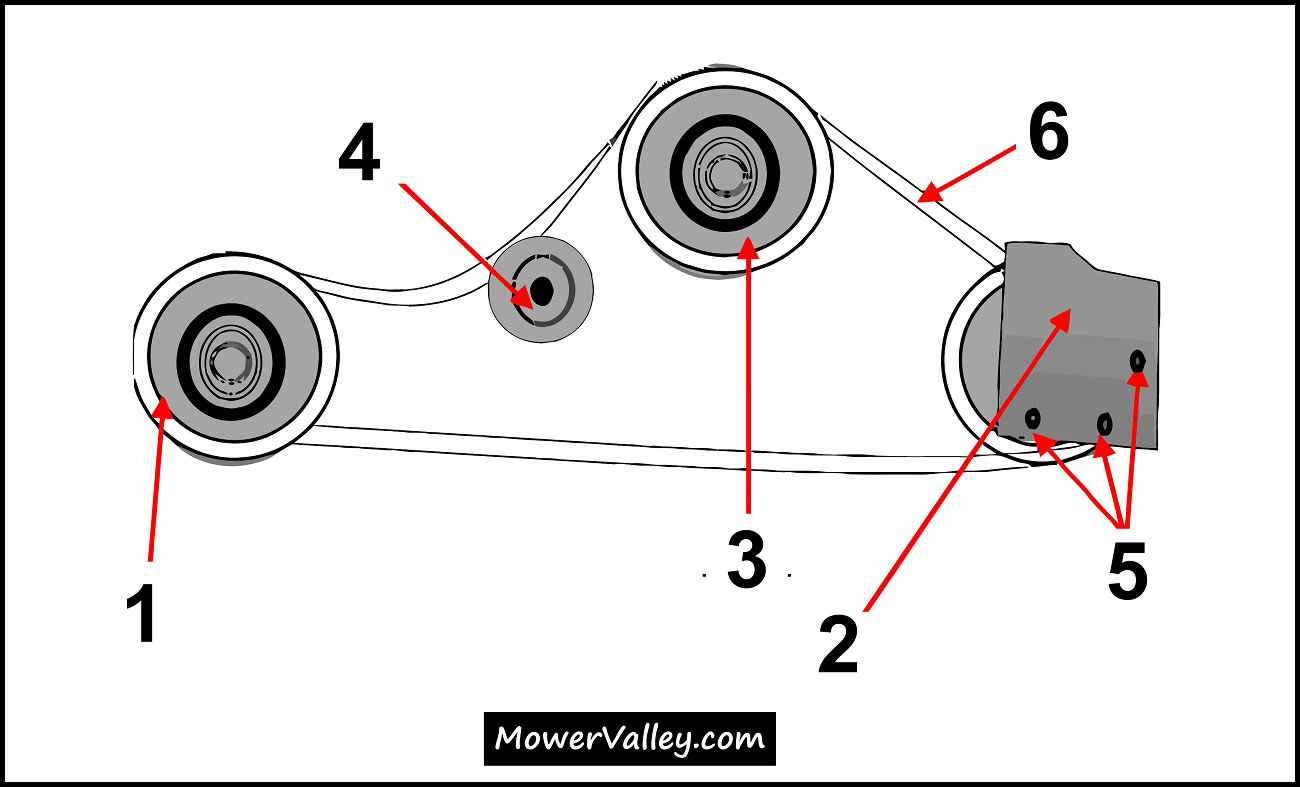
- Pulley Locations: The diagram will clearly show where each pulley is located on your mower. Pulleys are those grooved wheels that the belt wraps around.
- Belt Routing: This is the meat of the diagram. It shows the exact path the belt needs to follow around the pulleys. Pay close attention to the direction of the arrows!
- Tensioner Pulley: This pulley is spring-loaded and keeps the belt nice and tight. The diagram will show how the belt engages with it.
- Part Numbers: Often, the diagram will include the part number for the correct drive belt for your specific mower model. This is incredibly helpful when you're buying a replacement.
Pro Tip: Keep your mower's model number handy when searching for a diagram. That's the key to finding the exact diagram for your machine.
So where do you find these magical diagrams? The first place to check is your owner's manual. If you've misplaced it (we've all been there!), don't fret! A quick search online for "Craftsman riding mower drive belt diagram" + your model number will usually turn up plenty of results. You can also often find them on the Sears Parts Direct website, or other online parts retailers.
From Frowning to Mowing: Practical Tips
Ready to get your hands dirty (well, maybe a little)? Here are a few tips to make the process smoother:

- Safety First: Always disconnect the spark plug wire before working on your mower. We don't want any accidental starts!
- Take a Picture: Before removing the old belt, snap a photo of how it's routed. This can be a lifesaver if you get confused later.
- Wear Gloves: Protect your hands from grease and grime.
- Use the Right Tools: You'll likely need a socket wrench and maybe a screwdriver.
- Don't Force It: If something feels too tight or difficult, double-check the diagram. You might be missing something.
Remember, replacing a drive belt is a manageable DIY project. With a little patience and the right diagram, you can save yourself a trip to the repair shop and a hefty bill.
The Thrill of the Turf: Embrace the DIY Spirit!
So, there you have it! Demystifying the Craftsman riding mower drive belt diagram. It's not just about fixing your mower; it's about embracing a little bit of DIY spirit. It's about understanding how things work, and taking control of your lawn care destiny. And let's be honest, there's something deeply satisfying about firing up that mower after you've fixed it yourself and hearing that engine purr to life, ready to tackle the turf.
Ready to dive deeper? Explore online forums, watch some how-to videos, and don't be afraid to ask questions. The more you learn, the more confident you'll become in your lawn care abilities. So go forth, conquer your lawn, and enjoy the sweet smell of freshly cut grass. Your perfectly manicured kingdom awaits!