Can You Use Photoshop Brushes In Clip Studio
Okay, picture this: You're knee-deep in a digital masterpiece in Clip Studio Paint, feeling like the next Van Gogh, when BAM! You remember that amazing glitter brush you downloaded for Photoshop ages ago. The one that makes everything sparkle like a unicorn convention threw up on it. A tragedy, truly.
The Burning Question: Can We Mix and Match?
Is there a way to bring that sparkly goodness into Clip Studio? Can we cross the digital streams and unleash the brush-based potential? Well, buckle up, my friend, because I'm about to tell you!
The Short Answer (and Why You Should Care)
YES! You absolutely can, to a degree! It's not always a perfect, seamless, rainbows-and-puppies experience. But with a little know-how, you can import a whole galaxy of Photoshop brushes into Clip Studio Paint and make your art sing!
Must Read
Think of it like this: Photoshop and Clip Studio Paint are like two amazing ice cream shops. Both have incredible flavors, but wouldn't it be cool to combine them? Like, Photoshop's rocky road with Clip Studio's salted caramel? Pure genius!
The How-To (Simplified for Maximum Fun)
Alright, let's get down to brass tacks! No confusing tech jargon here, I promise. We're going to break this down into simple, easy steps, like building a magnificent Lego castle (but with less risk of stepping on a brick).
First, locate your Photoshop brushes. These usually come in a file ending in .ABR. Think of it as a digital treasure chest filled with brushy goodness. Keep it safe, keep it secret!
Next, fire up Clip Studio Paint. Open a new canvas, maybe something with a dragon on it, just for fun! Now, prepare for some digital wizardry!
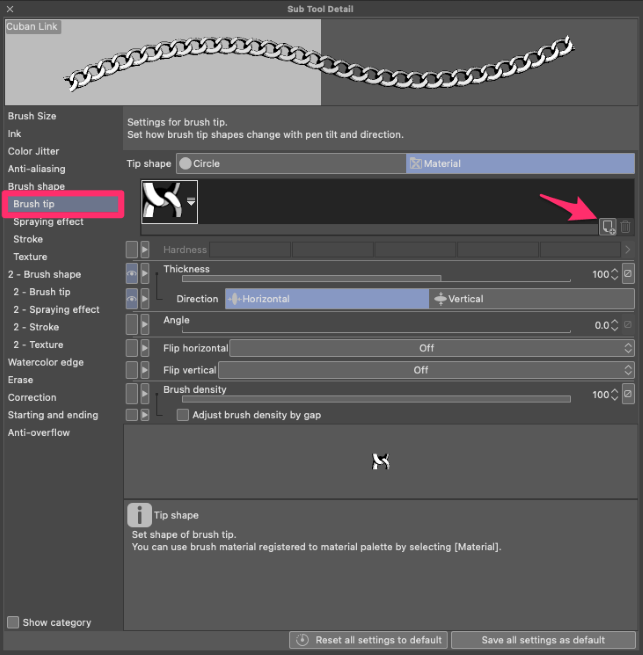
Go to your brush palette (it's usually on the side, looking all innocent). Find the little wrench icon; this is your secret passage to brush customization. Click it!
A whole new world of options will appear! Don't be scared! Look for something that says "Import brush." It might be hidden under a menu, but don't give up! The glitter is waiting!
Click that "Import brush" button, and a file explorer window will pop up. Navigate to the folder where you stashed your .ABR brush file.
Select the .ABR file and hit "Open"! Cross your fingers, toes, and maybe even your neighbor's fingers (with their permission, of course). Watch the magic happen!
Clip Studio Paint will now, hopefully, import your Photoshop brush. It might take a few seconds, depending on how complex the brush is. Patience, young Padawan!
And... PRESTO! Your Photoshop brush should now be chilling in your Clip Studio Paint brush library! It might have a slightly different name, but it's there, ready to be unleashed!
Important Caveats (Because Life Isn't Always Glitter)
Okay, hold your horses before you go painting glitter unicorns on everything. There are a few things to keep in mind. It's not always a perfect transfer.
Not all Photoshop brushes are created equal. Some are super complex and rely on Photoshop-specific features that Clip Studio Paint might not fully support. Think of it like trying to fit a square peg in a round hole… made of glitter.
You might need to tweak the brush settings in Clip Studio Paint to get it looking exactly like it did in Photoshop. Experiment with size, spacing, and opacity. It's all part of the fun!
Some brushes might just… not work. Don't take it personally! It's not you; it's the brush (probably). Just move on to the next sparkly treasure in your collection.
Also, be aware of performance. Super-complex brushes can sometimes slow down Clip Studio Paint, especially on older computers. If your computer starts sounding like a jet engine, maybe dial back the brush complexity a bit.
Troubleshooting Tips (for When Things Go Wrong)
So, you followed all the steps, and your Photoshop brush is still stubbornly refusing to cooperate? Don't despair! Here are a few things to try:
Make sure you're using the latest version of Clip Studio Paint. Updates often include improved brush import compatibility. Think of it as giving Clip Studio a super-powered brush translator.
Try importing the brush again. Sometimes, things just glitch out. A second try might be all it takes. Like restarting your computer when it's acting weird. The classic solution!
Check the brush settings in Photoshop to see if there are any unusual settings that might be causing problems. Sometimes, a brush is just configured in a weird way.
If all else fails, try searching online for solutions. The Clip Studio Paint community is huge and helpful. Someone else has probably encountered the same problem and found a fix.
Beyond the Basics: Getting Creative
Once you've mastered the art of importing Photoshop brushes, the real fun begins! Now you can start experimenting and creating truly unique brushes.

Try combining different Photoshop brushes to create your own custom brushes in Clip Studio Paint. The possibilities are endless! Think of it as a digital Frankenstein, but with brushes instead of body parts.
Use Photoshop brushes as a starting point and then tweak them in Clip Studio Paint to create something completely new. Change the shape, texture, or color dynamics to make it your own.
Share your custom brushes with the Clip Studio Paint community! Spread the brushy love and help other artists create amazing art. It's all about collaboration!
In Conclusion: Go Forth and Brush!
So, there you have it! You can, indeed, use Photoshop brushes in Clip Studio Paint. It's not always a walk in the park, but with a little patience and experimentation, you can unlock a whole new world of artistic possibilities.
Now go forth, my friend, and create something amazing! Unleash those Photoshop brushes, and let your creativity shine! And remember, when in doubt, add glitter!
Happy painting!