Smart Wifi Doorbell Camera Installation

Alright, superstar! You're about to embark on a mini-adventure that will totally transform your front door. We're talking about installing your very own Smart Wifi Doorbell Camera, and guess what? It's going to be so much fun, you'll wonder why you didn't do it sooner!
Forget those old, boring doorbells that just sat there. You're upgrading to a superhero gadget! Think of yourself as a secret agent, but instead of defusing bombs, you're just connecting a few wires and feeling like a total tech wizard.
Seriously, if you can plug in a toaster, you've got this. We're going to glide through this together, step by delightful step, making it feel less like a chore and more like a playful quest for home security greatness.
Must Read
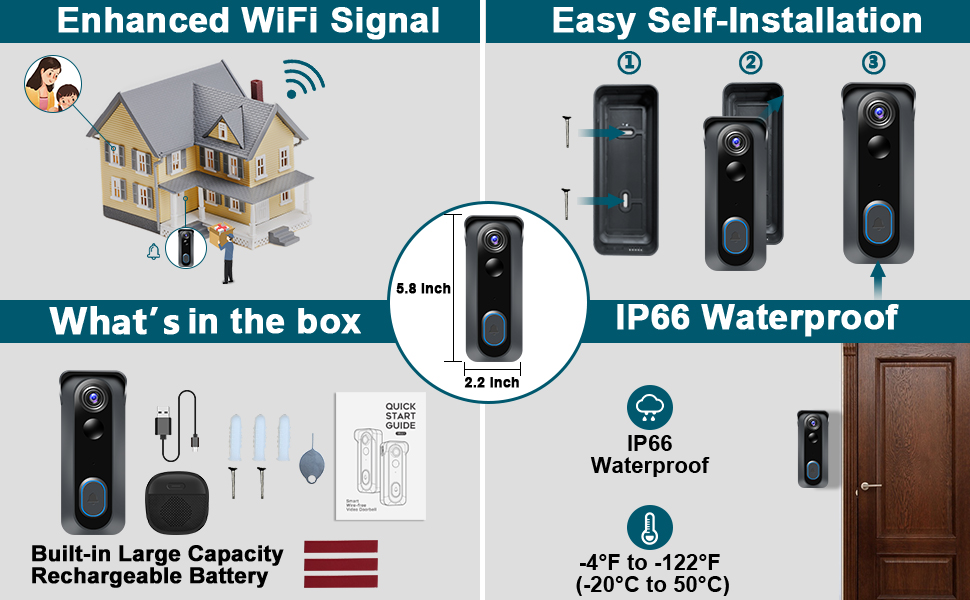
The Grand Unboxing: Treasure Awaits!
First things first, let's crack open that box! It’s like opening a present, right? Pull out all those goodies and lay them out. You'll probably find your snazzy new doorbell camera, a mounting bracket, some screws, a little tool kit (often a tiny screwdriver!), and maybe even some wire extenders.
Don’t be intimidated by the bits and bobs. Think of them as your personal toolkit for becoming the neighborhood's smartest home owner. Each piece has a purpose, and we’ll get to it in due time.
You might even spot a small wedge or angle mount. This little hero helps your camera see more of your porch, especially if your wall isn't perfectly straight-on. It’s all about getting that perfect view!
The Brains of the Operation: Your Smartphone App
Before we touch a single wire, let's get your phone in on the action. Grab your smartphone – yes, that magical device you use to scroll through cat videos – and find the app for your doorbell camera.
It's usually mentioned right on the box or in the quick start guide. Go ahead and download it! This app is going to be your command center, your virtual eyes and ears for everything happening at your front door.
Once downloaded, you'll set up an account. This is just like creating a new email or social media profile – simple peasy! Follow the on-screen prompts, create a password, and you're officially connected to your future doorbell.

Power Down, Partner! Safety First (and Fun!)
Okay, this is where we get a little serious, but still with a smile! Head over to your home's circuit breaker box. This is where all the electricity in your house gets its marching orders.
Locate the breaker that controls your doorbell or outdoor lights. Sometimes it’s labeled, sometimes it’s a fun little guessing game (but usually fairly obvious). Flip that switch to the "off" position!
"Always, always, always turn off the power before messing with wires. Safety is cool, shocks are not! You're a hero, not a lightning rod!"
Give your old doorbell a quick press to confirm it’s officially powered down. No sound? Perfect! You’ve successfully cut the power, making it safe to proceed with your smart home mission.
Saying Goodbye to the Old Guard: Removing Your Old Doorbell
Now, let’s go to your existing doorbell button. It’s been a loyal servant, but its time has come. Grab that tiny screwdriver that came with your new doorbell (or your own trusty one).
Gently unscrew the old doorbell from the wall. Don't yank it off like you're wrestling a bear! It usually just has a couple of small screws holding it in place.
Once it's loose, you'll see two small wires connected to the back. These are typically low-voltage wires, but remember, we turned off the power just to be super extra safe. Carefully disconnect these wires. Ta-da! Your old doorbell is officially retired.
The Mounting Bracket: Your Camera’s New Home
Now, grab your new mounting bracket. This is the sturdy foundation for your smart doorbell camera. Hold it up to where your old doorbell was, making sure those two little wires poke through the center opening.
Use a pencil to mark the screw holes on your wall. Some kits even come with a handy template! Drill small pilot holes if your wall is tough (like brick or stucco) or just screw the bracket directly into softer materials like wood siding.
Secure the bracket firmly to the wall using the screws provided. Make sure it's snug and level – you want your camera looking sharp, not wonky!
Wiring Wonders: Connecting Your New Smart Doorbell
Here’s the part that might sound a little intimidating, but trust me, it’s like connecting LEGO bricks. Take those two wires that were hanging out from your wall.
Look at the back of your new smart doorbell camera. You'll see two terminals, usually labeled something like "Front" or just two screw terminals. It doesn't usually matter which wire goes to which terminal in this low-voltage setup – just connect one wire to each.
Loosen the screws on the terminals, slide one wire under each screw, and then tighten them down. Give them a gentle tug to ensure they're secure. No loosey-goosey connections here!

Click and Connect: Attaching the Camera
With the wires connected to the back of your new doorbell, it’s time for the grand finale of the physical installation! Carefully tuck any excess wire back into the wall opening.
Now, align your smart doorbell camera with the mounting bracket you just installed. It should usually snap right into place, or slide down onto the bracket and secure with a small security screw at the bottom.
You’ll hear a satisfying click or feel it lock in. You’ve just attached your high-tech guardian to your home! Give yourself a mental high-five (or a real one, nobody’s judging).
The Moment of Truth: Power Up and Pair!
Alright, you amazing installer, head back to your circuit breaker box. It's time to bring your new doorbell to life! Flip that breaker switch back to the "on" position.
March back to your front door! Your new doorbell camera should light up, perhaps give a little chirp, or start blinking. This is its way of saying, "Hello, world! I'm ready for action!"
Now, grab your smartphone and open that app you downloaded earlier. The app will guide you through connecting your doorbell camera to your home's Wi-Fi network. This is usually super straightforward, just like connecting any new device to your Wi-Fi.

Testing, Testing, 1-2-3!
Once connected to Wi-Fi, it’s playtime! Press your new doorbell button. Did your indoor chime ring? Did you get a notification on your phone? If so, you’re golden!
Test the two-way talk feature. Say something silly into your phone, and listen for your voice from the doorbell. Wave at the camera and check the live feed on your app. Adjust the motion detection sensitivity if needed.
Walk back and forth in front of it like you're performing a dramatic monologue. Does it detect you? Does it record? Congratulations, you're officially a master of motion detection!
Victory Lap and Smart Home Bragging Rights
You did it! You successfully installed your Smart Wifi Doorbell Camera. Take a moment to admire your handiwork. Your front door now has a brain, eyes, and ears, all thanks to your awesome installation skills.
Now you can relax, knowing you'll always know who's at your door, whether you're at home, at work, or on vacation. Enjoy the peace of mind, the convenience, and most importantly, the incredible feeling of accomplishment.
Go ahead, do a little happy dance. You totally earned it! You transformed your home, and you had a blast doing it. Welcome to the future, you smart home superstar!