How To Make A Stainless Steel
Get Ready to Cook Up Some Shiny Awesomeness!
Ever wondered how those sleek, gleaming surfaces in your kitchen or that fancy watch manage to stay so stunningly bright? Well, buckle up, buttercups, because we're about to embark on a thrilling, super-simplified journey into the magical world of how to whip up a batch of stainless steel! Think of it less like heavy industry and more like a colossal, fiery cooking show where the ingredients are a bit… chunkier. No chemistry degree needed, just your sense of wonder!
Step 1: Gathering Our Star Ingredients – The Metal Mix-Up!
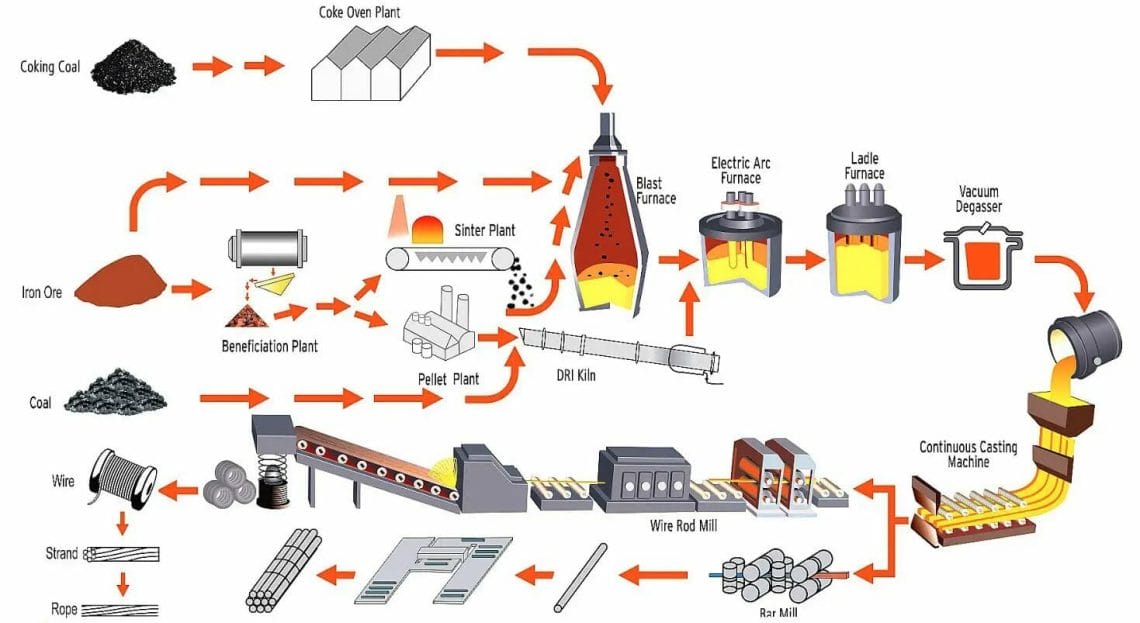
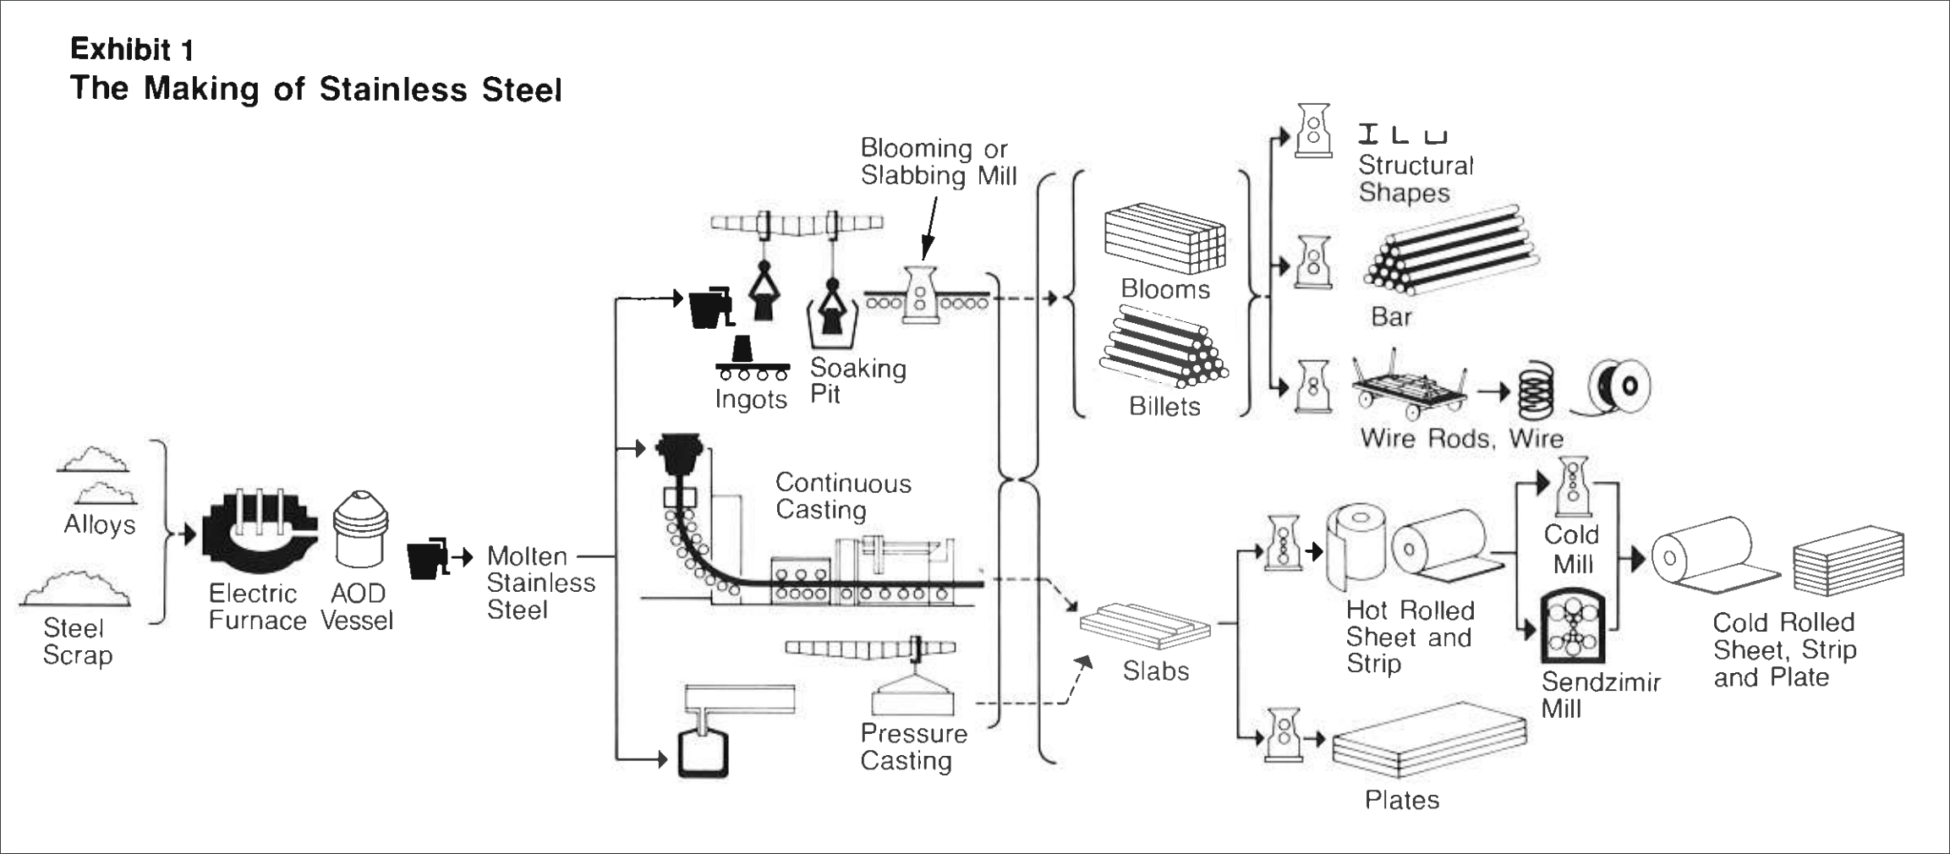
First things first, every great recipe starts with great ingredients. For our metallic masterpiece, we need a few key players. Our main character is plain old iron. Picture it as the sturdy flour in our cosmic cake – the big, strong base that holds everything together. But regular iron can be a bit… well, rusty. So, we invite its dazzling, super-powered friend to the party: chromium! This is our magic shield, the ingredient that gives stainless steel its legendary resistance to tarnish and stains. Without chromium, it would just be, well, plain old steel with an attitude problem when it rains!
Sometimes, we also invite other fantastic characters. Think of nickel as the charming guest who adds extra sparkle and makes everything a bit more resilient and sleek. And depending on what kind of super-specific powers we want our steel to have, we might sprinkle in tiny bits of other elements like manganese or molybdenum, like adding a pinch of secret spice for an extra kick! We gather these raw materials – often in giant, chunky forms – and get them ready for their grand transformation.
Must Read
Step 2: The Fiery Melting Pot Disco!
Now for the main event! Imagine the biggest, most spectacular oven you’ve ever seen, cranked up to temperatures hotter than a dragon's fiery breath – we're talking thousands of degrees Fahrenheit! This is our electric arc furnace, a giant metal cauldron where our ingredients are about to have the ultimate melting pot party. We toss in the iron, the chromium, and all the other chosen allies. Sparks fly, lights flash, and the metals begin to melt down into a shimmering, molten lava-like liquid. It's like watching a heavy metal concert where the instruments are melting and everyone is just thrilled about it!
Step 3: Secret Sauce & Stirring!
Once everything is a bubbling, glowing liquid, it's time for some serious refinement. We don't just want a hot mess; we want a perfectly blended, smooth, metallic concoction. This often involves moving the molten metal to another special furnace, like a giant mixing bowl, where we can fine-tune its composition. This is where the master chefs (metallurgists, in fancy terms!) make sure the exact right amounts of each ingredient are present. It's crucial for the steel to have its unique "stainless" properties.
"This isn't just mixing; it's a careful dance of elements, ensuring every drop of metal is ready for its destiny of dazzling durability!"
They might even use fancy techniques to remove unwanted impurities or gasses, making sure our metallic brew is as clean and pure as possible. Think of it as skimming the cream off the top, but way more epic and involving giant ladles of molten magic.
Step 4: From Liquid Lava to Solid Gold (or Silver-ish)!
Our molten, perfect mix is now ready to take on a more solid form. We pour this glowing, orange-hot liquid into giant molds. These molds shape the liquid metal into large slabs, billets, or blooms – essentially big, chunky blocks of what will soon become our beloved stainless steel. Picture pouring chocolate into a huge candy bar mold, but instead of chocolate, it's liquid metal, and instead of a candy bar, it’s a colossal metal ingot. As it cools, it solidifies into these enormous, impressive metal bricks.
Step 5: Rolling with the Punches – Shaping the Shine!
Those big, chunky blocks are impressive, but not very useful for making spoons or sinks! So, we send them on a trip through massive rolling mills. Imagine giant, industrial-strength rolling pins, hotter than a summer's day on the sun. The colossal blocks are heated up again and then squashed and stretched through these rollers, getting thinner and longer with each pass. This is where it really starts to look like the stainless steel we recognize – becoming sheets, plates, or long coils, like giant metal ribbons. Sometimes it's hot-rolled, sometimes cold-rolled for extra smoothness and strength, depending on its final destination.
Step 6: The Grand Finale Polish!
Almost there! Our newly shaped stainless steel might still look a bit rough around the edges, like it just rolled out of bed. So, it gets some pampering. This involves cleaning, annealing (a special heat treatment to make it even tougher and more workable), and often a final pass through polishing machines. This is where it gets its signature smooth, shiny, and beautiful finish. It’s like sending our metal through a spa day, ensuring it looks absolutely fabulous and is ready to conquer the world of kitchens, cars, and countless other places where strength meets sparkle.
And there you have it! From humble ingredients to a dazzling, super-strong material, making stainless steel is a fantastic adventure in metallurgy. So next time you see that gleaming surface, give a little nod to the incredible fiery journey it took to get there!