Alright, buckle up, buttercups! Get ready to unleash the cinematic genius hidden within your video camera, beaming straight onto your glorious TV screen. Forget complicated manuals and head-scratching diagrams, because we're about to make this connection so ridiculously easy, you'll wonder why you ever hesitated!
Imagine this: your latest masterpiece, whether it's Fido's adorable antics or Aunt Mildred's epic karaoke performance, is just begging to be seen on the big screen. No more squinting at tiny camera displays! We're talking full-blown, living room premiere vibes, right here, right now. Get ready to transform your living room into a blockbuster cinema!
The Grand Cable Unveiling: Your Connection Superheroes!
First things first, let's talk about our trusty sidekicks: the cables. You'll primarily encounter two main types that act as the magical bridge between your camera and your TV. Think of them as the express lanes for your video adventures, each with its own personality and superpowers!
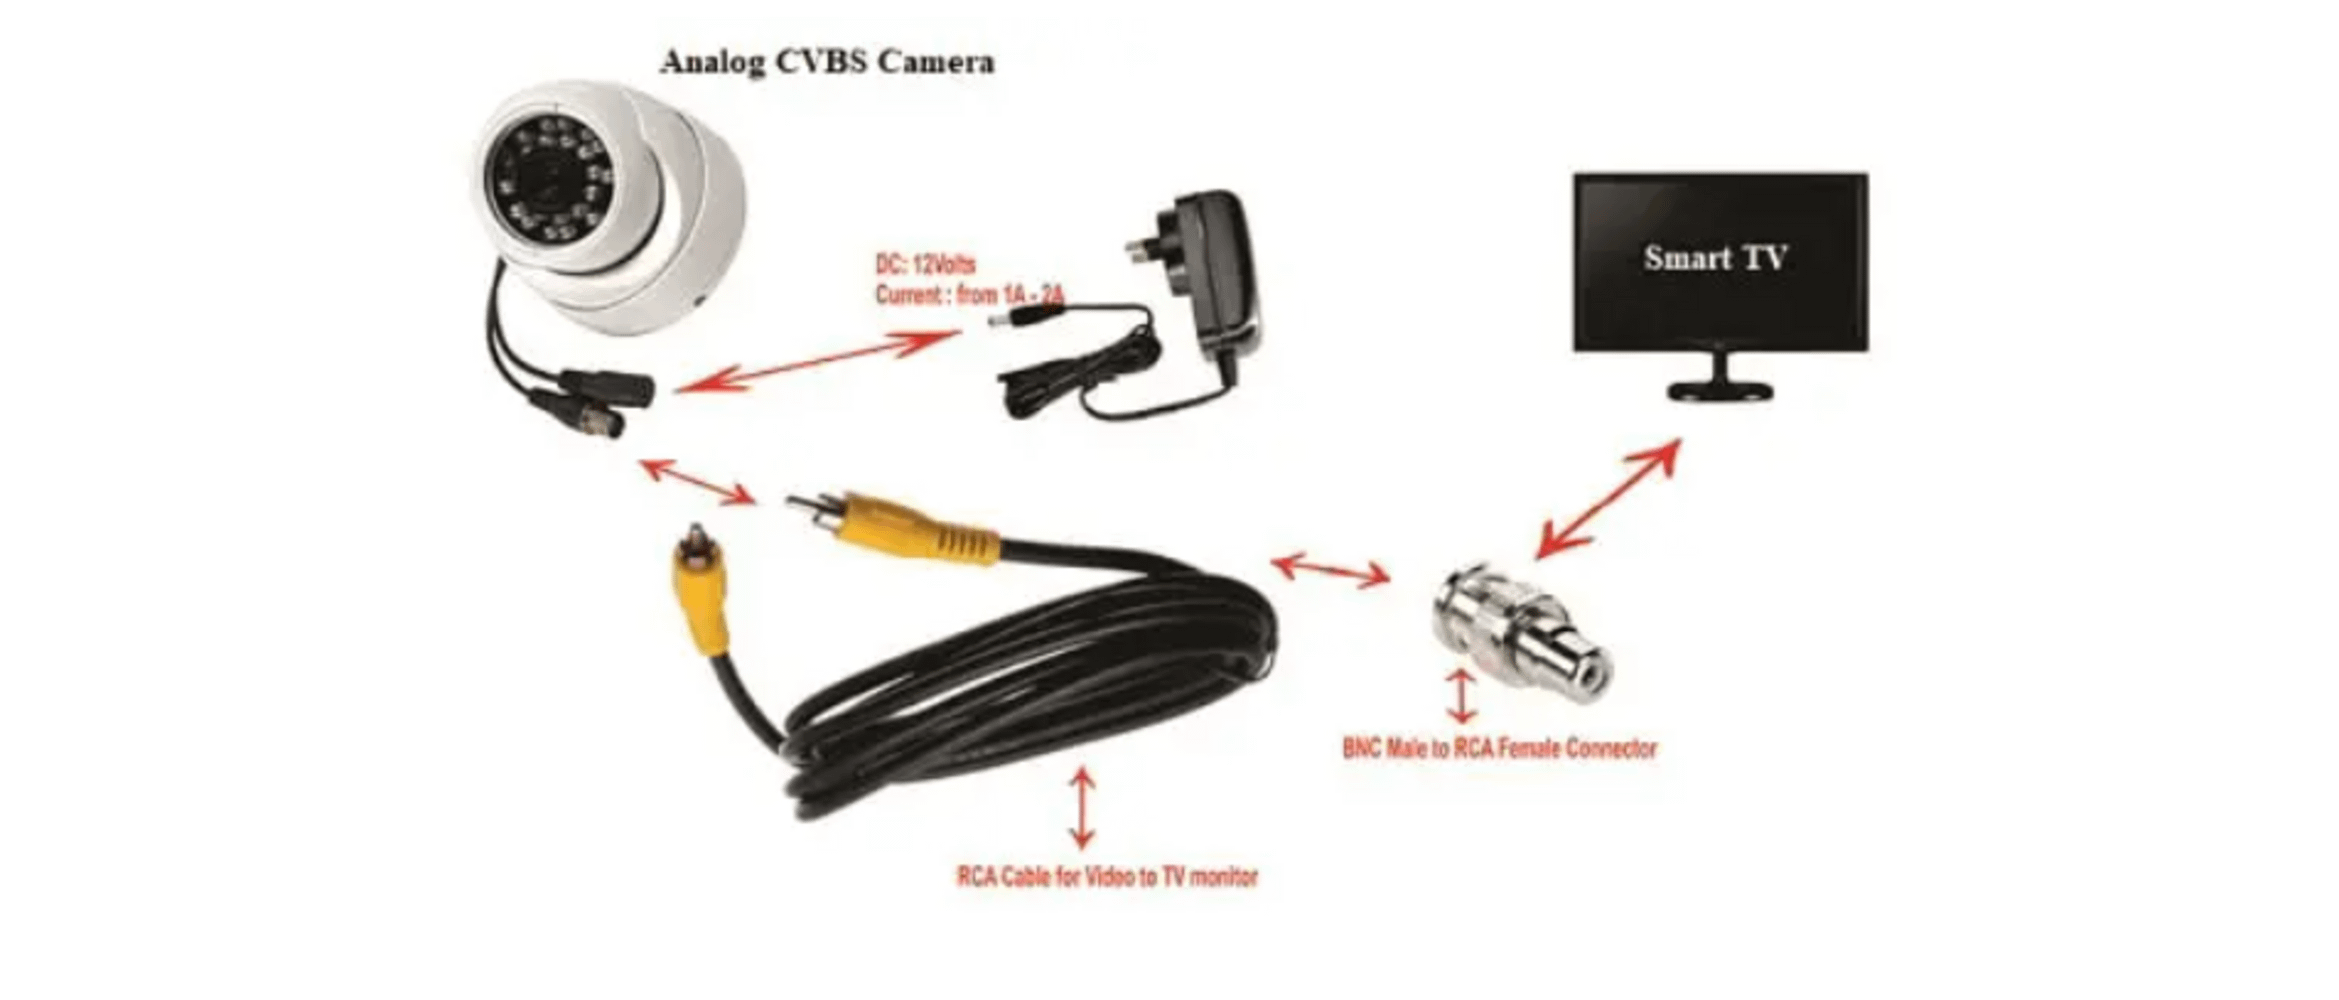
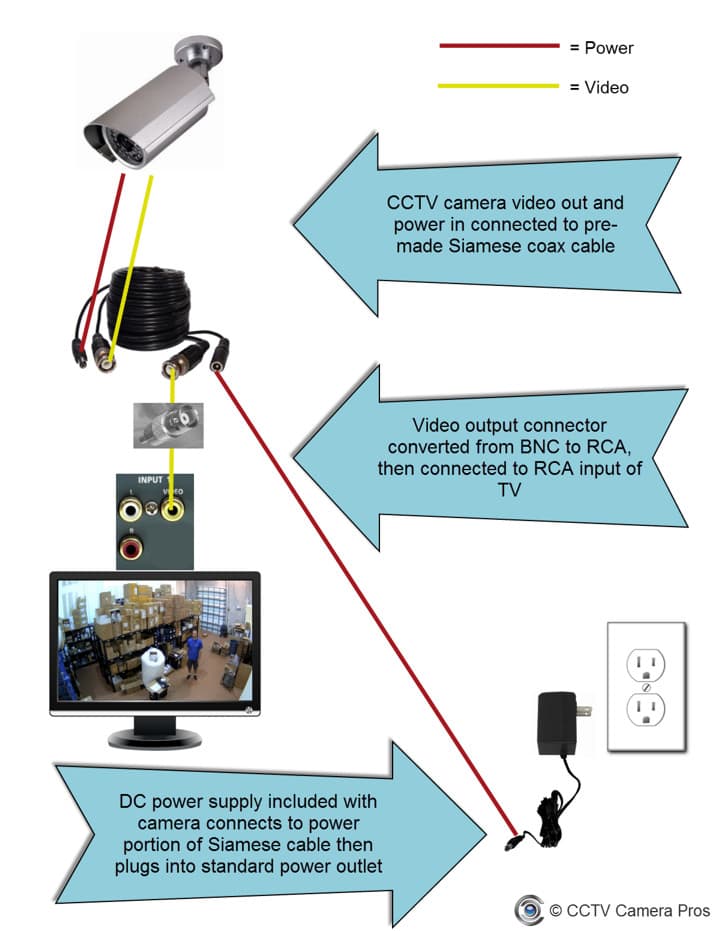
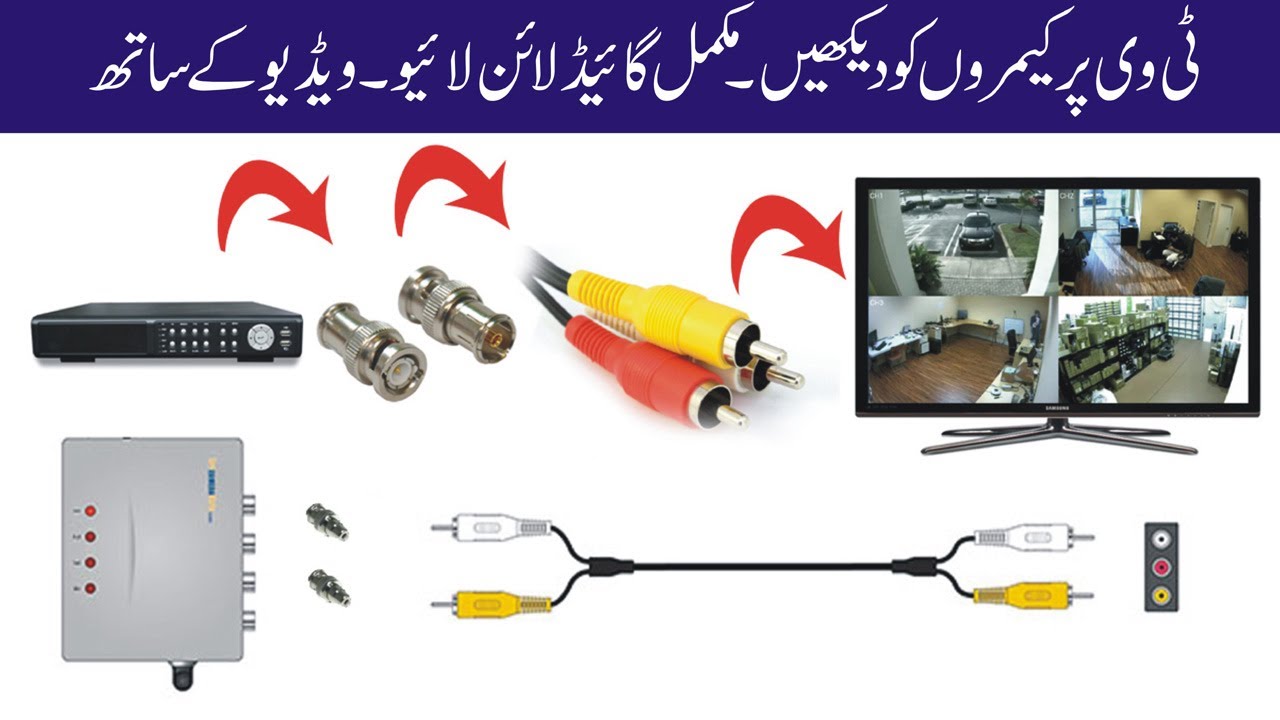
Ah, the classic RCA cables! These are the friendly, often brightly colored ones, usually a trio of yellow, red, and white. They're like the old-school cool kids of the AV world, reliable and always ready for action, bringing a touch of retro charm to your modern viewing experience.
The yellow plug is your star player; that's for the actual video signal, bringing all the amazing visuals to life. The red and white plugs? They're the dynamic duo handling your audio, ensuring every whisper, cheer, or dramatic soundtrack is heard loud and clear. They work together like a perfectly synchronized team!
Now, let's embark on a thrilling scavenger hunt for their matching dance partners on your camera. Look for an "AV Out" port, sometimes playfully labeled "Video Out" or even a tiny jack that might simply say "A/V". It might be a single port that uses a special cable to split into the three RCA colors, or it could be three separate, clearly marked ports, waiting patiently for their connections.
Pro Tip Alert: If your camera has a single port that looks suspiciously like a regular headphone jack but is meant for A/V output, you'll absolutely need that special adapter cable that came with your camera. It's like a secret handshake between devices, and without it, the conversation just won't happen!
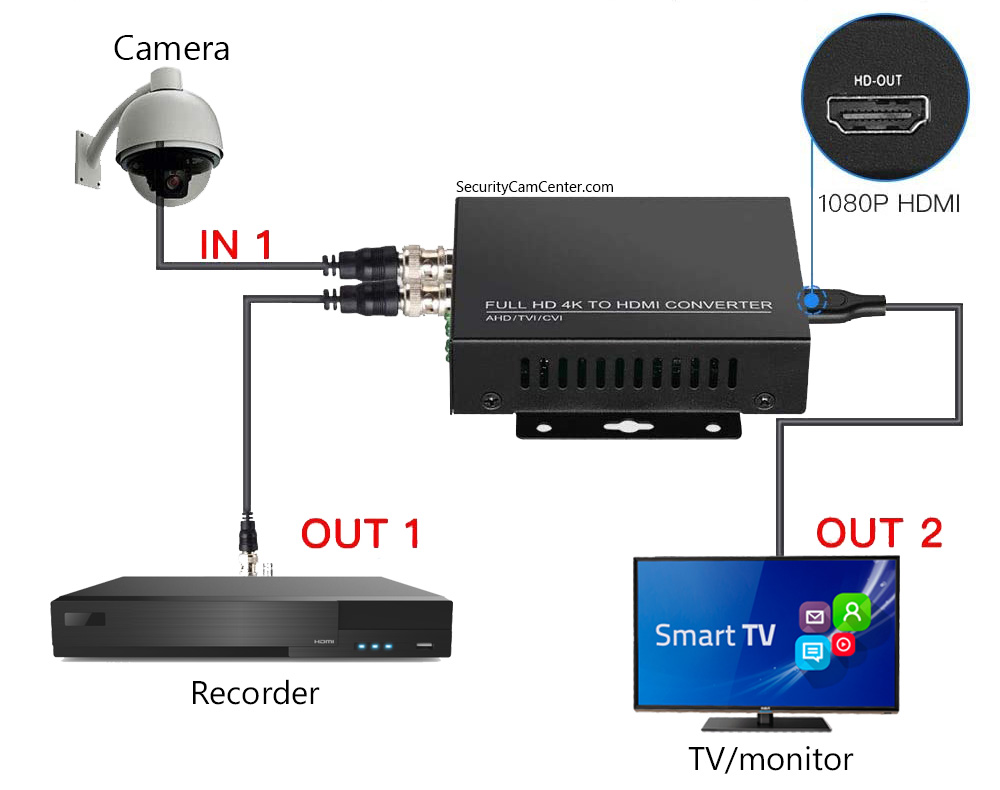
How to connect a HD security camera to TV using HDMI converter
Next, let's scout out the TV's welcoming committee. Spin that bad boy around (carefully, of course, no broken screens on our watch!) and look for input ports that mirror our colorful trio. You're searching for "Video In" or "AV In", often labeled with the same yellow, red, and white circles. They might be tucked away, but they're there, ready to receive your visual bounty. Don't be shy; they're practically winking at you!
Got 'em? Fantastic! Now for the truly satisfying part: simply match the colors! This is where your inner artist shines! Yellow to yellow, red to red, and you guessed it, white to white. It's like a super simple color-by-numbers game, but the reward is seeing your amazing video playback! Feel that click? That's the sound of success!
Once those plugs are snuggled in tight – no wobbly bits allowed! – grab your TV remote. This isn't just a remote; it's your magical wand for this operation! You need to tell your TV exactly where to look for the incoming awesomeness from your camera. Find the "Input" or "Source" button on your remote. Press it like you mean it, with purpose and a touch of theatrical flair!
You'll see a menu pop up on your screen, a digital list of all your TV's potential connections. It will offer choices like "HDMI 1", "TV", or maybe "Component". What you're looking for is usually something along the lines of "AV", "Video", or "Input 1/2/3", corresponding to precisely where you plugged in your RCA cables. Cycle through them with a sense of anticipation until... BAM! There's your camera's live feed or playback, crystal clear and ready for its close-up!
The Sleek Superstar: HDMI Cables!
Now, let's talk about the modern marvel: the HDMI cable. This sleek, usually black cable is the undeniable superstar of high-definition connections. It's like the super-express lane of digital data, carrying both stunning high-definition video AND crystal-clear audio all in one glorious, streamlined connection! It truly is a marvel of simplicity.
How-to Connect a Security Camera to TV - YouTube
No more matching a rainbow of colors here! The HDMI cable has a distinctive, trapezoid-like shape that only fits one way – a stroke of design genius for the easily confused among us (no judgment!). It’s wonderfully intuitive, designed to make your life blissfully simple. This is truly the "plug and play" champion, delivering instant gratification!
On your camera, embark on another mini-quest to find a port that proudly declares "HDMI Out". It might be a standard size, just like the one on your TV, or it could be a smaller Mini-HDMI or Micro-HDMI port, especially common on compact cameras or camcorders. If it’s smaller, don't fret! You'll simply need a specific cable with the correct miniature end for your camera and a standard HDMI end for your TV. Adapt and conquer!
Golden Rule: Always ensure you have the right type of HDMI cable for your camera. A common hero in these scenarios is the Mini-HDMI to HDMI cable, readily available. A quick peek at your camera's manual or a close look at the port itself will tell you exactly what you need!
And on your TV? Oh, you’ll find plenty of these glorious HDMI In ports! They're usually clearly labeled "HDMI 1", "HDMI 2", "HDMI 3", and so on, often lined up like eager little soldiers ready for connection. They’re practically waving at you, inviting you to connect and enjoy the high-definition goodness!
Connecting an HDMI cable is so straightforward, it feels almost like cheating, it's that easy. Just gently push one end into your camera's HDMI Out port and the other end into an available HDMI In port on your TV. There's only one way it fits, so no fumbling required – it's designed to be foolproof!
Can I Connect a Security Camera or Surveillance DVR System Directly to
Once connected, grab that trusty remote again. Hit the "Input" or "Source" button, just like before, with the same confident flourish! This time, you'll be looking for the specific HDMI input you used – if you plugged into "HDMI 2", select "HDMI 2" from the list. And just like magic, your camera's view should burst onto the screen, vibrant and crisp!
Uh-Oh! What If Nothing Happens? Don't Panic, You're a Troubleshooting Champion!
Sometimes, even with all our enthusiasm and careful plugging, technology likes to play a little hide-and-seek. But fear not, intrepid connector! Most "problems" are super easy to fix, more like minor puzzles than insurmountable challenges. We've totally got this!
First Troubleshooting Step: The Input Dance! Did you absolutely select the correct input on your TV? This, my friend, is the number one culprit in 99% of "nothing happening" scenarios! Double-check that you've chosen "AV" or the right "HDMI number" that matches precisely where you plugged in. Cycle through them again, slowly and deliberately, just to be sure your TV isn't just playing coy!
Second Troubleshooting Step: Power Up! Is your camera actually ON? And is it happily sitting in playback mode or recording mode, depending on what you want to show? Make sure its battery isn't flat, too; a lifeless camera can't perform miracles. A little power goes a long, long way in the world of electronics!
Third Troubleshooting Step: The Cable Check! Are your cables securely plugged in on BOTH ends? Give them a gentle but firm push. Sometimes they can be a bit shy and need a little encouragement to make a solid connection. Try swapping the cable if you have a spare, just in case one is having an off day and secretly went on strike.
How to Connect a CCTV Camera to Television TV with Online IT Solution
Fourth Troubleshooting Step: The TV Power Cycle! Sometimes your TV just needs a little brain refresh, like a quick nap. Turn the TV off, unplug it from the wall for about a minute, giving it a true digital detox. Then, plug it back in and turn it on. It's like giving it a mini-vacation, and often, it comes back refreshed and ready to connect!
Fifth Troubleshooting Step: Camera Settings! Some cameras have an internal setting that needs to be switched from, say, USB mode to Video Out mode. Dive into your camera's menu (gently, please!) and look for anything related to "Output" or "AV Out" settings. It might be hiding a crucial switch that needs to be flipped to let your camera "talk" to the TV!
The Grand Finale: Bask in Your Glory!
Congratulations, you magnificent tech wizard, you! You've successfully conquered the mighty challenge of connecting your video camera to your TV. Go ahead, pat yourself on the back, do a little happy dance, you totally deserve it. You've unlocked a new level of home entertainment!
Now you can relive those precious moments, share your adventures with loved ones on a grand scale, or simply marvel at the stunning clarity of your own videography. The world of big-screen camera playback is now your oyster, ready for you to explore!
So grab some popcorn, dim the lights, and prepare for your private screening – or even host a public one for your adoring fans! You've earned it. And remember, every connection you make, every cable you conquer, makes you a little bit more of a tech superhero. Keep on creating, keep on connecting, and keep on shining!