How To Connect Surveillance Camera To Tv

Alright, let’s talk about something a little bit… spy-ish. No, not sneaking around in a trench coat, but rather the surprisingly satisfying art of connecting your surveillance camera to your TV. You know, for those moments when you just need to see if it was the neighbor's cat or your own mischievous furball who knocked over the potted plant.
It’s a bit like trying to get two distant relatives to finally have a decent conversation at a family gathering. You know they should talk, but getting them to actually do it? That’s where the magic, or sometimes, the head-scratching, happens.
Why Bother, You Ask?
Well, sometimes, checking your phone app feels a bit like peeking through a keyhole. You want the grand, cinematic experience! You want to see the glorious, full-screen drama unfold. Maybe you’re waiting for a package and don’t want to keep running to the window like a mad person. Or perhaps you just want to feel like you’re in your own personal command center, sipping coffee while monitoring the squirrel invasion of your bird feeder.
Must Read
Whatever your reason, bringing that little eye-in-the-sky onto the big screen is a power move. And it’s often easier than you think.
The Arsenal: What You'll Need
Before we dive into the spaghetti junction of cables, let’s gather our tools. Think of it like preparing for a gourmet meal – you need the right ingredients, or you’ll end up with… well, let’s not talk about my last cooking attempt.
- Your Camera: Obviously! Make sure it’s powered up and sending a signal.
- Your TV: The bigger, the better for that dramatic effect.
- The Right Cables: This is where things can get a little wild. We're talking RCA (those red, white, and yellow old-timers), HDMI (the sleek, modern hero), or even BNC (more common for professional CCTV).
- Optional but Often Handy: A DVR (Digital Video Recorder) or NVR (Network Video Recorder). These are the brains of the operation, the master librarians of your video footage.
- Sometimes a Smart Stick: Like a Chromecast or Fire TV Stick, especially for those fancy IP cameras.
Seriously, mapping out your cables is like untangling a ball of yarn after your cat has had its way with it. A true test of patience!
The Grand Connection: Let's Get This Show on the Road!
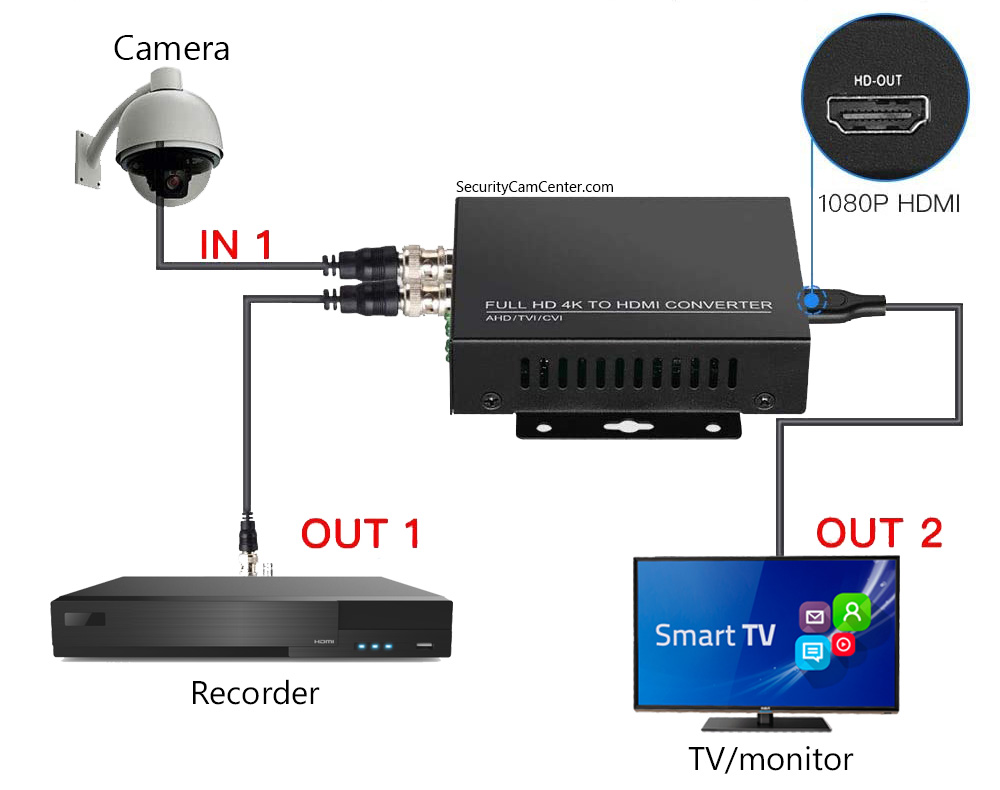
Method 1: The Old School, Direct Hook-Up (Analog Cameras)
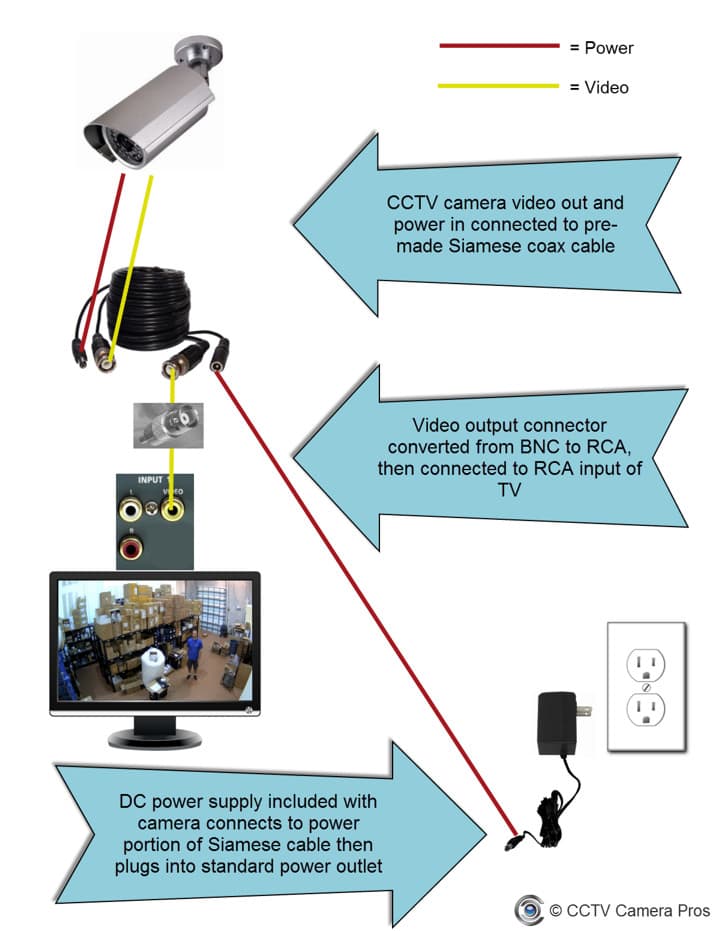
If you've got an older, analog camera (often with a single BNC output), this is like plugging in your old VCR. Simple, direct, and wonderfully retro.
You’ll likely need a BNC-to-RCA adapter, or if your TV is ancient, maybe a direct BNC input. Connect the camera's BNC cable to the adapter, then the RCA (yellow) cable to your TV's video input. Don't forget to plug in the camera's power!
Then, grab your TV remote and cycle through the input sources (usually labeled "Input," "Source," or "AV"). Keep pressing until you see your camera's feed. It's that satisfying moment when the fuzzy static disappears, and suddenly, you're watching your driveway live!
It might not be 4K ultra-HD, but it’s real-time surveillance, baby!
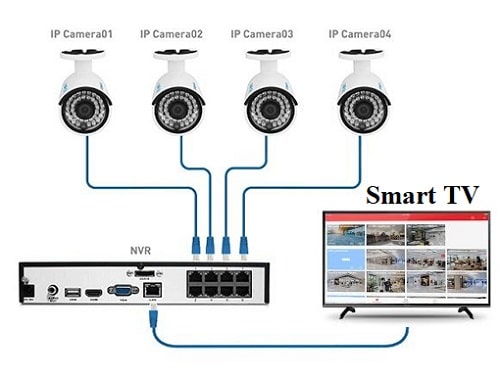
Method 2: The Command Center Approach (Via DVR/NVR)
This is probably the most common scenario for multi-camera setups. Your DVR/NVR is like the mission control center, collecting all the feeds.
First, make sure all your cameras are properly connected to your DVR/NVR. Then, connect your DVR/NVR to your TV. Most modern DVRs/NVRs will have an HDMI output. This is your best bet for clarity and ease.
Grab an HDMI cable (the universal connector for all things high-definition) and plug one end into the DVR/NVR's HDMI Out port and the other into an available HDMI In port on your TV. Power everything on.
Again, use your TV remote to switch the input source to the correct HDMI channel (e.g., HDMI 1, HDMI 2). Voila! You should now see your glorious multi-camera view, probably in a nice grid layout. It’s like having your own mini "situation room" in your living room.
If your DVR/NVR is older, it might have VGA or even RCA outputs. The principle is the same: match the output on the recorder to an input on your TV using the appropriate cable.
Method 3: The Smarty Pants Way (IP Cams & Streaming Devices)
Got a modern IP camera that primarily works with an app? You might not have a direct cable connection. But fear not, tech-savvy friend!

This is where your Chromecast, Amazon Fire TV Stick, or other smart streaming device comes into play. Many modern IP camera systems (like Ring, Arlo, Nest, etc.) have integrations with these devices.
Essentially, you cast or mirror the camera feed from your phone/tablet app to your TV via the streaming stick. Or, some camera apps have a dedicated "TV app" that you can download directly onto your smart TV or streaming device. Check your camera's specific instructions for compatibility.
It’s like telling your phone, "Hey, big screen, show them what you've got!"
A Few Friendly Reminders (The "Don't Forget" List)
- Power Up!: Sounds obvious, but make sure everything—camera, DVR/NVR, TV—is plugged in and turned on. I've spent embarrassing minutes troubleshooting, only to find a loose power cord.
- Input, Input, Input!: This is the number one culprit for "why isn't this working?" Don't forget to select the correct input source on your TV.
- Resolution Woes: If the picture looks squished or stretched, check your camera and DVR/NVR settings for output resolution. Sometimes a quick tweak makes all the difference.
- Read the Manual (Gasp!): I know, I know. It's the last resort. But sometimes, those dusty old pages (or digital PDFs) hold the key to specific model quirks.
And there you have it! In no time, you'll be watching your doorstep, your backyard, or even your pet's antics with newfound clarity on the big screen. It’s a small victory, but a satisfying one. Now, if you'll excuse me, I think I just saw a rogue leaf blow across my driveway, and I need to investigate in glorious HD!