Changing Batteries In Honeywell Thermostat

Alright, so picture this: you're just chilling, maybe binging your favorite show, when suddenly it hits you. That little shiver down your spine? It’s not a ghost, thank goodness. It's your house, feeling just a tad colder than it should. Or, heaven forbid, a bit warmer than that perfect Goldilocks zone you usually enjoy.
You wander over to the thermostat, maybe give it a hopeful pat, like it’s a temperamental pet. And there it is. That dreaded, blinking, or just plain missing display on your trusty Honeywell. Ugh. My friend, you’re not alone. We’ve all been there, standing in front of that seemingly complicated little box, wondering if you need to call a wizard or, worse, an electrician.
Hold Up, Don't Panic!
Before you dive into a full-blown existential crisis about your home's climate control, let's take a collective deep breath. Because, honestly? Nine times out of ten, the culprit isn't some complex wiring issue or a possessed HVAC system. Nope. It's usually something far, far simpler. Something so simple, in fact, that we often overlook it entirely.
Must Read
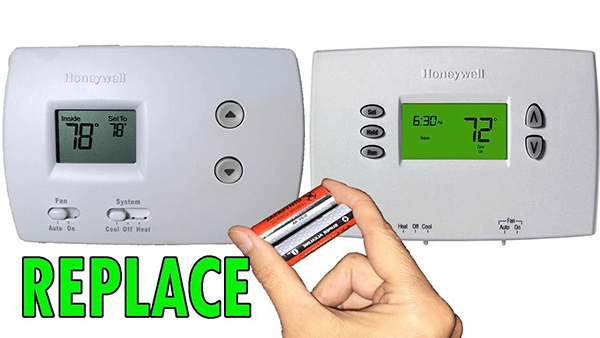
I'm talking about the batteries. Yeah, those little powerhouses that keep your thermostat ticking along, silently doing its job until, well, it stops silently doing its job. It's like your phone dying, but for your house's comfort. Annoying, right?
The Great Battery Hunt: What You'll Need
First things first, gather your supplies. You're not going on an expedition to the Amazon, I promise. Most Honeywell thermostats take standard AAA batteries. Sometimes AA, but usually AAA. Just peek at the old ones when you get them out, or check your manual if you're feeling fancy. No, you don't need a heavy-duty toolbox. Maybe a small flathead screwdriver if your battery compartment is a bit sticky, but that's about it. And a dash of confidence, because you totally got this!
Think of it as a mini-DIY project. No saw, no hammer, just pure, unadulterated battery-swapping glory. You'll feel like a tech guru, trust me.
Where Did They Hide Them?! Finding the Compartment
Okay, this is where it can get a little bit like a treasure hunt. Honeywell, bless their hearts, likes to keep us on our toes. The battery compartment isn't always screamingly obvious. Sometimes it's right on the front panel – a little pull-down door that looks like it's trying to hide. Easy peasy!
Other times, you might need to gently pull the entire front cover of the thermostat off the wall plate. Don't yank it like you're starting a lawnmower; a gentle, firm pull usually does the trick. You might hear a little click. And voilà! The batteries are revealed, usually nestled on the back of that front plate.
Then there are the sneaky ones. The ones that have a little tray that slides out from the side or even the bottom. Take a good look around your thermostat. Look for little arrows, small tabs, or anything that suggests a hidden door. Don't be afraid to give it a little exploratory poke (gently, please!). You’re looking for the part that seems designed to move.
The Big Swap: Out With the Old, In With the New!
Once you’ve unearthed the secret battery lair, the rest is smooth sailing. Pop out those old, dead batteries. Give them a little goodbye wave. They served you well, even if they quit without notice. You might even notice a faint residue on them – totally normal, just toss them responsibly, okay?

Now, grab your fresh, shiny batteries. This is important: pay attention to the polarity! You know, the little '+' and '-' signs. Don't just cram them in there. Line them up correctly. It's like plugging in a USB cable – you often try it one way, then flip it, then realize the first way was right all along. But with batteries, just get it right the first time. The diagram inside the compartment is your best friend here.
Slide them in with a satisfying click. Feel that power surge (metaphorically, of course). You're practically an engineer now!
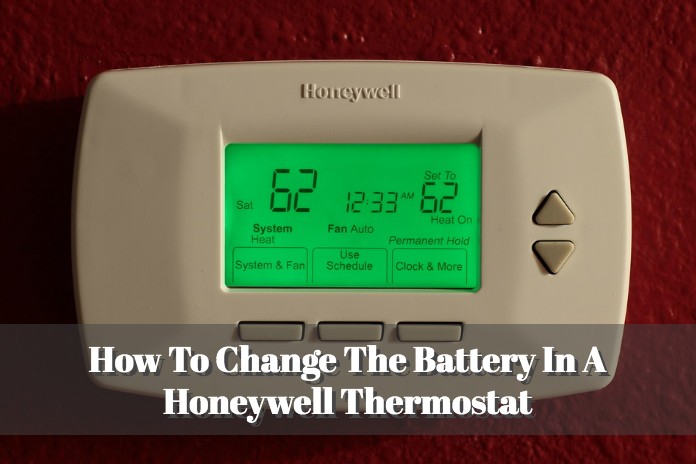
The Moment of Truth (and Relief!)
Once the new batteries are snuggled into their cozy home, put the cover back on. If you pulled the whole front plate off, gently press it back onto the wall plate until it clicks into place. If it was a little door or tray, just close it up.

Now, watch that display! Did it light up? Is it showing the temperature? Are you able to adjust settings? If you're anything like me, you'll probably let out a little cheer. Maybe even do a small, triumphant dance. Because you just fixed it! Without a single phone call, without waiting for a technician, and without spending a fortune.
A Little Pro-Tip for Next Time
To avoid this whole song and dance in the future, here's a thought: mark your calendar! Maybe once a year, when you change your smoke detector batteries (you do change those, right?), give your thermostat a fresh set too. Think of it as preventative maintenance for your comfort zone. It’s like flossing – a little effort now saves a lot of trouble later.
See? Told you it wasn't rocket science. Just a friendly reminder that sometimes the simplest solutions are the ones we overlook. Now go forth, bask in your perfectly controlled home temperature, and feel proud of your inner handyman/woman. You earned it!