Wiring 4 Wire To 3 Wire 220v

Alright, let’s talk about a situation that has probably made more than a few homeowners scratch their heads, utter a mild expletive, and then google frantically: wiring a 4-wire appliance to a 3-wire 220V setup. It’s like buying a brand-new smartphone only to realize your house still has rotary dial jacks. A real head-scratcher, right?
Picture this: You’ve just wrestled that shiny new dryer or range into your laundry room or kitchen. You plug it in, brimming with the pride of a DIY champion, and then… crickets. Or worse, a suspicious lack of power. You peek behind the machine and see it: a sleek, modern 4-prong plug staring down your ancient, battle-worn 3-hole outlet. It’s like two different species of electrical connectors, separated by decades of code updates and technological advancements. What gives?
The Great Wire Migration: 3-Wire vs. 4-Wire
Let’s break down the drama without getting too bogged down in the super-technical jargon. Think of electricity like a busy highway. In the old days (we're talking pre-1996 for many appliance circuits), a 3-wire system was like a bustling three-lane highway:
Must Read
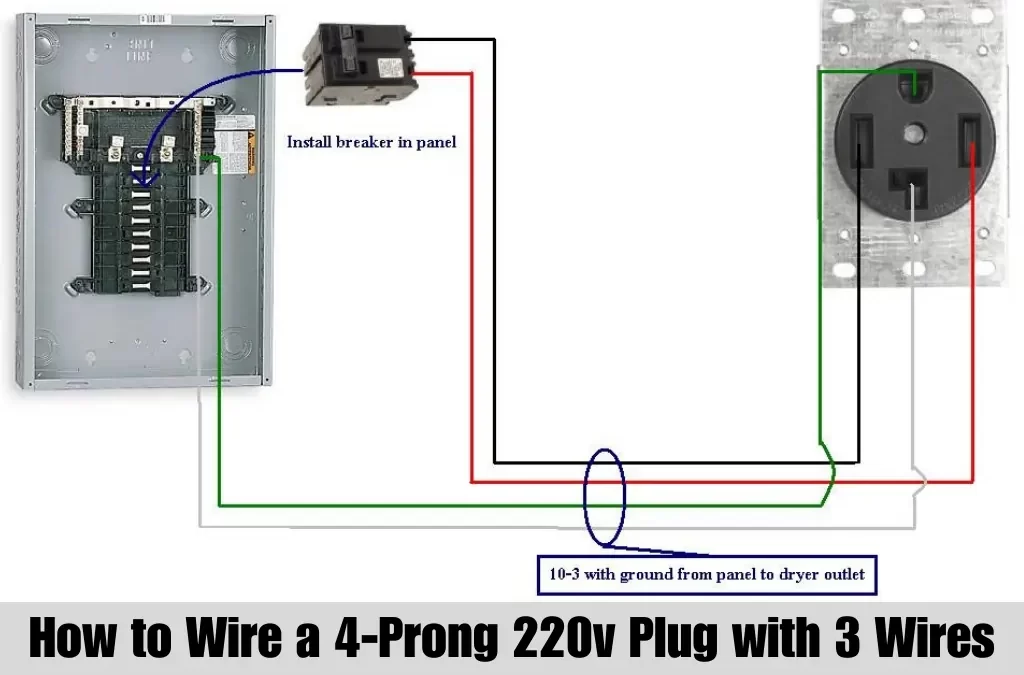
- Two lanes (wires) were for the hot, zippy power (220V!). These are usually black and red.
- And one lane (wire) was a bit of a multi-tasker. It was both the neutral return path (where the electricity goes back home) AND the ground path (the emergency escape route if things went sideways). This was typically white or bare.
It worked, mostly. But sometimes, when that shared neutral/ground lane got a little congested or, heaven forbid, broke down, things could get a bit… shocking. Literally.
Then came the enlightened era of the 4-wire system. This is your modern, upgraded superhighway:

- Still two lanes for the hot, zippy power (black and red).
- A dedicated, separate lane for the neutral return (usually white).
- And a brand-new, completely separate, express lane just for safety grounding (usually green or bare copper).
Ah, glorious separation of duties! Safer, more reliable. But what happens when your brand-new appliance expects the four-lane highway, and your house is still rocking the three-lane country road?
The Moment of Truth: Safety First (Seriously!)
Before we even think about touching wires, let’s get this out of the way: electricity is not a toy. It’s not a magic trick. It bites. Hard. So, rule number one, before you even look at a screwdriver, is to KILL THE POWER to that circuit at the breaker panel. Not just "turn off the light switch," but actually flip the big, satisfying, circuit-killing switch. Confirm it's off with a non-contact voltage tester if you have one. If you’re not comfortable, or if your gut feels like it’s doing the Macarena, call a qualified electrician. Seriously, there’s no shame in it. They do this stuff in their sleep.
The Electrical Tango: How to Make Them Play Nice
Okay, so you’ve got your new 4-wire appliance (with its fancy cord) and your old 3-wire receptacle. The good news is, for certain appliances like ranges and dryers, you can often make them compatible. It’s less about rewiring your house and more about adjusting the appliance itself.

Here’s the basic idea: A 4-wire appliance has its neutral (white) and ground (green/bare) wires kept strictly separate internally. But when you’re plugging into a 3-wire system, those two paths are going to merge at the wall. So, you need to tell the appliance, "Hey, buddy, you’re going back to the old ways. Your neutral and ground are going to be buddies again, just for this setup."
This is usually done by modifying a small connection inside the appliance's terminal box where the power cord attaches. Most ranges and dryers that come with a 4-prong cord also have instructions for converting to a 3-prong setup. This involves a little metal piece, often called a bonding strap or a jumper bar. It looks unassuming, but it’s the key to making everything work.

The (Simplified) Steps for the Brave DIYer (Remember Safety First!)
- Power Off: We've covered this. Don't skip it. Not even for a second.
- Access the Terminal Box: This is usually a small panel on the back of your appliance, secured with a few screws. Remove the cover.
- Identify the Wires: You'll see terminals, often labeled, for L1 (hot, often black), L2 (hot, often red), Neutral (white), and Ground (green/bare).
- The Bonding Strap: If your appliance came with a 4-prong cord, the internal neutral and ground will likely be separate. There will be a screw connecting the neutral terminal to the appliance chassis. Your instruction manual will show you where the bonding strap is. This strap, when installed, connects the neutral terminal directly to the appliance chassis (which is also connected to the ground screw). For a 3-wire cord, you install or ensure this strap is in place. For a 4-wire cord, you remove it. You're going from 4-wire (strap removed) to 3-wire (strap installed).
- Connect the Cord:
- The two hot wires (usually black and red) from your new 3-prong cord go to the L1 and L2 terminals.
- The single neutral/ground wire (usually white or bare) from your 3-prong cord goes to the neutral terminal, which is now bonded to the chassis via that strap.
- Secure and Test: Double-check all connections. Make sure they’re snug. Replace the cover. Then, and only then, restore power and test your appliance.
When NOT to Do It
It’s important to understand that this conversion is generally for existing 3-wire receptacles. You should never install a 3-wire receptacle in new construction or when upgrading your wiring. Modern code dictates 4-wire for new installations for that extra layer of safety.
This little conversion isn't about cutting corners; it's about making your new gadget play nice with your vintage home without having to rip out walls. It’s the electrical equivalent of using a universal adapter for your international travel – a temporary, practical solution.
The Sweet Taste of Victory
When that dryer hums to life or that oven starts preheating, you’ll feel a wave of satisfaction. You’ve outsmarted the electrical gods, made peace between different eras of wiring, and saved yourself a headache (and possibly an electrician's bill for a straightforward job). Just remember, while a little bit of knowledge is powerful, a healthy respect for electricity is even more so. Stay safe out there, and happy appliance-ing!