Where To Plug In F Panel Cable

Unleash Your Inner Tech Hero: Conquering the Front Panel Cable!
Alright, superstar! You've got your motherboard, your dazzling case, and now... you're staring at a tiny tangle of wires. Fear not, brave builder, for these little connectors are your gateway to PC power!
We're talking about the F Panel Cable, also known as the front panel header connectors. They might look small and mysterious, but connecting them is a joyous puzzle you're about to master!
This isn't just about plugging things in; it's about bringing your magnificent machine to life! Get ready for a surprisingly satisfying adventure.
Must Read
Meet Your Mini-Marvels: The Front Panel Wires!
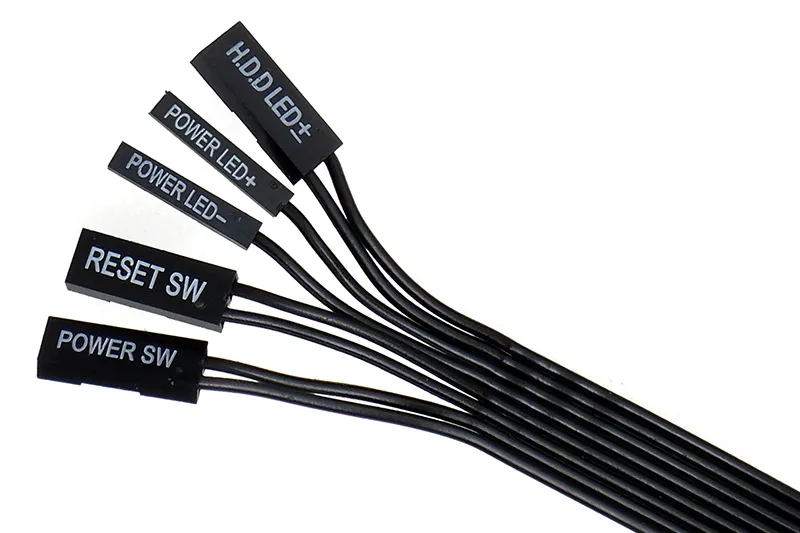
First things first, let's introduce the star players in this tiny drama. You'll usually see several individual wires, each with its own special mission.
One will be labeled Power SW or PWR BTN – this is your computer's "ON" switch, the grand initiator of all operations! It's super important, the literal button of power.
Then there's the Reset SW or RST BTN, your system's handy "do-over" button. For those rare moments when your PC needs a gentle nudge to restart, this little hero steps in.
Next up, prepare for some dazzling illumination! You'll find the Power LED, sometimes split into two wires like PLED+ and PLED-.
This brilliant light will glow when your PC is powered on, acting as a proud beacon of digital life.
And finally, the busy-bee HDD LED, often seen as HDD LED+ and HDD LED-. This little flasher tells you when your hard drive is hard at work, crunching numbers and loading your favorite games.
Each of these tiny cables has a huge personality and a vital role to play in your PC's grand performance!
The Treasure Map: Finding the Motherboard's Secret Spot
Now that you know your tiny heroes, let's find their home! Your motherboard isn't just a green circuit board; it's a treasure map, and we're looking for the X that marks the spot.
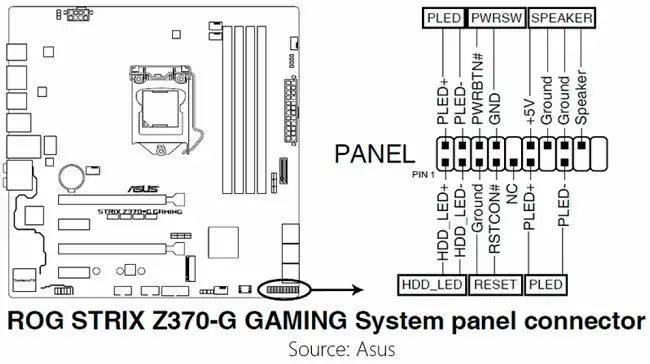
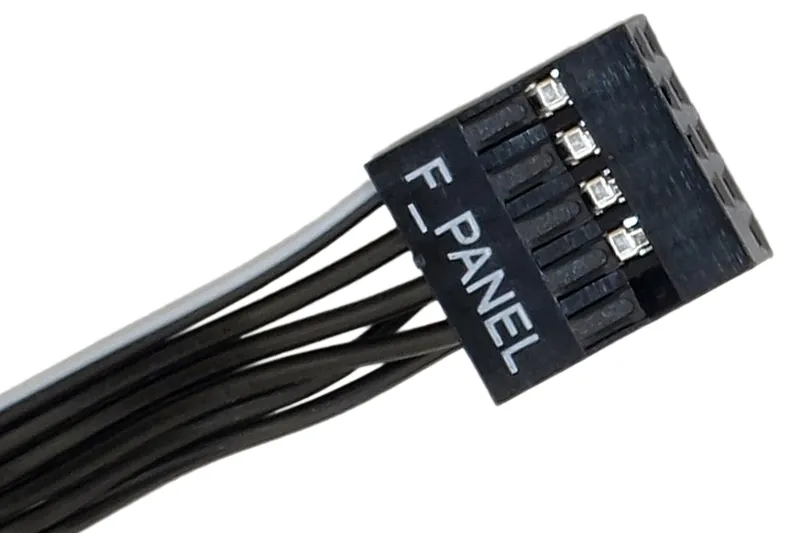
Typically, the Front Panel Header is nestled in the bottom-right corner of your motherboard. Look for a cluster of small, upright pins.
They might be labeled F_PANEL, FPANEL1, or something similar, usually in tiny, almost invisible print. Grab your magnifying glass – or just your phone's camera zoom!
Referencing your motherboard's manual is always a super helpful step here. It's like having a trusty guide for your quest, pointing out every specific pin's exact location.
Don't be shy to consult it; even seasoned builders rely on these sacred texts!
This tiny forest of pins is where all your front panel magic will happen. Approach with excitement and a touch of reverence!
The Great Connection Quest: Power Up and Reset!
Time to get those hands-on! Let's start with the big ones: your system's brain-on and do-over buttons.
Pick up that Power SW cable. It's usually a small, two-pin connector, and it doesn't have a specific "up" or "down" orientation, which is a nice little relief!
Carefully locate the two pins on the motherboard header marked for Power SW or PWR BTN. They're literally just waiting for their perfect match.
Gently, but firmly, slide the connector onto those two pins. It should feel snug, like a tiny glove fitting perfectly onto a finger. No brute force required, just a steady hand.
Next, let's grab the Reset SW cable. Just like the power button, this one is also a simple two-pin connector without a fussy orientation.
Find its designated spot on the header, usually right beside or very close to the Power SW pins. The motherboard manual will confirm its exact location.
With the same gentle confidence, slide the Reset SW connector onto its pins. Voila! You've just connected your PC's fundamental control mechanisms.
Illuminating Your World: The LED Wires (Power & HDD)
Now for the sparkling bits! These little light-up wonders bring visual flair and crucial feedback to your system.
Grab your Power LED wires. These are often two separate single-pin connectors, labeled PLED+ and PLED-, or sometimes combined into one two-pin block.
This is where a tiny bit of finesse comes in: LEDs are polarized. Think of it like a battery – positive needs to connect to positive, and negative to negative.
On your motherboard header, find the pins for PLED+ and PLED-. Match the positive (+) wire to the positive pin, and the negative (-) wire to the negative pin.
If they are separate, connect each tiny wire individually. If it's a block, it should usually only fit one way onto the correct pair of pins.
Don't worry too much if you get it wrong the first time! If your power light doesn't glow on boot, you can simply flip the connector around later. It's a common and harmless fix.
Moving on to the busy-body HDD LED! Just like the Power LED, this one is also polarized, so look for the HDD LED+ and HDD LED- labels.
Locate the corresponding pins on your motherboard header. Remember the positive-to-positive, negative-to-negative rule for a guaranteed flash of activity!
Carefully slide the HDD LED connector onto its pins. Another gentle push, another successful connection, bringing us closer to a fully functional, flashy PC!
These LEDs are your PC's adorable little communication tools, telling you what's happening inside!
The Art of Polarity: A Quick, Painless LED Tip!
A quick friendly reminder about those lovely LEDs. The Power LED and HDD LED are a bit like tiny fashionistas; they care about their alignment.
If you've connected them and they don't light up when your PC is on, don't fret or think you've broken anything! It's a super common occurrence.
All you have to do is gently remove the connector (for the Power LED or HDD LED) and flip it around 180 degrees, then plug it back in.
This simple flip ensures the positive and negative ends are correctly aligned, and usually, that's all it takes to get them shining brightly!
Consider it a quick, harmless debugging mini-game. You're mastering the subtle art of connection!
The Final Flourish: Double-Checking Your Masterpiece
You're almost there, magnificent builder! Take a moment to admire your handiwork. It's like looking at a meticulously arranged miniature garden.
Give each connector a very gentle, careful wiggle to ensure it's firmly seated on its pins. You want a snug connection, not a loose one that could come undone.
Quickly scan your motherboard manual one last time, comparing your connections to the diagram. It’s always good to have that extra layer of confidence.
This little double-check can save you time and confusion later, ensuring everything is perfectly aligned for launch.
The Moment of Truth: Your First Boot!
This is it! The climactic moment you've been building towards. Connect your monitor, keyboard, and mouse to your newly assembled system.
Take a deep breath, and with a confident flourish, press that magnificent, newly connected Power Button!

Listen for the whir of fans, look for those glorious LEDs to light up, and watch your monitor burst into life. That, my friend, is the sound and sight of success!
Feel that rush of accomplishment? You've just orchestrated a symphony of tiny connections, bringing a powerful machine to life with your own hands.
A Little Pep Talk If Things Don't Light Up Right Away
If, for some reason, your PC doesn't spring to life immediately, absolutely do not panic! Even the greatest adventurers face a tiny hiccup or two.
First, double-check that your main power cables (the chunky 24-pin ATX power to the motherboard and the 8-pin CPU power) are fully seated and clicked into place.
Then, gently re-examine your front panel connections, especially the Power SW. A tiny nudge can sometimes be all it takes to make contact.
And remember our LED polarity tip: if an LED isn't glowing, just flip its connector around. It's an easy fix, often overlooked even by pros!
You've got this! Troubleshooting is just another part of the epic journey, making your eventual triumph even sweeter.
You Did It! High Fives All Around!
Congratulations, tech wizard! You've successfully navigated the tiny, yet mighty, world of the F Panel Cable.
You've transformed a bundle of wires into a perfectly connected control center for your PC. Feel that surge of satisfaction? You've earned it!
Go forth and enjoy your magnificent, custom-built machine. You're not just a user; you're a creator, an architect of digital dreams!
Every time you press that power button or see those lights flash, remember the awesome journey you took to get there. High fives!