How To Wire Well Pressure Switch
Alright folks, gather 'round, grab your lattes (mine’s a double espresso, thanks!), because we're about to dive into the thrilling, nail-biting world of… well pressure switch wiring! I know, I know, it sounds about as exciting as watching paint dry. But trust me, messing this up can lead to some seriously soggy situations – and nobody wants that.
Think of your well pressure switch as the brain of your well system. It's the tiny overlord that dictates when your pump should turn on and off. It's the reason you have glorious, life-giving water flowing from your taps. Disrespect it, and you might find yourself showering with a watering can. And believe me, that's not a good look.
First, A Word of Caution (and a Dad Joke)
Before we get our hands dirty, let's talk safety. Water and electricity are like cats and dogs – they just don't mix. Always, always turn off the power at the breaker before you start fiddling with any wires. I cannot stress this enough. We want you plumbing, not meeting St. Peter.
Must Read
Okay, Dad joke time: Why did the electrician marry the plumber? Because they were so well-grounded! (I'll be here all week, folks.)
Identifying the Culprits: Wires and Terminals
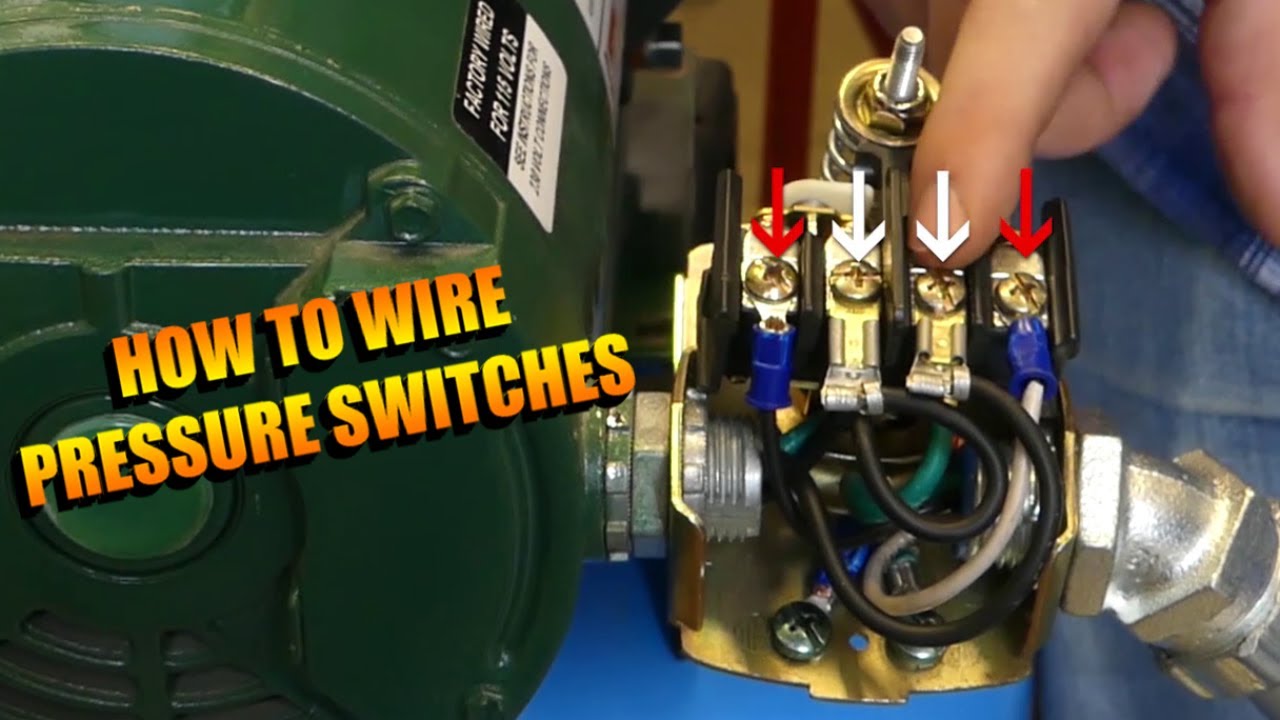
Now that the electricity is safely snoozing, let's take a look at our cast of characters. You'll typically find a few wires vying for your attention. These usually come in standard colors: black (the hot wire – treat it with respect!), white (the neutral wire – usually pretty chill), and green (the ground wire – the unsung hero, always there for you).

Your pressure switch will also have terminals – little metal studs waiting to be connected. They're usually labeled with numbers or letters, but sometimes they're just… there. This is where the fun begins! Don't panic. We'll figure it out.
The standard setup usually involves two sets of terminals. One set is for the wires coming from your breaker box (the power source), and the other set is for the wires going to your well pump.
The Wiring Tango: A Step-by-Step (ish) Guide
Here's the general idea of how to wire a well pressure switch. Remember, this is a simplified explanation. Always consult your pressure switch's manual for the specific wiring diagram for your model! Seriously, don't skip this step. Wiring diagrams are like maps to buried treasure… except the treasure is water, not gold.
- Turn off the power! (I'm serious!) Double-check. Triple-check. Have your neighbor check.
- Locate the wiring diagram. It's usually tucked away inside the switch cover or printed on the side.
- Connect the power wires. The black wire (hot) from the breaker box goes to one of the "Line" terminals. The white wire (neutral) goes to the other "Line" terminal.
- Connect the pump wires. The black wire (hot) going to the pump goes to one of the "Load" terminals. The white wire (neutral) going to the pump goes to the other "Load" terminal.
- Connect the ground wire. The green wire gets connected to the grounding screw on the pressure switch. This is super important for safety! Think of it as a safety net for rogue electrons.
- Double-check everything. Make sure all the connections are snug and secure. Loose wires are bad news.
- Carefully replace the switch cover. Don't pinch any wires!
- Turn the power back on. Hold your breath... Will it work? Will water gush forth like a glorious fountain of life?
Important Note: Some pressure switches require you to wire the pump's neutral wire directly to the neutral wire coming from the breaker, bypassing the switch entirely. Again, consult your wiring diagram!

Troubleshooting: When Things Go Wrong (and They Often Do)
Okay, so you followed all the steps, but your pump is still stubbornly refusing to cooperate. Don't despair! Here are a few common culprits:
- Loose connections: Double-check all the wires to make sure they're securely attached.
- Incorrect wiring: Compare your wiring to the diagram again. A single swapped wire can cause chaos.
- Bad pressure switch: Sometimes, the switch itself is the problem. If you suspect this, you might need to replace it.
- Low water pressure: If your well is running dry, the pump might not be able to build enough pressure to trigger the switch.
Pro Tip: Label Everything!
Before you disconnect any wires, take a picture or label them with masking tape. Future you will thank you for it. Trust me. Future you is a frazzled mess who barely remembers what he had for breakfast.
When to Call a Professional
Look, I'm all for DIY, but if you're feeling even slightly uncomfortable or unsure about any of this, call a qualified electrician or plumber. Seriously. It's better to spend a little money now than to risk electrocution or flood your basement.
Remember, water and electricity are a dangerous combination. So be safe, be smart, and may your well pressure switch always work flawlessly!
And hey, if all else fails, blame the gremlins. They love messing with plumbing.