How To Wire More Than One Outlet

So, you’ve gazed upon that single, lonely wall outlet, haven't you? It sits there, smugly powering exactly one thing, while your myriad devices, chargers, lamps, and espresso makers are locked in a mortal combat for a precious sliver of electrical real estate. You’ve dreamt of more, pondered the possibilities, perhaps even whispered to the wall, “There has to be another way!” Well, my friend, pull up a virtual armchair, grab a virtual latte, because today we’re going to demystify the dark arts of wiring more than one outlet, turning you into a domestic wizard of electrons!
Now, before we plunge into the glorious guts of your walls, a quick, humorous-but-dead-serious safety announcement from our sponsor, "Don't Be a Sparky Mess Inc." We're dealing with electricity here. It's like a tiny, invisible, incredibly fast pugilist that doesn't appreciate being messed with without proper precautions. So, rule number one, tattooed on your brain, emblazoned in your soul: ALWAYS turn off the power at the breaker box before you touch anything. I mean it. Unless you're auditioning for a human lightning rod role, which, let's be honest, pays terribly.
The Grand Principle: Parallel, Not Party Pooper
You might have vague memories from physics class about "series" and "parallel" circuits. Think of it like this: remember those ancient Christmas lights? One bulb goes out, the whole dang string dies. That's a series circuit – a total party pooper. Now, think of modern Christmas lights – one bulb pops, and the rest shimmer on, blissfully unaware of their fallen comrade. That's a parallel circuit. For outlets, we want the modern Christmas light approach. Why? Because you don't want your fridge to go dark just because the toaster decided to retire early. Each outlet needs its own direct connection to the power source, like VIP access to the electron buffet.
Must Read
Your Magical Toolbelt (Mostly Common Sense)
Before you begin your electrifying odyssey, you'll need a few trusty companions:
- Screwdrivers: Flathead and Phillips. Essential for, you know, screwing things.
- Wire Strippers: Not for burlesque, but for safely removing the insulation from wires.
- Lineman's Pliers: Great for twisting wires.
- Voltage Tester (non-contact): Your absolute best friend for double-checking the power is OFF. Seriously, don't skip this.
- New Outlets: Duh. Make sure they match your existing ones (15A or 20A).
- Electrical Box: If you're adding a new location.
- Electrical Wire: The right gauge (usually 14-gauge for 15A, 12-gauge for 20A circuits) and type (like Romex for indoor wiring).
- Wire Nuts: Little plastic helmets for safely joining wires.
- Pigtail Wires: Short lengths of wire (same gauge) for connecting multiple outlets in a box – we'll get to these heroes.
Step 1: The Sacred Power Off Ritual
Go to your breaker box. Find the breaker that controls the circuit you're working on. Flip it to the OFF position. Now, here's the fun part: go back to your original outlet and plug something simple in, like a lamp or a radio. If it doesn't turn on, you’ve chosen wisely, young Padawan. If it does, you've chosen poorly, or accidentally turned off the fridge. Go back, try again. Confirm with your voltage tester that no power is present! This step is non-negotiable. Seriously.

Step 2: Peek Inside the Electrical Labyrinth
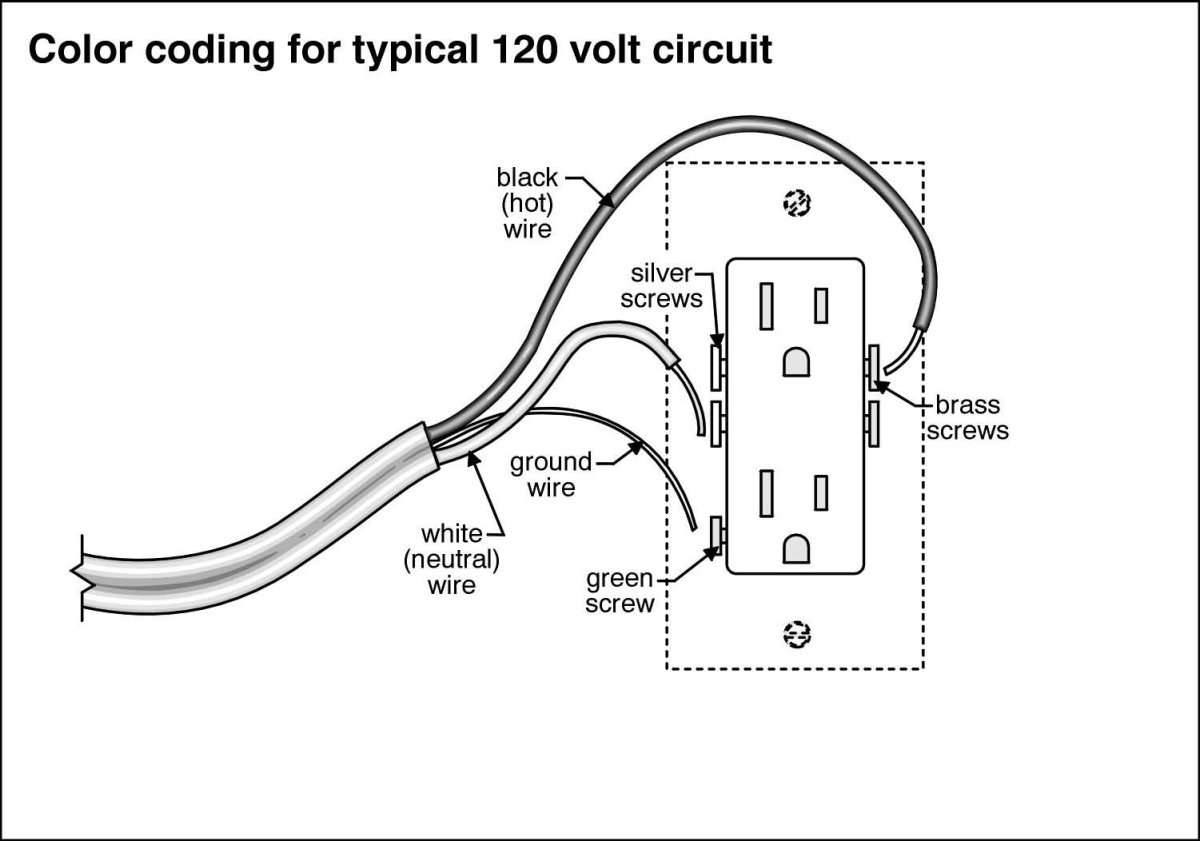
Remove the cover plate from your existing outlet. Gently unscrew the outlet from the box and pull it out a bit. You'll see a colorful spaghetti of wires. Typically, you'll have:
- Black Wire (Hot): The live wire, carrying the power. Connects to the brass or darker screw.
- White Wire (Neutral): Carries power back to the panel. Connects to the silver or lighter screw.
- Bare Copper or Green Wire (Ground): A safety wire, preventing shocks. Connects to the green screw.
If you're adding a brand new outlet in a new location, you'll be running new wire from an existing power source (like another outlet, a switch, or directly from the panel, if you're feeling ambitious and know what you're doing!). For simplicity, let’s assume you’re extending from an existing outlet.
Step 3: The Daisy Chain of Power (in Parallel, Remember?)
This is where the magic happens. You’re essentially creating a little branch for each new outlet. We use "pigtails" to achieve this. Pigtails are short lengths of wire (about 6-8 inches) that act as a bridge, ensuring each outlet gets its own slice of the electrical pie without hogging it from the next.
In your existing box, you might have one or two sets of wires. You're going to create bundles:
- For Hot (Black): Take all the incoming hot wires, the outgoing hot wire (to your new outlet), AND a short pigtail wire. Twist them together securely with lineman's pliers and cap them with a wire nut. The single pigtail wire then connects to one of the brass (hot) screws on your existing outlet.
- For Neutral (White): Do the same. All incoming neutral wires, outgoing neutral wire, AND a short pigtail. Twist, cap, and connect the pigtail to one of the silver (neutral) screws on your existing outlet.
- For Ground (Bare/Green): You guessed it! All incoming grounds, outgoing ground, AND a pigtail. Twist, cap, and connect the pigtail to the green (ground) screw on your existing outlet.
Think of it like a little wire party inside the box, where everyone gets a turn on the main connection.

Now, run your new wire from this box to your next new outlet's location. At the new outlet, it’s a straightforward connection:
- Black Wire: To a brass screw.
- White Wire: To a silver screw.
- Bare/Green Wire: To the green screw.
If you're wiring another outlet from this one, you'll repeat the pigtail process at this second outlet, branching off to your third, and so on. Just ensure your wire gauge can handle the total load for the entire circuit! Don't overload a 15A circuit with a bunch of heavy-duty appliances.
Step 4: The Moment of Truth – Button Her Up & Test!
Once all your connections are snug (tug gently on each wire to ensure it won't slip out of the screw terminal or wire nut), carefully push the wires back into the electrical box. Screw the outlets back into place, attach the cover plates, and take a deep breath. You're almost a hero.

Head back to the breaker box, utter a silent incantation (or just say "Beam me up, Scotty!"), and flip the breaker back ON. Now, grab that lamp or radio you used earlier and test each new outlet. If they all light up, congratulations! You've successfully wrangled the electrons and multiplied your power points!
What if it Doesn’t Work? (The Comedy of Errors)
Don't panic! Even the greatest wizards fumble a spell now and then. Go back, turn the power OFF (you know the drill!), and check your connections. Is a wire loose? Did you accidentally swap a hot and a neutral? (Easy mistake, but potentially dangerous, so be thorough!) Is a wire nut not tight enough? Did you forget to strip enough insulation off a wire? Most issues are simple connection errors. Re-check, re-secure, and try again.
You Are Now an Electron Whisperer!
See? It wasn't so scary, was it? With a little knowledge, some patience, and a healthy respect for safety, you've transformed a single power point into a multi-device marvel. You've conquered your electrical fears and empowered your home. Go forth, my friend, and plug in all the things! Just remember, if you ever feel out of your depth, a professional electrician is always there to save the day (and your eyebrows). But for now, revel in your newfound electrical prowess!