How To Wire A 30 Amp Rv Outlet

Ever dreamed of that perfect RV getaway, parked just so, without having to play campground roulette for the best electrical hookup? Or maybe you just want to power up your rig right in your own driveway for some easy-peasy packing and prepping? Well, my friend, you're in the right place! Wiring a 30 amp RV outlet might sound like a task for a seasoned electrician, but with a little know-how and a sprinkle of DIY spirit, you can totally conquer it. Think of it as your personal quest for ultimate RV freedom – no more relying on finicky extension cords or overpriced campground spots.
Before we dive in, let’s be real: this is electricity we're talking about, so safety is paramount. It’s not about being a superhero; it’s about being smart. If at any point you feel unsure or out of your depth, please, please call a qualified electrician. There's no shame in calling in the pros for peace of mind!
Gather Your Arsenal: Tools & Materials
Every great adventure starts with the right gear. Think of this as your treasure map for a successful wiring quest:
Must Read
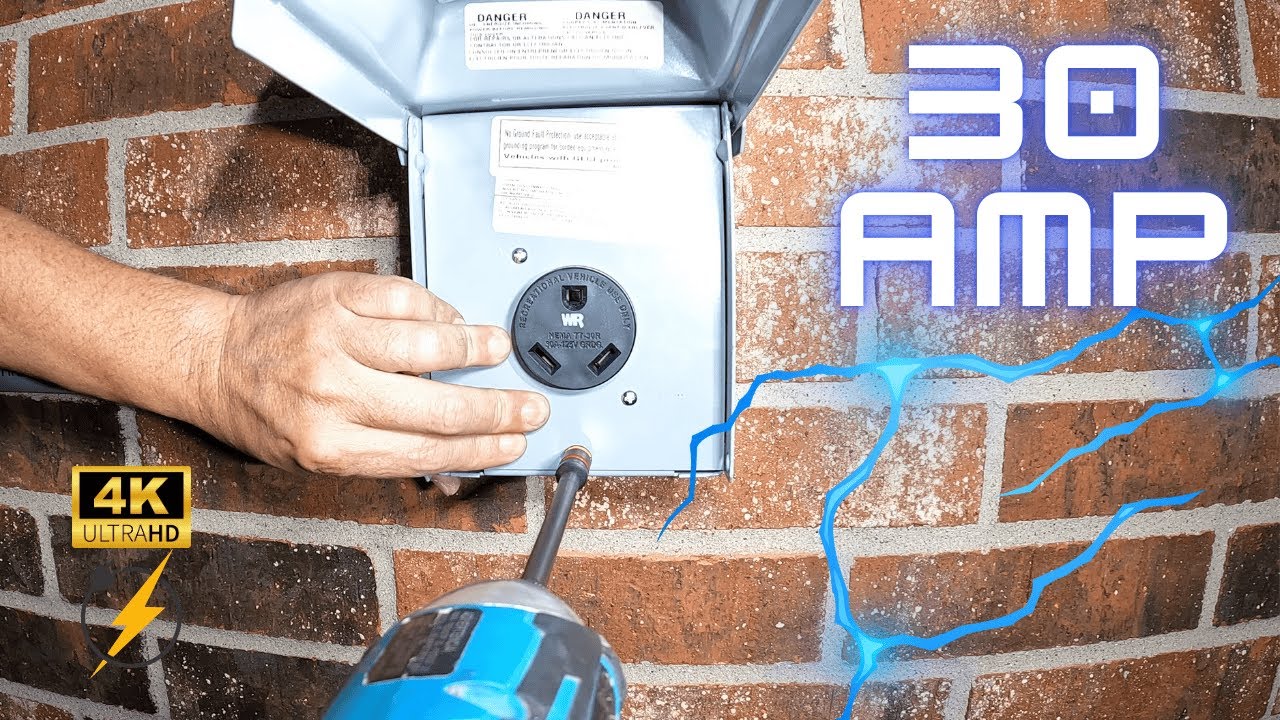
- 30 Amp RV Receptacle (NEMA TT-30R): This is the specific outlet designed for RVs. It looks a bit like a regular outlet but with a unique "T" shaped slot.
- Weatherproof Box & Cover: Essential if your outlet will live outdoors (and let's be honest, it probably will).
- 10-Gauge, 3-Wire with Ground Cable: This is your power highway. For outdoor use, consider UF-B cable for its direct burial rating.
- 30 Amp Single-Pole Breaker: Your safety switch for the circuit.
- Conduit & Fittings: If you need to protect your cable from physical damage or the elements, especially if running it along a wall or underground.
- Basic Tools: Screwdrivers (flathead and Phillips), wire strippers, needle-nose pliers, a voltage tester or multimeter (non-negotiable!), drill, level, and some wire nuts.
Pro Tip: Always buy a little more cable than you think you need. It’s better to have extra than to come up short and have to make another trip!
Let's Get Wired: Step-by-Step Power Play
Step 1: Power Down, Pal!
Head to your home's main electrical panel. Locate the main breaker and switch it to the OFF position. Then, take a moment to confirm that the power is indeed off using your voltage tester on existing outlets. No power = no shocks. It’s a simple equation.
Step 2: Mount the Box
Choose a sturdy, convenient location for your RV outlet box. Think about where your RV will typically be parked. Use your drill and screws to securely mount the weatherproof box to a wall or post. Make sure it’s level – aesthetics matter, even for utility!
Step 3: Install the Breaker
Back at the electrical panel (with the main power still OFF!), find an empty slot for your new 30 amp single-pole breaker. Snap it firmly into place. This breaker will be your dedicated guardian for the RV outlet circuit.
Step 4: Run the Cable
Carefully run your 10-gauge cable from the main electrical panel to your mounted RV outlet box. If you’re running it through walls or conduit, now’s the time to feed it through. Make sure to leave a few extra feet of slack at both ends for easy connections. This isn't a race; take your time to ensure the cable is protected and routed properly.

Step 5: Wiring the Receptacle
This is where the magic happens! Inside your RV outlet box, you'll see three terminals on the back of the TT-30R receptacle:
- Hot (Brass/Gold Screw): This is for your black wire. Strip about ½ inch of insulation from the black wire and securely connect it to the brass terminal.
- Neutral (Silver Screw): This is for your white wire. Strip the white wire and connect it to the silver terminal.
- Ground (Green Screw): This is for your bare copper or green wire. Strip and connect it to the green terminal.
Ensure all connections are tight and secure. Loose connections are a no-go in electrical work!

Step 6: Wiring the Panel
Now, back to the main electrical panel (still OFF!).
- Connect the bare copper or green ground wire to the main ground bar (usually a bare metal bar with many other ground wires).
- Connect the white neutral wire to the main neutral bar (similar to the ground bar but distinct).
- Connect the black hot wire to the newly installed 30 amp breaker. There will be a screw terminal on the breaker for this connection.
Double-check all your connections in the panel. A secure connection is a safe connection.
Step 7: The Moment of Truth (Carefully!)
Replace all covers on your electrical panel and RV outlet box. Before flipping any switches, use your voltage tester at the RV outlet to confirm there's still no power. Once you're certain, head back to your main electrical panel. First, flip on your new 30 amp breaker. Then, flip the main breaker back to the ON position.

Now, use your voltage tester at the RV outlet. You should see a reading for 120 volts between the hot and neutral slots, and between the hot and ground slots. No power? Head back to Step 1 and retrace your steps.
Roll Out!
Congratulations, you’ve done it! You’ve successfully wired your own 30 amp RV outlet. Now, you can confidently plug in your RV, whether it's for pre-trip cooling, post-trip cleaning, or simply enjoying the comfort of your rig right in your own backyard. It's not just about having power; it's about the empowerment of knowing you can tackle these projects and take greater control of your adventures.
Just like a well-charged phone or a perfect cup of coffee, having your own dedicated RV power outlet brings a little more ease and joy to daily life. It's a small step towards big adventures, proving that a little DIY spirit can unlock a whole lot of convenience and fun.