How To Spool A Push Button Rod

Gather Your Tools, Fellow Angler!
First things first, let's round up our brave little adventurers: your fabulous fishing rod, your snazzy push-button reel, a fresh spool of fishing line (the star of our show!), and a trusty pair of scissors or line clippers. Think of this as preparing for a super fun, tiny expedition!
Each piece is a VIP, ready for its moment in the spotlight. Make sure your line is suitable for your reel – a little matchmaking goes a long way here. We want a perfect pair, like peanut butter and jelly, or socks and sandals (if you're feeling adventurous!).
Attach the Reel: A Snug Embrace
Now, let's introduce your reel to your rod! See that little foot on your reel? It's designed to slide perfectly into the reel seat on your rod. It’s like a tiny, perfect puzzle piece clicking into place.
Must Read
Gently slide the reel's foot until it feels snug and happy. Then, twist that locking nut on the reel seat until your reel is held tight, like it's getting a really firm, yet loving, hug. No wobbles allowed – we want stability for our future fishy friends!
Pro Tip: Don't overtighten like you're trying to win a wrestling match! Just enough to be secure. We're aiming for happy, not stressed, fishing gear.
The Grand Opening: Pushing That Button!
Behold the Button of Freedom!
Okay, here’s where the magic begins with your push-button reel. See that delightful little button? Give it a confident, yet gentle, push. You’ll hear a satisfying click, and the cover will pop open, revealing the mysterious inner spool.
This is like opening the hood of a tiny, high-performance sports car, ready for action! The spool inside is where all the line will live, patiently waiting for its big adventure. It’s an exciting moment, isn’t it?
Make sure that button is fully depressed and the line-guide pin is tucked away. We need a clear path for our line to start its journey, unhindered and ready to rock!

Thread the Line: A Grand Tour Through the Guides
The Journey Begins!
Take the end of your fishing line and imagine it’s a tiny, brave explorer. We’re going to guide it through the first eyelet on your rod – the one closest to the reel. Think of it as the grand entrance to an exciting theme park ride!
Once it’s through the first guide, keep threading it, one by one, through every single guide all the way to the tippy-top of your rod. Each guide is like a little doorway, ensuring our line stays neat and tidy on its path.
It’s a bit like giving a tour guide to a very important guest, showing them all the best spots along the way. Make sure you don't miss a single one – every guide plays an important role in line management!
Fun Fact: Skipping a guide is like forgetting a step on a ladder – things can get wobbly! We want a smooth, strong connection from reel to rod tip.
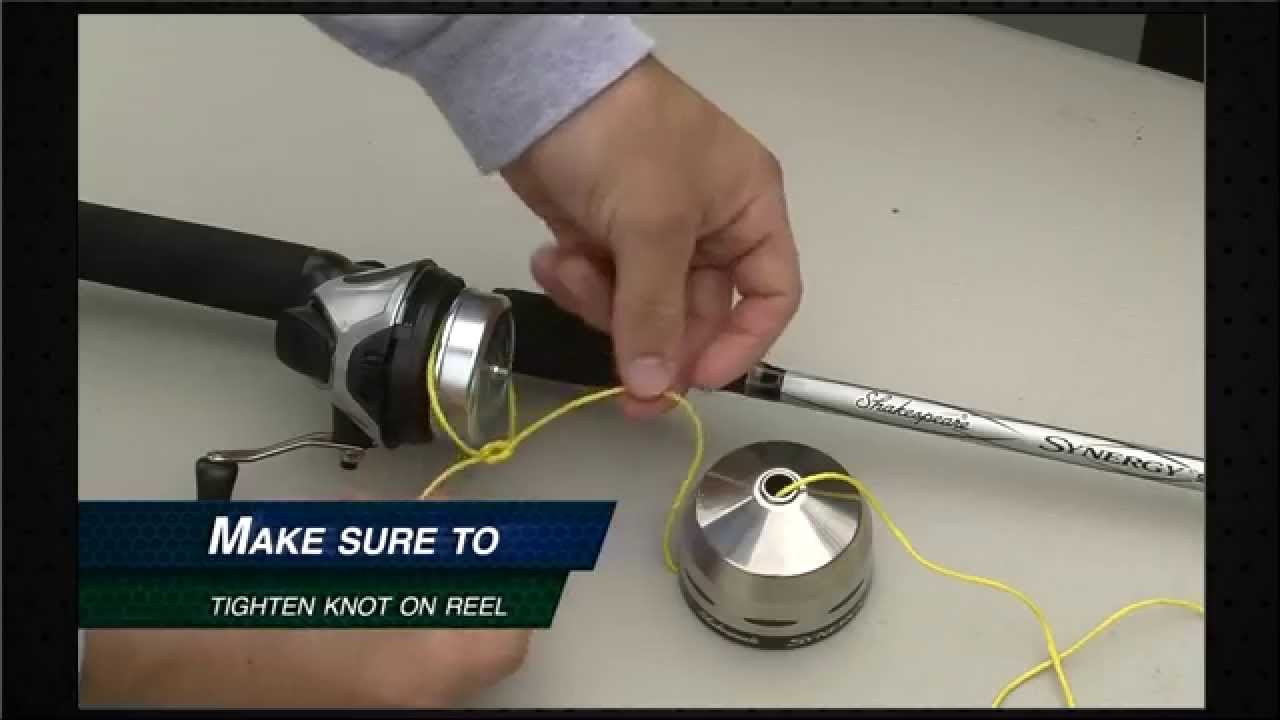
The Essential Knot: Tying to the Spool
A Strong Foundation
Now, our brave line has reached the end of its tour through the rod guides! But wait, it needs to connect to the inner spool of the reel. This is where we tie a super important knot – the arbor knot is a fantastic choice, but any secure knot that cinches tight will do.
Thread the line through a tiny hole or around the spindle of the inner spool. Then, tie a small overhand knot around the main line, and then another small overhand knot around just the tag end. Pull it tight, and watch it cinch down like a tiny, determined hug.

Trim the excess tag end, but not too close! We want that knot to be strong and secure. This is the bedrock of your fishing success, the anchor that holds it all together. No flimsy business here!
Close the Reel: Ready for Action!
With your line securely tied to the spool, it's time to close up shop! Push that reel cover back down until you hear a satisfying click. Sometimes you need to give the handle a little turn for it to fully engage.
This is like tucking your line in for a cozy nap before its big adventure. Make sure it's closed tight and feels secure. The button should pop back out, indicating it's ready for casting.
Give the handle a gentle crank. You should feel the line-guide pin engaging and disengaging with each turn, preparing to magically reel in your line. It’s like a tiny machine coming to life!
Hold That Spool! The Right Way
The Line Dance Begins
Here’s a crucial, often overlooked, step: how you hold the new spool of fishing line! Imagine it’s a precious vinyl record – we want to handle it with care to avoid any nasty tangles. Place the new spool of line on the floor, or have a friend hold it for you.
Make sure the line is coming off the bottom of the spool, and the label is facing upwards. This helps prevent line twist, which is like a grumpy little monster that can ruin your day on the water. We want smooth, happy line!
Twist Alert: If the line comes off the top, it's getting twisted before it even hits your reel! This leads to frustrating coils and tangles later. Be a line-twist ninja!
Reel It In: The Art of Spooling!
Smooth and Steady Wins the Race
Now for the main event! Pick up your rod and reel, and with your non-reeling hand, pinch the fishing line just above the reel. This creates a tiny bit of tension, which is key to a perfectly spooled reel.
Start turning the handle of your reel. Slowly but surely, the line will begin to wind onto the inner spool. Keep that gentle tension going with your fingers! It’s like guiding a tiny ribbon onto a gift – smooth and even.
Watch the line lay onto the spool evenly, side to side. If you see it bunching up on one side, adjust your tension or slightly move your pinching fingers up or down the rod. We want a perfectly flat, level layer of line, like a neatly stacked pile of pancakes!
Fill 'Er Up! But Not Too Much!
The Goldilocks Zone
Keep reeling, maintaining that lovely tension. How much line do you put on? This is the Goldilocks Zone – not too little, not too much, but just right!
You want to fill the spool until the line is about 1/8 to 1/16 of an inch from the edge of the spool cover. Think of it like pouring a delicious beverage – leave a little room at the top so it doesn't spill over!

If you overfill, your line will explode off the reel in a tangled mess during casting – a frustrating experience nobody wants! If you underfill, you won't get good casting distance. Aim for that sweet spot, like hitting a bullseye!
Snip, Snip! A Clean Finish
Once you’ve reached the perfect amount of line, it's time for the grand finale snip! Take your trusty scissors or line clippers and cut the line coming from the new spool. Voila! Your reel is now fully spooled and ready for action!
Marvel at your handiwork. A perfectly spooled reel is a thing of beauty and efficiency. It’s the kind of accomplishment that makes you feel like a fishing superstar, ready to conquer the watery world!
Give the reel handle a few more turns, just to make sure everything feels snug and the line is settled. Your rod is now a lean, mean, fish-catching machine!
Final Touches: Let the Fun Begin!
Now that your rod is spooled and ready for glorious action, you can add your preferred swivel, leader, or directly tie on your favorite lure! Imagine the possibilities, the adventures awaiting that perfectly spooled line.
Go forth, cast with confidence, and enjoy the thrill of the catch! You've just mastered a fundamental skill, and you did it with flair and fun. Happy fishing, my friend!