How To Seal Gaps In Garage Door
Okay, so picture this: it was a surprisingly chilly Tuesday morning, and I was just trying to grab my bike from the garage. As I wrestled with the gears, I noticed a tiny, insistent draft swirling around my ankles. "Huh," I thought, "must be my imagination." But then, out of the corner of my eye, I saw it – a little crumbly leaf, doing a slow, graceful ballet across my garage floor. Inside! My perfectly swept garage floor! That's when I knew. The great outdoors was no longer respecting boundaries. My garage door, bless its heart, had developed a serious case of the "open-door policy" for everything except me. And that, my friends, is how I tumbled down the rabbit hole of figuring out how to seal those sneaky gaps in a garage door.
Because let's be real, a gap in your garage door isn't just about a rogue leaf. It's an open invitation for creepy crawlies to set up shop, a free pass for cold air in winter (and scorching hot air in summer!), and frankly, a subtle drain on your hard-earned cash through those annoying heating or cooling bills. You know the feeling, right? That little shiver down your spine when you realize you're basically air-conditioning or heating the entire neighborhood because of a tiny gap. Not ideal.
Why Bother Sealing Those Gaps? (Beyond The Rogue Leaf)
Before we dive into the nitty-gritty, let's quickly chat about why this really matters. We're talking about:
Must Read
- Energy Efficiency: Huge savings! No more paying to heat or cool the great outdoors.
- Pest Control: Keep out spiders, mice, bugs, and other critters who think your garage is a five-star hotel.
- Cleanliness: Fewer leaves, dust, and debris blowing in means less sweeping for you. Hooray!
- Security: A snugger fit means a slightly more secure garage, deterring potential unwanted visitors.
See? It's not just about my bicycle-grabbing drafts. It's a whole package deal of benefits.
Finding The Culprits: Where Do Gaps Hide?
Before you grab your toolkit, you need to play detective. The most common gap culprits are:

The Bottom Seal: This is the big one. Your garage door sits on it. Over time, it can crack, flatten, or just plain wear out. It's often the main entry point for drafts and critters.
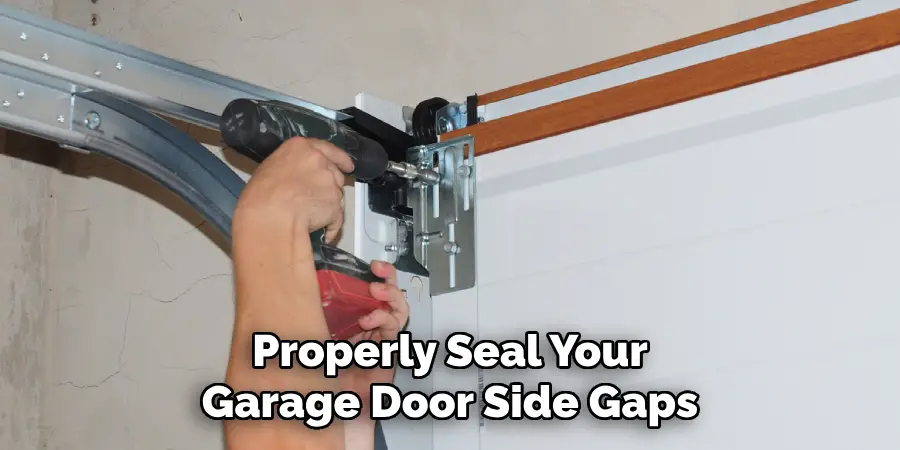
The Side and Top Seals (Jamb Seals): These run along the vertical edges and across the top of your garage door frame. They're usually vinyl or rubber strips that press against the door when it's closed. They can warp, tear, or become brittle.

To find them: Close your garage door completely. Turn off the lights in the garage during the day. Do you see light peeking through anywhere? If yes, you've found a gap! You can also run your hand along the edges to feel for drafts. Trust me, your hand is a surprisingly good draft detector.
Gather Your Arsenal: What You'll Need
You won't need a whole hardware store, but a few key items will make this job much easier:
![How To Seal Garage Door Gaps On Sides [A Step By Step Guide] | Quiet](https://www.quiethome.life/wp-content/uploads/2022/04/How-To-Seal-Garage-Door-Gaps-On-Sides-768x644.jpg)
- New Bottom Seal: Usually rubber or vinyl, shaped like a U, T, or bulb. Make sure it's compatible with your door's retainer.
- New Side/Top Seals: Vinyl or rubber weatherstripping, often with a rigid backing for easy installation.
- Utility Knife or Scissors: For cutting the new seals to size.
- Measuring Tape: Measure twice, cut once, right?
- Screwdriver/Drill: For removing old seals and attaching new ones.
- Caulk (optional): For tiny, stubborn cracks around the frame.
- Cleaning Supplies: A brush or damp cloth.
Operation Seal-Up: Let's Get To Work!
Sealing The Bottom Gap (The Big One!)
- Park your car elsewhere (safety first!), and make sure your garage door is open all the way and secured.
- Remove the Old Seal: Look at the bottom of your garage door. There's usually an aluminum retainer holding the old seal. You might need to unscrew an end cap, then simply slide the old seal out. This can be a bit tricky if it's really stiff or brittle. Don't be afraid to pull!
- Clean the Retainer: While it's exposed, give that retainer a good clean with a brush or damp cloth. Get rid of any gunk or debris.
- Install the New Seal: This is where it gets a little fun (or frustrating, depending on your seal type). Slide your new bottom seal into the retainer. A little dish soap or silicone spray on the edges of the seal can help it slide more easily. You might need an extra set of hands to guide it through. Make sure the "fin" or "bulb" of the seal faces the outside when the door is closed.
- Trim and Secure: Once it's all the way through, trim any excess with your utility knife and replace the end caps if your door has them.
Tackling The Side and Top Gaps
- Remove the Old Weatherstripping: Carefully pry off or unscrew the existing weatherstripping around the sides and top of the door frame. It's usually nailed or screwed in.
- Clean the Surface: Wipe down the frame where the new weatherstripping will go. You want a clean, smooth surface.
- Measure and Cut: Measure the length of the sides and top of your garage door opening. Cut your new weatherstripping to these lengths. It’s often easier to cut the side pieces first, then the top.
- Install the New Seals: With the garage door closed, position the new weatherstripping so the flexible flap gently presses against the door. You want a snug fit, but not so tight that it makes the door difficult to open or close. Start from the top corner and work your way down, screwing or nailing it into place every 12-18 inches. Repeat for all three sides.
The Grand Reveal: Testing Your Work
Once everything is in place, close your garage door. Step inside, turn off the lights, and do that light test again. Are there any persistent peeking lights? Run your hand around the edges one more time. You should feel a significant reduction, if not a complete absence, of those pesky drafts.
It might take an hour or two, and perhaps a tiny bit of wrestling with that bottom seal, but the payoff is huge. A warmer (or cooler!), cleaner, and critter-free garage. Plus, the satisfaction of knowing you just saved yourself some money on energy bills? Priceless. Go forth and seal, my friends!
