How To Replace Exterior Door Weather Stripping

Let's talk weather stripping. You know, that bendy stuff around your doors? The stuff that's probably cracked, peeling, and doing approximately zero to keep out drafts? Yeah, that stuff.
Now, before we dive in, I have an unpopular opinion: Replacing weather stripping is actually kind of... fun. Okay, maybe not fun like a bouncy castle. But definitely more fun than, say, cleaning the gutters. Don't @ me.
Ready to ditch the drafts and embrace the... well, slightly less drafty? Let's get started. First, go outside. Find the door you want to tackle. Stare at it. Contemplate its failings. Just kidding! (Mostly.)
Must Read
Look closely at the existing weather stripping. Note how it's attached. Is it nailed? Glued? Mystically held in place by the sheer force of homeowner neglect? Knowing this will save you a headache later. I promise.
Time for the removal. Grab your trusty screwdriver, pliers, or maybe even just your fingernails (if you're feeling particularly ambitious). Yank, pry, and cajole that old weather stripping off. It's probably going to come off in pieces. That's perfectly normal. Don't be alarmed if a spider or two decides to evacuate the premises. They were probably paying rent in dust bunnies anyway.
Now, look at the bare frame. See all that gunk? Yeah, we gotta deal with that. A scraper, a stiff brush, and maybe some elbow grease are your friends here. Get that surface as clean and smooth as possible. Think of it as preparing a canvas for your masterpiece... of weather sealing.
Here's a pro-tip: if the old weather stripping was held on with nails, consider filling those holes with wood filler. It'll give the new stuff a better surface to adhere to. And it'll make you feel like a real DIY pro. Even if you accidentally get wood filler in your hair (totally hasn't happened to me... twice).
Okay, now for the exciting part: installing the new weather stripping! Head to your local hardware store and grab a roll. There are a million different types. Foam, rubber, silicone... it's a weather stripping jungle out there! Ask the helpful person behind the counter for guidance if you're feeling overwhelmed. Or just pick the one that looks the coolest. No judgement.

Measure the length of the door frame. Then, cut the weather stripping to size. Remember the old carpenter's adage: measure twice, cut once. Unless you enjoy making multiple trips to the hardware store (I don't).
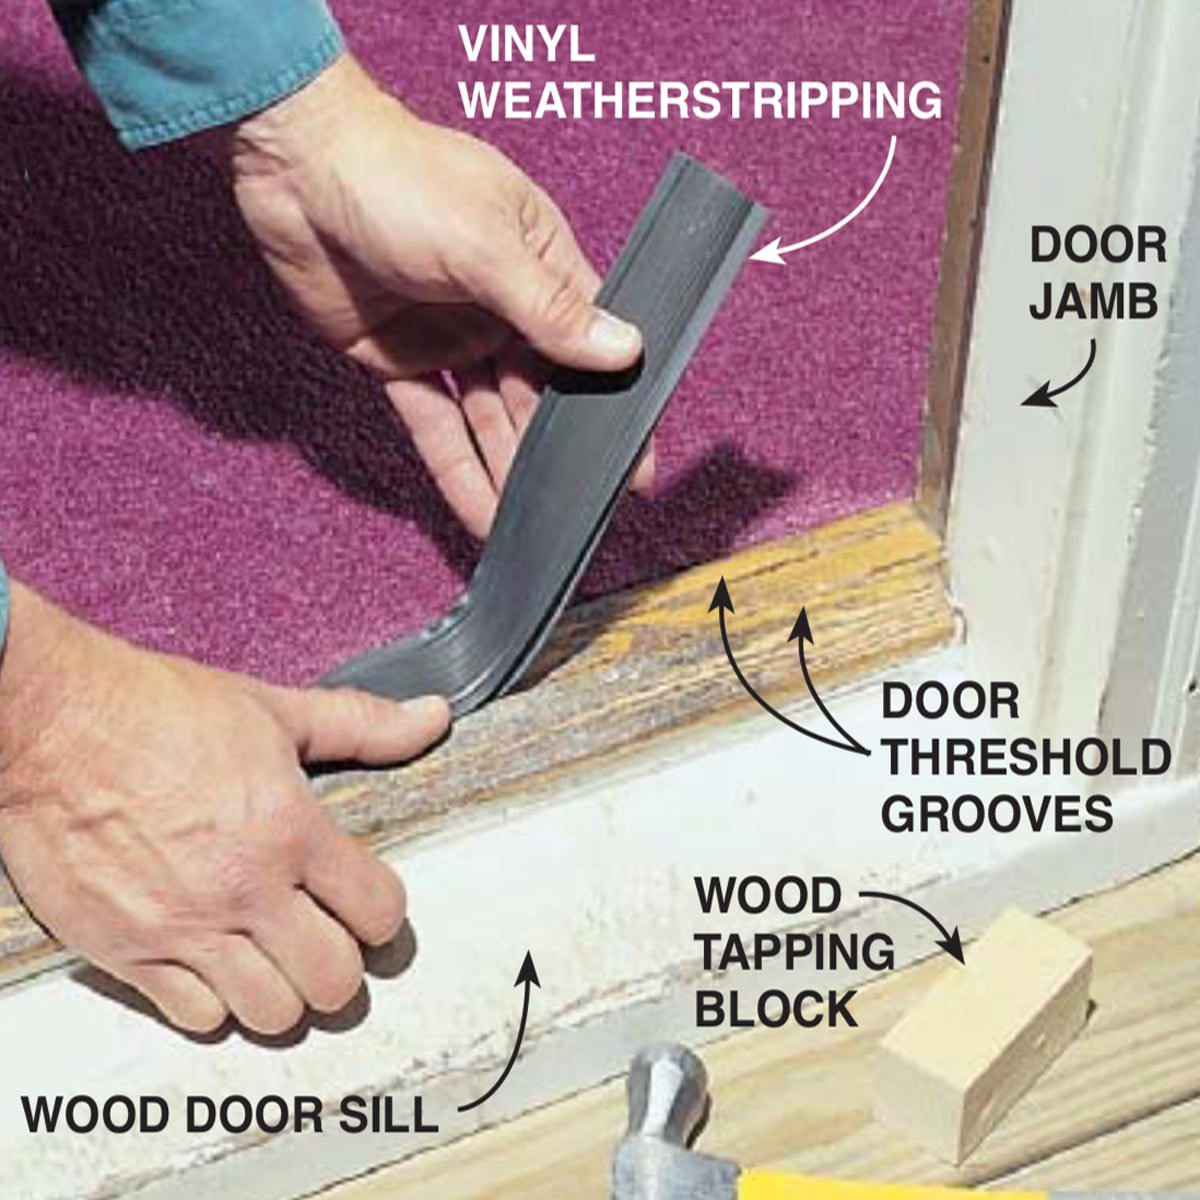
Now, carefully apply the new weather stripping. Most types have an adhesive backing. Peel off the paper and stick it on. Press firmly to make sure it's securely attached. If you're using the nail-on type, well, you know what to do. Just try not to hammer your thumb. It's happened to the best of us.
Pay attention to the corners. You want a nice, tight seal. Overlap the ends slightly to prevent drafts from sneaking in. Think of it like wrapping a present... for your house. A present that keeps the cold air out.

Close the door. See if it seals properly. Does it feel snug? If not, adjust the weather stripping as needed. This might involve peeling it off and re-sticking it. Don't worry, it's not rocket science. Unless you're actually a rocket scientist. In that case, maybe you should be building rockets instead of replacing weather stripping.
Step back and admire your work. You've done it! You've conquered the weather stripping beast. You are now a master of home improvement. Okay, maybe not a master. But definitely a competent amateur.
Repeat the process for all your exterior doors. Soon, you'll have a draft-free fortress. And you'll be saving money on your energy bill. Which means more money for... well, whatever you want! Like a bouncy castle. Just kidding! (Mostly.)

So there you have it. Replacing weather stripping: not as scary as it seems. And maybe, just maybe, a little bit fun. Now go forth and seal those drafts!
Final thought: Remember to dispose of the old weather stripping properly. Don't just toss it in the yard. Your neighbors will thank you.