How To Replace Battery In First Alert Smoke Detector
Ah, the sound of silence. It’s golden, isn't it? Except for when that silence is abruptly, rudely, and quite consistently shattered by a high-pitched, insistent chirp. You know the one. It’s the little bird in your ceiling that refuses to be ignored, usually at 3 AM, just when you’ve finally drifted into that perfect, dream-filled slumber. Or perhaps it chooses the climax of your favorite TV show, adding an unwelcome layer of suspense. We’ve all been there, staring up at the offending device, muttering promises to deal with it tomorrow.
That persistent little peep is your First Alert smoke detector's way of saying, "Hey! My juice box is empty! Time for a refill!" And while it might feel like an annoying chore, taking care of it is one of those small, satisfying tasks that brings a surprising amount of peace of mind. Plus, it’s honestly a lot easier than you might think.
Why Bother? (Beyond the Annoying Chirp!)
Let's be real, silencing that incessant chirp is a huge motivator. But your smoke detector is more than just a noisemaker; it’s your home's silent, vigilant guardian. Think of it as that super-responsible friend who always has your back. It's not just for the big, dramatic, movie-style fires (though it's absolutely crucial for those!). It’s also there for the everyday "oops" moments:
Must Read
- When you get engrossed in a good book and forget about the toast in the toaster oven.
- That ambitious culinary experiment that filled the kitchen with a little too much smoke.
- Or even just a forgotten pot on the stove while you answer the door.
Your smoke detector is like your home's sixth sense, sniffing out trouble before it becomes a real headache. It's like having a miniature superhero on your ceiling, powered by a tiny battery, ready to shout a warning. Replacing its battery is like giving your superhero a power-up, ensuring it's always ready to spring into action. It’s a small investment in a good night's sleep, knowing your home is protected.
Think of it this way: you wouldn't let your car run out of gas, right? Or your TV remote die in the middle of a nail-biting scene. This is similar, but with much higher stakes. It’s a quick, simple bit of home maintenance that keeps everyone safe and sound. So, let's get that guardian back to full strength!
Gather Your Supplies (No Heavy Lifting Required!)
Good news! You won't need a whole toolbox for this mission. Just a few everyday items:
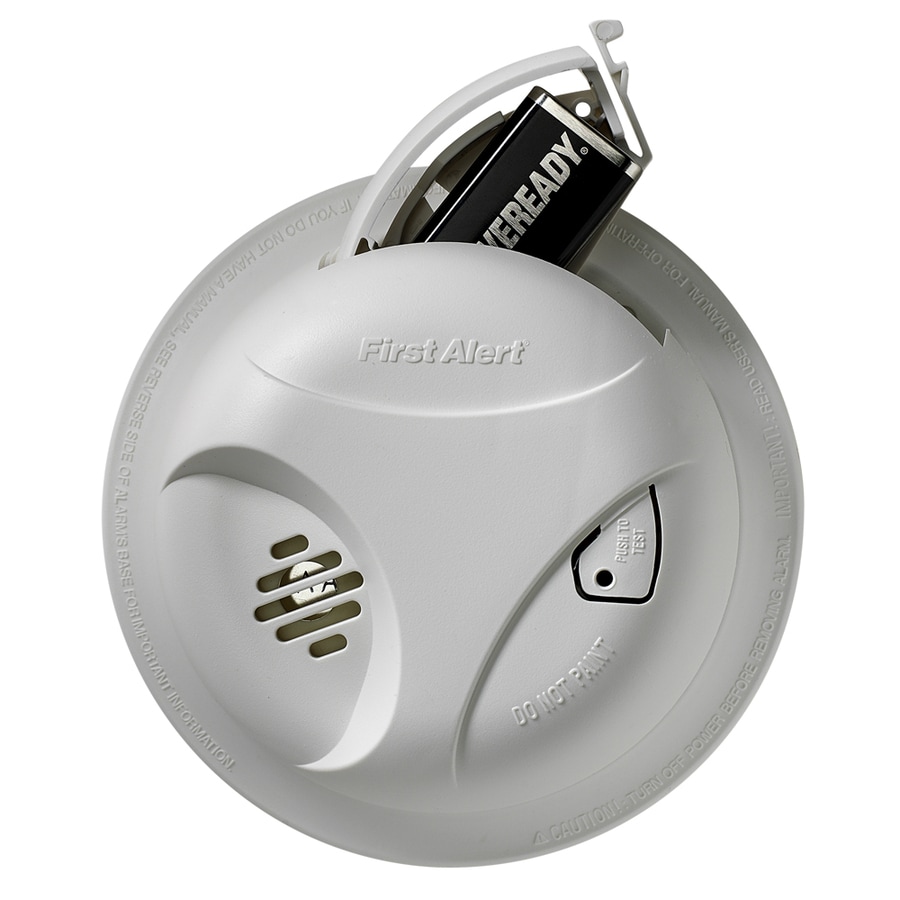
1. A New Battery: Most First Alert smoke detectors happily munch on a standard 9-volt battery (you know, the rectangular one with two little nubs on top, like a tiny robot face!). Some models might use AA or AAA batteries, so it's a good idea to check your specific model's manual if you still have it, or simply take the old battery with you to the store. Don't be shy about treating your detector to a fresh, long-lasting alkaline battery; it's worth it!
2. A Step Stool or Sturdy Chair: Unless you're secretly a professional basketball player, reaching the ceiling-mounted guardian will likely require a little lift. Safety first, so make sure whatever you stand on is stable. No wobbling!

3. Maybe a Small Flathead Screwdriver: Sometimes, just sometimes, a battery compartment can be a little stubborn or have a tiny latch. But often, your fingers will do the trick.
4. A Positive Attitude (and maybe some earplugs for the test!): You’re about to accomplish something important and satisfying!
Let's Get This Done! Your Step-by-Step Guide
Step 1: Silence the Chirp (If It's Still Happening)
If your smoke detector is still making noise, many First Alert models have a "hush" or "silence" button. Give it a gentle press. This might buy you a few minutes of blessed quiet before you start the battery swap, making the whole process a little less stressful.

Step 2: Access Your Detector
Most smoke detectors are attached to the ceiling or wall by a mounting bracket. To remove it, you usually just need to give the detector a gentle twist counter-clockwise (like opening a jar, but usually less sticky!). Some might have small clips or tabs you need to press. It should detach fairly easily from its base. Don't worry, the base stays screwed into the ceiling.
Step 3: Open the Battery Compartment
Once you have the detector in your hand (or while it's still attached, if you have a short model with an accessible compartment), look for the battery door. It’s usually a small sliding panel or a hinged cover. You might see a small arrow indicating which way to slide it, or a tab to press. If it's a bit stiff, that's where your small screwdriver might come in handy for a gentle pry.
Step 4: Swap the Old for the New
Carefully remove the old battery. Notice how it's connected – there's usually a positive (+) and a negative (-) terminal. Pop the fresh battery in, making sure to match the polarity. It’s just like putting batteries into a TV remote; if it doesn't fit easily, don't force it, just flip it around. You should feel it slide in snugly. Always dispose of old batteries responsibly!

Step 5: Test Your Guardian!
This is the most important step! Before you put the detector back on the ceiling, find the "test" button (it's often clearly marked). Press and hold it for a few seconds. Prepare yourself: this thing is designed to be loud! You should hear a very shrill, piercing alarm sound, possibly a series of beeps. This means your new battery is working perfectly, and your detector is ready to protect your home. If you don't hear anything, double-check your battery insertion and try again.
Step 6: Reinstall and Enjoy the Silence
Once you've confirmed it's working, simply align the detector with its mounting bracket on the ceiling or wall and twist it clockwise until it clicks or locks into place. Give it a gentle tug to make sure it's secure.
A Job Well Done!
And there you have it! You’ve tamed the chirping beast, empowered your home's guardian, and ensured another layer of safety for your loved ones. Give yourself a pat on the back. That quiet house, free from incessant beeping, feels extra peaceful now, doesn't it? You’ve not only solved an annoying problem but also taken a crucial step in keeping your home safe. Sleep soundly tonight, knowing your First Alert smoke detector is on duty, fully charged and ready for anything!