How To Measure A Bend Radius

Ever looked at a curvy piece of something – maybe a cool lamp, a sleek pipe, or even just the edge of a well-made desk – and thought, "Huh, I wonder how they got that curve just right?" Or, more likely, have you ever been elbow-deep in a DIY project, trying to make two pieces fit together, only to realize your curve is... well, off? Yeah, we've all been there. It’s like trying to fit a square peg in a round hole, but with more swearing and less clear geometry.
What you're probably wrestling with, even if you didn't know it, is something called a bend radius. Sounds super techy, right? Like something an engineer in a lab coat would mumble about while staring intensely at blueprints. But trust me, it's not! It's actually pretty straightforward, and knowing how to measure it is like unlocking a secret superpower for your next home improvement adventure. Or, you know, just for being generally smarter about the world around you. Who doesn't want that?
So, What Is This "Bend Radius" Thing, Anyway?
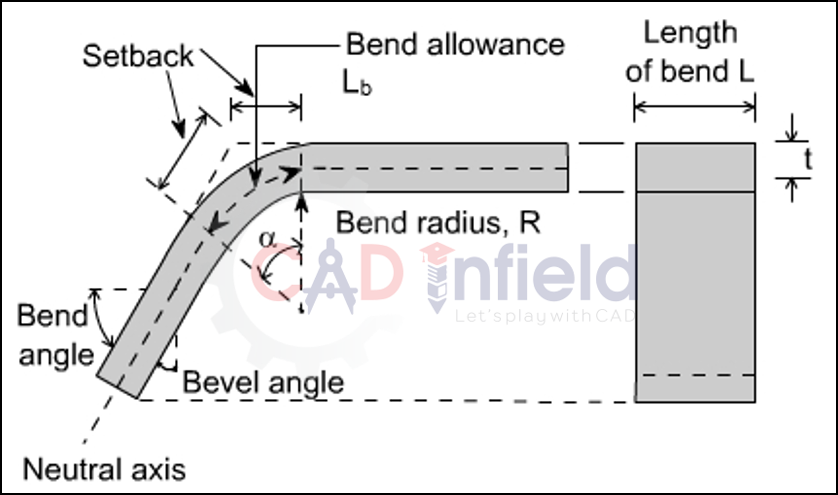
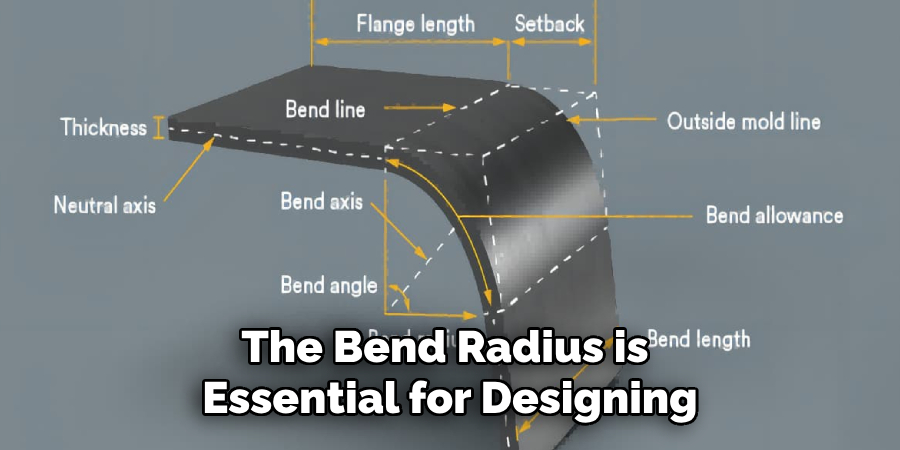
Alright, let's cut to the chase. Imagine you have a piece of material – metal, wood, plastic, even that stubborn piece of paper you tried to fold perfectly. When you bend it, it forms a curve. The bend radius is simply the radius of the inside curve of that bend.
Must Read
Think of it this way: if you could fit a perfect circle snugly into the inside of that bend, the radius of that circle is your bend radius. Easy peasy, lemon squeezy! It's important to remember it's the inside curve. The outside curve will naturally be a bit bigger, thanks to the material's thickness. Don't let that trick you!
Why Should You Care About Measuring It?
Good question! Are you planning to build a custom shelf with a nice rounded edge? Bending some copper pipes for a new plumbing fixture? Or maybe you're just fixing a dent in your bike frame (don't ask)? Knowing the bend radius ensures a few things:

- Perfect Fit: Your parts will actually, you know, fit together. Revolutionary, I know.
- Strength and Durability: Bending materials too sharply (a small bend radius) can weaken them, leading to cracks or breaks. Nobody wants a wobbly shelf or a leaky pipe, right?
- Aesthetics: A consistent bend radius just looks better. It's the difference between "nailed it!" and "oh dear."
Okay, Spill! How Do I Actually Measure It?
Method 1: The "Eyeball & Ruler" (The Quick & Dirty Way)
Alright, for starters, there's the "squint and guess" method. This isn't going to win you any precision awards, but for a super quick ballpark figure, it can work.
Grab a ruler. Hold it up to the inside of your bend. Try to visualize a circle. Now, guess. Is it roughly 1 inch? 2 inches? Write it down. Repeat a few times. Average your guesses. See? Told you it was dirty. And quick! This is for when you just need a rough idea, or you're trying to impress someone with your spatial reasoning skills. (Don't tell your engineering friends you started here.)
Method 2: The "Template Tango" (Your New Best Friend!)
This is where things get really satisfying. Enter the bend radius gauge set. These little beauties are like a fan of different curves, each one meticulously labeled with its precise radius.
How to use 'em: Simply take your gauge set and slide each template against the inside curve of your material. Find the one that snuggles in perfectly, with no gaps or wobbles. Bing-bong! That's your bend radius! It's like finding Cinderella's slipper, but for metal. Super satisfying, right? You can grab these at most hardware stores or online for a few bucks. They're a game-changer.
Method 3: The "Geometric Gizmo" (When You're Feeling Brainy)
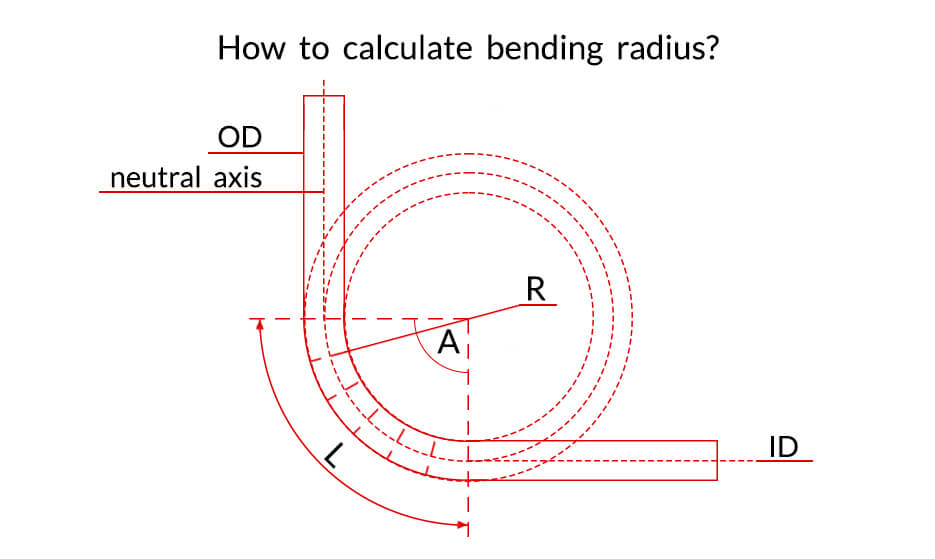
No templates? No problem! If you're feeling a bit mathy (don't worry, it's just basic algebra), you can calculate the bend radius using a ruler and a calculator. This is often called the chord method.
Here's the deal:
- Draw a straight line across the opening of the bend. This line is called your chord. Measure its length. Let's call that L.
- Measure the perpendicular height from the midpoint of your chord to the deepest part of the bend. This is your sagitta (fancy!), or the arc height. Let's call that h.
- Plug it into the formula: R = (L² / 8h) + (h / 2)
Don't panic! It's just a simple equation. For example, if your chord (L) is 4 inches and your height (h) is 1 inch:
R = (4² / (8 * 1)) + (1 / 2)
R = (16 / 8) + 0.5
R = 2 + 0.5
R = 2.5 inches.
See? Not so scary! Just make sure your measurements for L and h are as accurate as possible. A little error here can lead to a bigger error in your radius.
Method 4: The "Digital Dabbler" (Because, Apps!)
In this glorious modern age, of course, there's an app for that. Or at least, some fancy digital calipers come with radius measuring capabilities. Some CAD software can even do it if you're working with digital models. It’s often as simple as touching a few points or selecting a feature, and BAM! The number appears. Almost too easy, isn't it? But sometimes, good old analog tools are just more satisfying.
A Few Friendly Tips:
- Always measure the inside curve. (Did I mention that already? It’s important!)
- Take multiple measurements if you can, especially if the bend isn't perfectly uniform. Average them out.
- Good lighting makes a huge difference.
- Don't rush it. A minute of careful measuring can save you hours of fixing mistakes.
And there you have it! Measuring a bend radius is no longer a dark art known only to the initiated. Now you're equipped with the knowledge to tackle those curves like a pro. Whether you opt for the quick eyeball, the satisfying template, or the slightly brainy math, you'll be speaking the language of curves in no time.
Go forth and measure those bends with confidence, my friend! Your next project (and your inner perfectionist) will thank you.