How To Install Portable Generator Transfer Switch

Alright, settle in, grab a coffee (or something stronger, depending on your electrical prowess), because we're about to embark on a journey. A journey into the thrilling world of... portable generator transfer switches! I know, I know, sounds like something out of a sci-fi movie, but trust me, it's way more practical than a lightsaber when the power goes out. Think of it as your personal power outage superhero.
Now, why would you even want a transfer switch? Well, imagine this: a storm knocks out the power. You're fumbling around in the dark, the fridge is starting to sweat, and your phone – the lifeline to the outside world – is down to 2% battery. But wait! You have a portable generator. But plugging it directly into a wall outlet? That's a big no-no. Like, a seriously big no-no. It can fry your appliances, backfeed power onto the grid (potentially electrocuting linemen!), and generally cause all sorts of electrical mayhem. Think of it as trying to fit a square peg into a round hole, but with the added bonus of potentially setting your house on fire. Don't do it.
That's where the transfer switch comes in. It's basically a safe and legal way to connect your generator to your home's electrical system. Think of it as a gatekeeper, ensuring that power only flows where it's supposed to, and no one gets electrocuted in the process.
Must Read
Step 1: Gather Your Arsenal (and Maybe a Friend)
Before we dive in, let's gather our tools. This isn't brain surgery, but you'll need a few essentials: a portable generator transfer switch kit (obviously!), a screwdriver (preferably with multiple heads, because Murphy's Law), a wire stripper, a voltage tester (to make sure everything is dead as a doornail before you touch it), a drill (maybe), and, most importantly, a friend. Seriously, having someone around to hand you tools and tell you that you're doing a great job is invaluable. Plus, if something goes wrong, you have a witness. You know, for insurance purposes.
Warning: Electricity is not a toy. If you're not comfortable working with electrical wiring, hire a qualified electrician. Seriously. Your life (and your house) are worth more than saving a few bucks. I am legally obligated to tell you this, and also because I don't want to feel responsible for any electrocution-related incidents.

Step 2: Cut the Power! (Seriously, Cut It)
This is the most important step. Go to your main electrical panel (usually in the basement or garage) and flip the main breaker to the "off" position. Then, double-check it with your voltage tester. Make sure there's no power flowing. This is not the time to be brave or overconfident. Think of it as disarming a bomb. You wouldn't just assume it's safe, would you?
Step 3: Install the Transfer Switch (The Fun Part… Kinda)
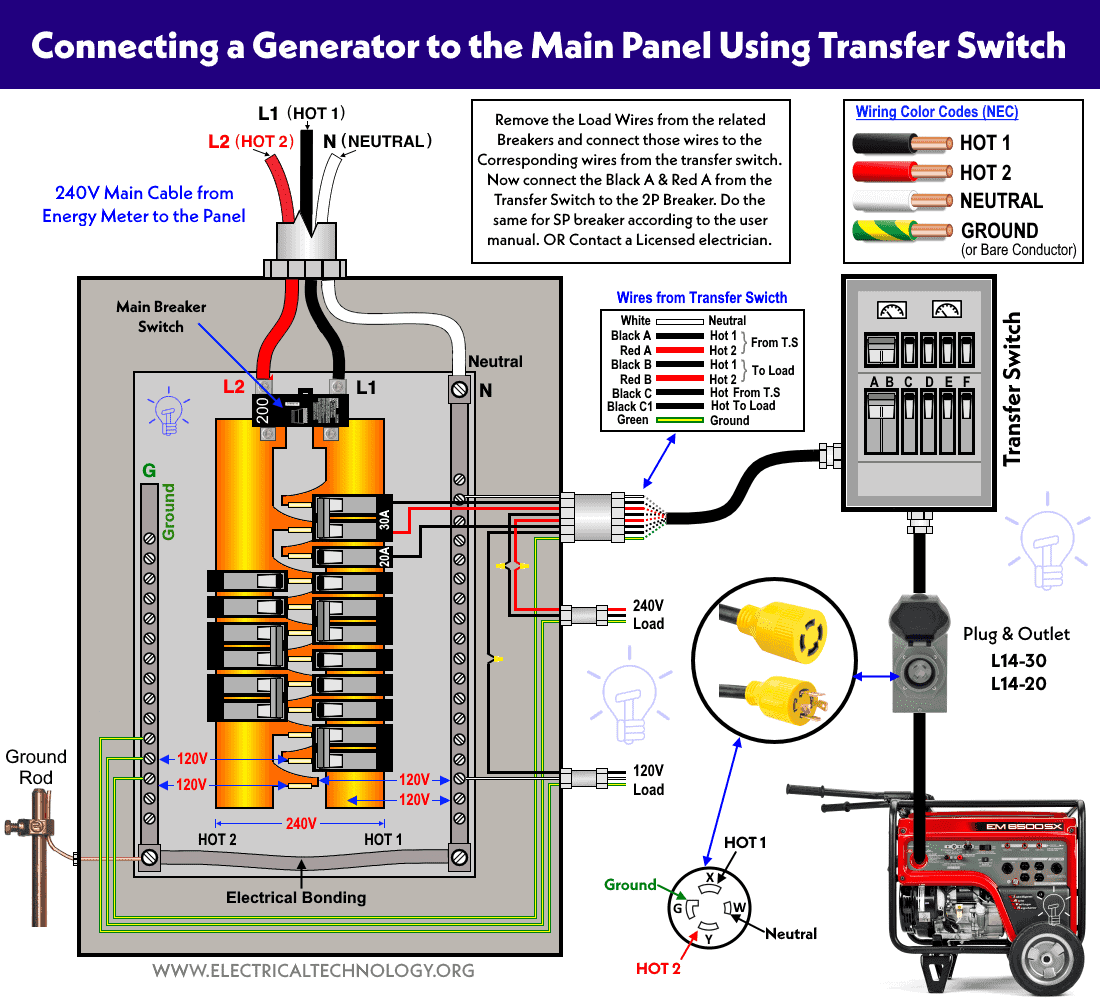
Now comes the slightly more complicated part. Your transfer switch kit will come with instructions, so READ THEM CAREFULLY! They're usually written in a language that resembles English, but sometimes requires a decoder ring (or a YouTube tutorial). Generally, you'll be mounting the transfer switch box near your main electrical panel and wiring it into specific circuits. This usually involves removing existing wires from your main panel and connecting them to the transfer switch, then running new wires from the transfer switch to the corresponding breakers in your main panel.

Think of it like re-routing a highway. You're taking the electricity from your main panel, sending it through the transfer switch, and then back to the circuits in your house. Make sure all connections are tight and secure. Loose connections can cause arcing, which can lead to fires. And nobody wants a fire. Unless you're really cold, I guess.
Pro Tip: Label everything! Seriously, use a label maker or some masking tape and a marker to identify each wire. Future you will thank you. Trust me, trying to figure out which wire goes where six months later is not a fun game. It's more like a frustrating puzzle with potentially shocking consequences.
Step 4: Test the System (Fingers Crossed!)
Once you've wired everything up, it's time to test the system. First, double-check all your connections. Then, turn the main breaker back on. Now, plug your generator into the transfer switch and start it up. Follow the instructions in your transfer switch manual to select which circuits you want to power. If everything works correctly, your lights should come on, your fridge should start humming, and you can celebrate with a well-deserved cup of coffee (brewed with generator power, of course!).
If something doesn't work, don't panic! Turn off the generator and the main breaker, and double-check your wiring. It's usually something simple, like a loose connection or a misidentified wire. Remember that friend you recruited? Now's the time to buy them pizza for their moral support.
Step 5: Pat Yourself on the Back (You Deserve It!)
Congratulations! You've successfully installed a portable generator transfer switch. You're now a power outage preparedness pro. You can sleep soundly knowing that the next time the lights go out, you'll be ready to keep the coffee brewing and the Netflix streaming (priorities, people!). Just remember to use your newfound power responsibly. Don't go powering the entire neighborhood – that's just showing off. And definitely don't try to run your Bitcoin mining operation. That's just tempting fate. Now go forth and conquer the darkness!
