How To Install A Second Battery For Car Audio
So, you're thinking about adding a second battery to your car? Buckle up, buttercup, because you're about to embark on a journey. A journey filled with more wires than a telephone exchange and enough potential for sparks to rival a Fourth of July celebration. Don't worry, though! We'll get through this together. Think of me as your slightly-less-knowledgeable but infinitely more enthusiastic guide.
First, The Gathering of the Gear
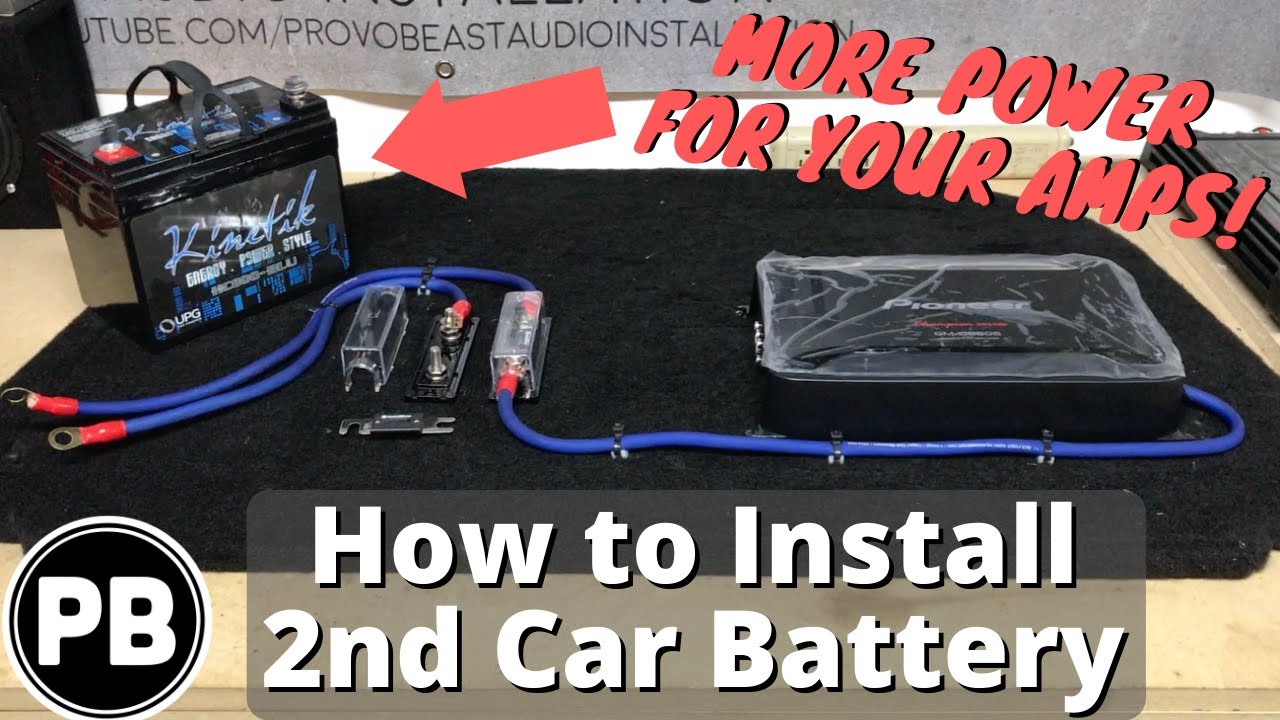
Imagine you're Indiana Jones, but instead of searching for the Ark of the Covenant, you're hunting down battery trays and inline fuses. Your shopping list is going to include a battery, naturally. A deep-cycle battery is the champion here, designed to handle the constant drain and recharge cycles. A regular car battery would throw a tantrum and quit faster than a toddler denied a cookie.
Then there's the wiring. Oh, the wiring! It's like spaghetti, only less edible and far more likely to give you a mild electric shock. You'll need thick gauge wire, the kind that looks like it could tow a small car. And don't skimp! Cheaping out on wiring is like wearing flip-flops on Mount Everest. It's just a bad idea waiting to happen.
Must Read
You'll also need a battery isolator, something that sounds vaguely like a futuristic device from a sci-fi movie. Its job is to prevent your main battery from being drained by your fancy new audio system. Think of it as a bouncer for your car's electrical system, only instead of kicking out rowdy patrons, it's keeping the voltage levels respectable.
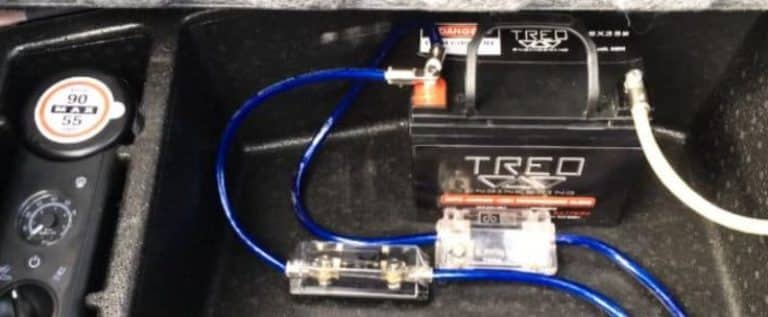
Finally, there's the assortment of fuses, terminals, connectors, and the all-important battery tray. The tray is especially crucial because you don't want your new battery bouncing around in your trunk like a rogue bowling ball. Trust me on this.

The Installation Antics Begin
Now comes the fun part: actually putting everything together. Find a spot for your second battery. Maybe it's in the trunk, maybe under a seat, maybe even bolted to the roof (okay, maybe not the roof). Just make sure it's secure and won't interfere with anything important, like, say, the spare tire or the flux capacitor.
Then comes the wiring. This is where things can get a little… interesting. Imagine you're a surgeon, carefully connecting wires to the battery isolator, then running them to your main battery and your amplifier. Except instead of a scalpel, you're using a pair of wire strippers. And instead of saving lives, you're just trying to make your subwoofer thump louder.

Secure everything! Loose wires are the bane of any electrical system. They're like mischievous gremlins, constantly looking for an opportunity to cause trouble. Use zip ties, electrical tape, anything to keep those wires in their place. You want neatness, you want tidiness, you want a wiring job that would make Marie Kondo proud.
The Moment of Truth
The moment of truth has arrived. You've connected all the wires, secured the battery, and double-checked everything (or at least, you think you have). It's time to start the car. You hold your breath, turn the key, and… nothing. Just kidding! Hopefully, the car starts right up, and your new battery is happily charging away.

Now, crank up the volume. Feel the bass rattle your ribcage. Let the music wash over you. You've done it! You've successfully installed a second battery, and your car audio system is now ready to unleash its full potential. You are the master of your mobile listening experience.
Just remember, if something goes wrong, don't panic. Electrical problems can be tricky, so it's always a good idea to consult a professional if you're not comfortable working with electrical systems. After all, you don't want to end up with a smoking car and a very expensive paperweight.
And always, always, disconnect the negative terminal of your car's battery before you start tinkering with anything electrical. Safety first, my friends! Unless you enjoy the sensation of being lightly electrocuted, in which case, knock yourself out. But don't say I didn't warn you.
So, go forth and conquer the world of car audio. With a little patience, a dash of ingenuity, and a whole lot of electrical tape, you'll be rocking out in no time.