How To Install A First Alert Smoke Detector

Okay, so you've taken the plunge! You’ve got yourself a shiny new First Alert smoke detector, probably still in its box, staring at you like a tiny, watchful robot. Good on you! Adulting, right? It's like a tiny superhero for your house, sniffing out trouble before it becomes real trouble. And guess what? Installing it is waaaay easier than assembling that IKEA shelf that’s still wobbly. Promise!
Ever burnt toast and set off the alarm? Yeah, me too. But imagine if it was actually serious. These little gadgets are life-savers, literally. A small investment of time for a giant peace of mind. Plus, no one wants to be 'that' neighbor whose house is smoking while they're blissfully unaware, right? Let’s get this done so you can sip your coffee in peace.
Gather Your Arsenal (It's Not Much, I Swear!)
First things first, let's gather our supplies. It's not a lot, I swear! You'll need your brand-spanking-new First Alert smoke detector, of course. Check the box – it usually comes with a mounting bracket and screws. If not, don't panic! A couple of small wood screws will do the trick. You'll also want a Phillips head screwdriver (that's the one with the cross shape), maybe a pencil, and a drill if you're feeling fancy (and if your walls aren't made of butter).
Must Read
Oh, and don't forget the batteries! Seriously, the detector is useless without 'em. Usually 9V, but double-check your model's instructions. You probably have a spare lying around, right? Just kidding, buy new ones! Fresh batteries are your best friend here.
Picking the Perfect Spot (It's Like Real Estate, But for Smoke)
Now, where does this little guardian angel go? Think high and central. Smoke rises, so ideally, you want it on the ceiling. If that's a no-go, high up on a wall is the next best thing, about 4-6 inches from the ceiling. Avoid corners, though; smoke gets weird and trapped there, like me at a networking event.

And definitely not near a window, vent, or fan – hello, false alarms! Kitchens are tricky; burnt popcorn is a menace, but you want to place it outside the kitchen, maybe in the hallway leading to it. Same for bathrooms, the steam is a real drama queen. Basically, you want one on every level of your home, and inside or near every sleeping area. Don't skimp here, folks! More is more when it comes to safety.
Battery Power! (This is Crucial, People!)
This is so important, I'm practically shouting it: Install the batteries first! Seriously, it's like putting gas in your car before driving off. Most First Alert detectors use a 9V battery. Pop open the little battery compartment – usually a slide-out tray or a simple snap-open cover. Insert the battery, matching the '+' and '-' terminals. You might hear a quick chirp; that's just it saying 'Helloooo world!' Close it up securely. Don't skip this! A detector without power is just, well, a piece of plastic.
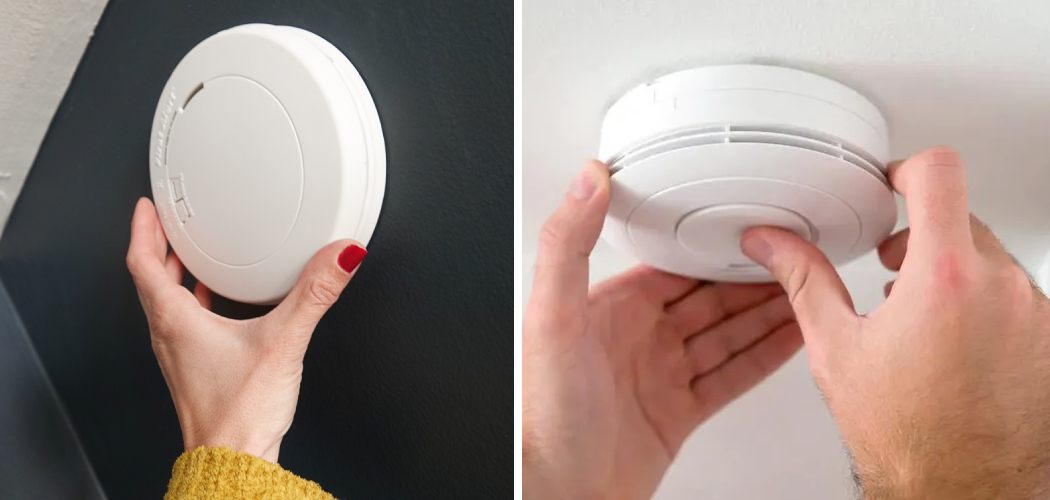
Mounting the Bracket (Time to Get a Little Handy!)
Alright, time to get a little handy. Grab that mounting bracket – it's usually a circular or square piece with screw holes. Hold it up to your chosen spot on the ceiling or wall. Use your pencil to mark where the screw holes are. Now, if you're using a drill, grab a drill bit slightly smaller than your screws and make some pilot holes. This makes screwing much easier and prevents cracked plaster (ask me how I know!). If no drill, just go straight for the screwdriver.
Line up the bracket with your marks and screw it in until it's snugly secured. It shouldn't wiggle or spin. Give it a good test push. This bracket is the foundation of your smoke detector's existence, so make sure it's solid. You got this! You're practically a DIY expert now.
The Big Reveal: Attaching the Detector (The Satisfying Click!)
This is the satisfying part, like fitting the last puzzle piece! Take your smoke detector unit (the big part with the batteries in it). There will be a set of grooves or a specific alignment on the back that matches the mounting bracket. Line 'em up! Gently twist or push the detector onto the bracket until you hear a satisfying click.

It should feel secure and not want to fall off. Give it a gentle tug to double-check. Bravo, you're almost there! It's like giving your house a superpower, one click at a time.
Test Drive! (Prepare for a Loud Noise!)
The grand finale! Now that it's all installed, we need to make sure it actually works. Find the 'Test' button on your detector – it's usually clearly labeled. Press and hold it for a few seconds. What should happen? A loud, piercing siren! Yes, it's supposed to be annoying. That's its job!

If it screams, you're golden. If it's silent, or just chirps weakly, troubleshoot! Check the batteries (again!), check the connection to the bracket. Don't be shy with the test button; better to know it works now than... well, you know. High-five yourself!
A Word on Maintenance (Don't Forget About It!)
So, you're done! But like any good relationship, it needs a little upkeep. Make a note to test your smoke detector monthly. And don't forget to change the batteries at least once a year, or whenever it starts chirping those annoying 'low battery' warnings. Daylight Savings is a great reminder for this! Easy peasy.
See? Told you it wasn't rocket science! You've just installed a crucial piece of home safety equipment and probably saved yourself a future headache (or worse!). Go grab that coffee, you've earned it. Now, doesn't that feel good? You're practically a home improvement guru!